Mexican-style pressure cooker lentil rice

Mexican-style pressure cooker lentil rice

Ever since COVID hit, my workplace has been fully remote — we still have an office but there’s no requirement to be in it — and given my commute is an hour on the train, plus a fifteen minute walk to the station in the first place, I opt to work from home unless I particularly want to go into the office for whatever reason. Even prior to COVID, we had free lunches provided in the office and so I’d just throw together some veggies and meat and sauce into a wrap and toast that to have while we played our regular daily Magic the Gathering over our lunch break.

Since I’m now working from home the vast majority of the time, though, I have to provide my own lunches (::dramatic hand to forehead::), and since I like having enough time to get a good drum practice session in over my lunch break, I mostly make a big batch of something on a weekend, freeze it into individual serves, and then bung a serve into the microwave each day for lunch. Unlike Kristina I have no qualms about having the same thing for lunch every day, it’s mostly just a delicious thing to put into my face while I’m catching up on my RSS feeds and forums and so on, prior to going out to the back room to play drums.

We use the hell out of our pressure cooker in particular for rice-based things (our is a Crockpot Express), and Kristina had introduced me to this conconction that has rice, chicken stock, lentils, and kale in it and I’d started making batches of that. I wanted to expand the variety a bit and really like the typically Mexican seasonings of smoked paprika and cumin, and through a whole lot of trialling and mucking around have come up with an absolutely delicious recipe for Mexican-style lentil rice.

Serves

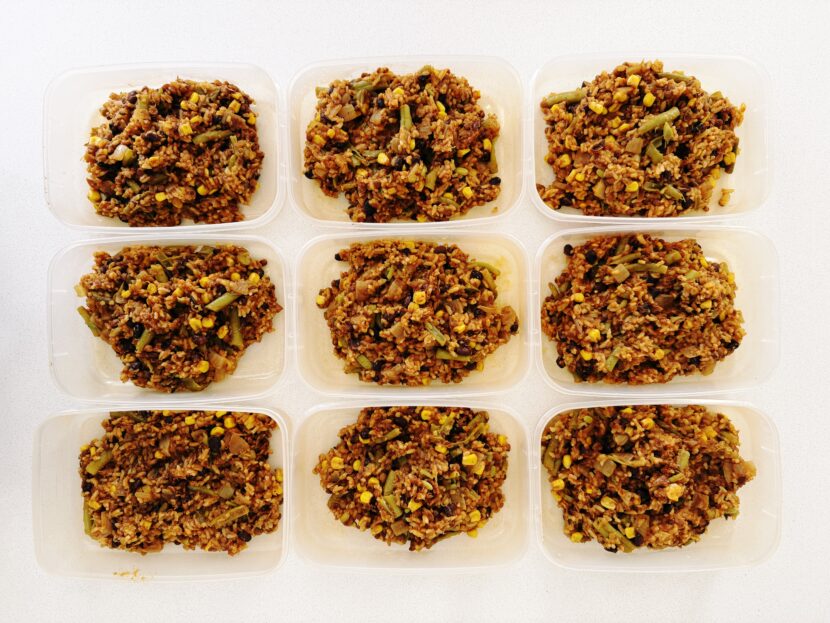
This recipe makes nine serves of around 350g each.

Ingredients

⚠️ I use Australian measurements, so a tablespoon is 20mL instead of the 15mL that the rest of the world uses (don’t ask me why it’s like this), and 1 cup is a standard 250mL metric cup.

  • 2 cups of medium grain rice
  • 2x 420g tins of brown lentils1
  • 1x 400g tin of black beans
  • 2 large onions, finely diced
  • 5 cups (1.25L) of water
  • 45g of Vegeta chicken stock2
  • 450g sliced green beans3
  • 250g corn2
  • 4tbsp tomato paste
  • Healthy serving of garlic paste4
  • 1 tbsp smoked paprika
  • 1 tbsp ground cumin
  • 1/2 tbsp cinnamon
  1. Coles-brand lentils are actually surprisingly decent here because they don’t turn to mush.
  2. You don’t have to use this specific brand, but I’ve found it to be very tasty.
  3. I use frozen beans and frozen corn and defrost them under hot water from the tap before putting them into the pressure cooker pot.
  4. I use garlic paste rather than chopped up fresh garlic solely due to laziness, and give it about ten good-sized dollops. You can adjust it to taste.

Directions

  1. Dice the onions and start them cooking in a pan.
  2. Drain the lentils and black beans, rinse them off, and put them plus the rice, green beans, and corn into the pressure cooker pot.
  3. Boil the 4.5 cups of water in a kettle and dissolve the chicken stock and tomato paste in it, then dump it into the pressure cooker pot.
  4. Once the onions are looking good and caramelised, add the garlic paste and cook a bit further to allow the flavour to infuse.
  5. Add the onions to the pressure cooker pot, along with the smoked paprika, cumin, and cinnamon, and give the whole thing a solid stirring.
  6. Set the pressure cooker on regular “Pressure Cook” mode, low pressure, for 13 minutes.

Additions

To add some freshness, while I’m defrosting an individual serve in the microwave to have for lunch, I’ll chop two good thick slices of fresh tomato and dice it, along with about half as much in volume of diced red capsium. At the half-way defrosted mark I’ll stir in some shredded cheese (Perfect Italiano’s Perfect Bakes is a particularly tasty option) then pop it back into the microwave for the rest of the defrosting. When it comes out, stir the tomato and capsicum in and for some extra flavour and kick add two teaspoons of La Costeña chipotle sauce (or whatever hot sauce you’d like).

A bread update!

I blogged back in October last year about how I’d started making my own bread from scratch, and I haven’t stopped! I still haven’t graduated to sourdough yet (my one attempt was poorly timed in retrospect, it was right in the middle of everyone panic-buying flour and things around when coronavirus was really becoming a thing, and I didn’t want to waste a whole bunch of flour), but I’ve settled into a delicious routine with the “Saturday Overnight White Bread” recipe. I’m using 20% whole wheat flour, have bumped the water from 780mL to 790mL, and use a full quarter teaspoon of yeast (the recipe says “a scant quarter”). It’s at the point where I don’t even need to look at the recipe, I’ve got the timings and measurements totally memorised.

As well, Kristina bought me a pair of proofing baskets for Christmas last year, and MAN do they make a difference! They help keep the shape of the loaf and also wick moisture from the surface of it, which makes the crust come out even better. Feast your eyes on these beauties.

A photo of two golden brown loaves of bread sitting on a cooling rack.
A photo of two brown loaves of bread sitting on a cooling rack.

My associated lunches have been excellent as well, they’re primarily either cheese and tomato toasties with a recent addition of capsicum, or mushrooms cooked in a frying pan with garlic, sage, and rosemary, sitting on top of thickly-sliced tomato (also cooked in a frying pan) with crumbled up sharp cheddar cheese on top.

A photo of two cheese and tomato toasties sitting on a plate, with diced capsicum on top.
A photo of two slices of homemade bread sitting on a plate, topped with thick slices of tomato with mushrooms on them, and small pieces of crumbled up cheddar cheese atop it all.

Beanie has gotten to know the exact sound of a knife cutting through bread, because whenever I start he’s over into the kitchen like a shot waiting for crumb fallout and also the tiny useless end-piece we always give him.

And now for something completely different: Anzac biscuits!

And now for something completely different: Anzac biscuits!

A disclaimer up front: I can’t claim any credit whatsoever for this recipe, my co-worker Rachel posted about it at work and I asked if she minded if I re-posted the recipe here!

With Anzac Day just past, another thing from this time of year is Anzac biscuits:

The Anzac biscuit is a sweet biscuit, popular in Australia and New Zealand, made using rolled oats, flour, sugar, butter (or margarine), golden syrupbaking soda, boiling water, and (optionally) desiccated coconut. Anzac biscuits have long been associated with the Australian and New Zealand Army Corps (ANZAC) established in World War I.

As mentioned above, my co-worker Rachel posted her own recipe that’s based as closely as possible on the really early Anzac biscuit recipes, and I made them last night and they’re amazing.

There’s two recipes, one is the pre-1920s version without coconut, and the other is with coconut and more sugar. I made the pre-1920s one as Kristina can’t eat coconut. The method is identical, just the ingredients differ.

I should also point out that they should go a lot flatter than in the picture above, but I cheated and microwaved the butter and golden syrup in the microwave rather than heating it on the stove, so the mixture didn’t stay warm and it didn’t end up spreading.

Ingredients

  • 1 cup plain flour (all purpose flour)
  • 1 cup rolled oats (not steel cut or quick oats)
  • 1 cup sugar (part white sugar, part soft brown sugar)
  • 3/4 cup desiccated coconut
  • 115g salted butter
  • 1 tablespoon golden syrup
  • 1.5 teaspoons bicarbonate of soda
  • 2 tablespoons of boiling water

Pre-1920s recipe without coconut

  • 1 cup plain flour
  • 2 cups rolled oats
  • 1/2 cup sugar
  • 115g salted butter
  • 2 tablespoons golden syrup
  • 1 teaspoon bicarbonate of soda
  • 2 tablespoons of boiling water

Method

  1. Preheat your oven to 170˚ degrees (no fan).
  2. Combine dry ingredients in a bowl.
  3. Melt butter and golden syrup slowly in a small saucepan.
  4. In a jug, dissolve bicarb soda in boiling water.
  5. Pour boiling water and bicarb into the butter and syrup. It will foam up. Add it immediatley to the dry ingredients.
  6. Mix everything together just enough to combine. The mixture should be sticky. Don’t let it get cold.
  7. Roll into teaspoon sized balls, and place on a baking sheet, spaced at least 10cm apart – they will spread a lot.
  8. Bake for 8-10 minutes. Your oven time may vary.
  9. Remove from oven, and cool on the baking sheet for a few minutes.
  10. Transfer to wire rack to cool.
  11. Store in an airtight container. They’ll keep for months.

A new hobby: Making bread!

A new hobby: Making bread!

Back in July and August, Kristina had been on a bit of a bread-making spree. We have an old bread machine that Kristina bought from Vinnies back in 2009 when she first moved over here from the US, and she’d been using that with varying amounts of success. I was talking to some of my co-workers and one of them recommended a book called Flour Water Salt Yeast and said you absolutely cannot go past it. I bought that for Kristina’s birthday, as well as the thing it says to bake the bread in, a Dutch oven.

It’s a really interesting book, even the most basic recipes only use a tiny amount of yeast (2 grams/½ a teaspoon), you don’t knead them, and the shortest recipe has the dough rising for five hours and proofing for another hour. You can get a good idea of how it all goes from the man himself, Ken Forkish.

As it turns out Kristina doesn’t really have the patience for it, so the bread-making has become my thing, and OH MY GOD THE BREAD FROM THIS BOOK. It is absolutely epic, nice and chewy like sourdough and the Dutch oven is the magic around how the crust comes out so good.

I’ve been doing a batch of bread almost every weekend now, and there’s something really enjoyable about the whole process. I’ve been tooting my efforts, get a load of all of this damn bread! The first two photos were the “Saturday White Bread” recipe where it’s done in one day, the third was the Overnight 40% (actually 35% and rye) Wholemeal Bread, and the last was the Overnight White Bread (which I screwed the timing up for because I didn’t read the recipe of when to start it and so had to put it into the fridge overnight so it didn’t rise too much, but it came out delicious anyway).

A magnificent-looking round brown crusty bread loaf.
A dark brown round loaf of bread covered in flour.
A brown absolutely delicious-looking round loaf of bread sitting on a cooling rack, with a light dusting of flour on it.
Two round loaves of bread on a cooling rack, the left one being noticeably browner than the right one.

And now for something completely different: roast potatoes!

Growing up, we’d frequently go over to my grandma’s house on a Sunday evening for a full roast dinner. Roast beef, roast veggies, gravy, the works. Her roast potatoes were always amazing, they were wonderfully crispy on the outside and I never knew how she did it. Whatever my parents’ method is pales in comparison as they never get them at all crispy.

I made roast potatoes tonight following a recipe from Taste.com.au entitled The Best Roast Potatoes, and my god, they’re not joking. They’re almost identical to how my grandma’s used to come out! If you’re a fan of roast potatoes, you should definitely give that recipe a go.

  1. Preheat oven to 200°C or 180C fan-forced. Peel potatoes and cut into 5cm chunks. Place into a large saucepan. Cover with cold water.
  2. Bring to the boil over medium-high heat. Reduce heat to medium. Simmer for 5-10 minutes or until partially cooked (potatoes should be only just tender when pierced with a skewer).
  3. Drain potatoes well. Return to saucepan over low heat until any remaining water evaporates. Shake saucepan vigorously to rough up surface of potatoes (this will make them crunchy when roasted). Alternatively, scrape surfaces of potatoes with a fork to create a rough texture.
  4. Pour oil into a large roasting pan. Place roasting pan into oven for 5 minutes or until oil is hot. Working quickly, add potatoes to hot oil. Use tongs to turn potatoes to coat in oil, then return roasting pan to oven.
  5. Roast potatoes for 40 minutes. Turn and roast for a further 30 minutes or until golden and crisp. Season with salt. Serve immediately.