Today marks ten years since we moved into our house!
This is the second-longest I’ve lived in any one place, when I was born we were living in a very small house and just before my 10th birthday we moved to where my parents still are to this day. After that, I moved out of home when I was 24, so only another four years here and it’ll be the longest I’ve lived anywhere!
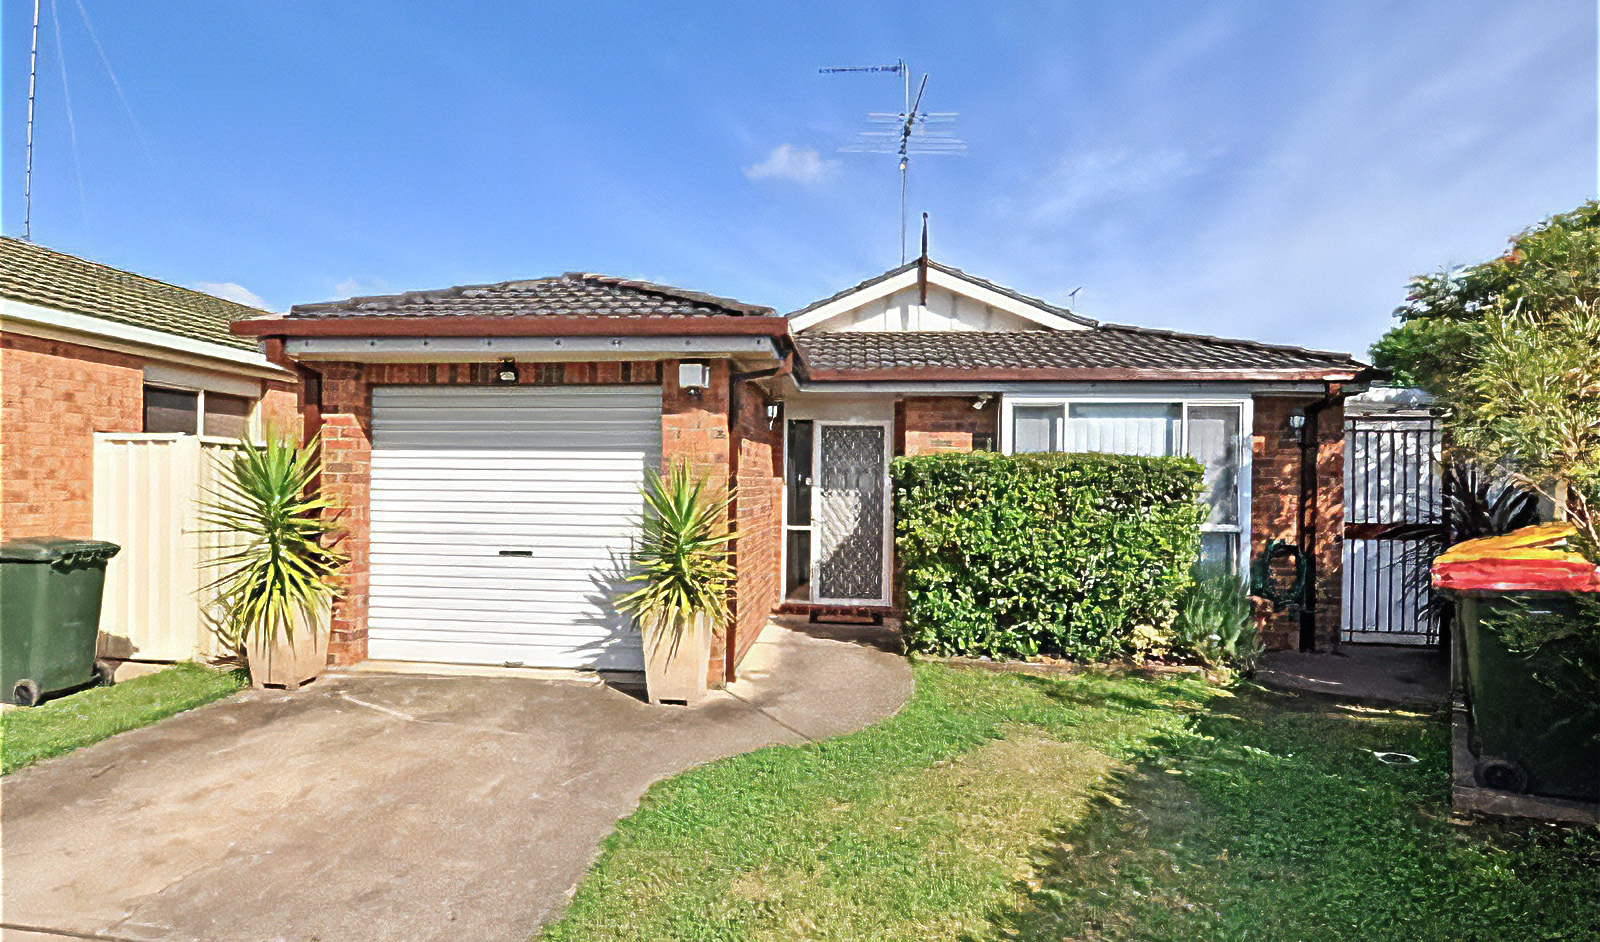
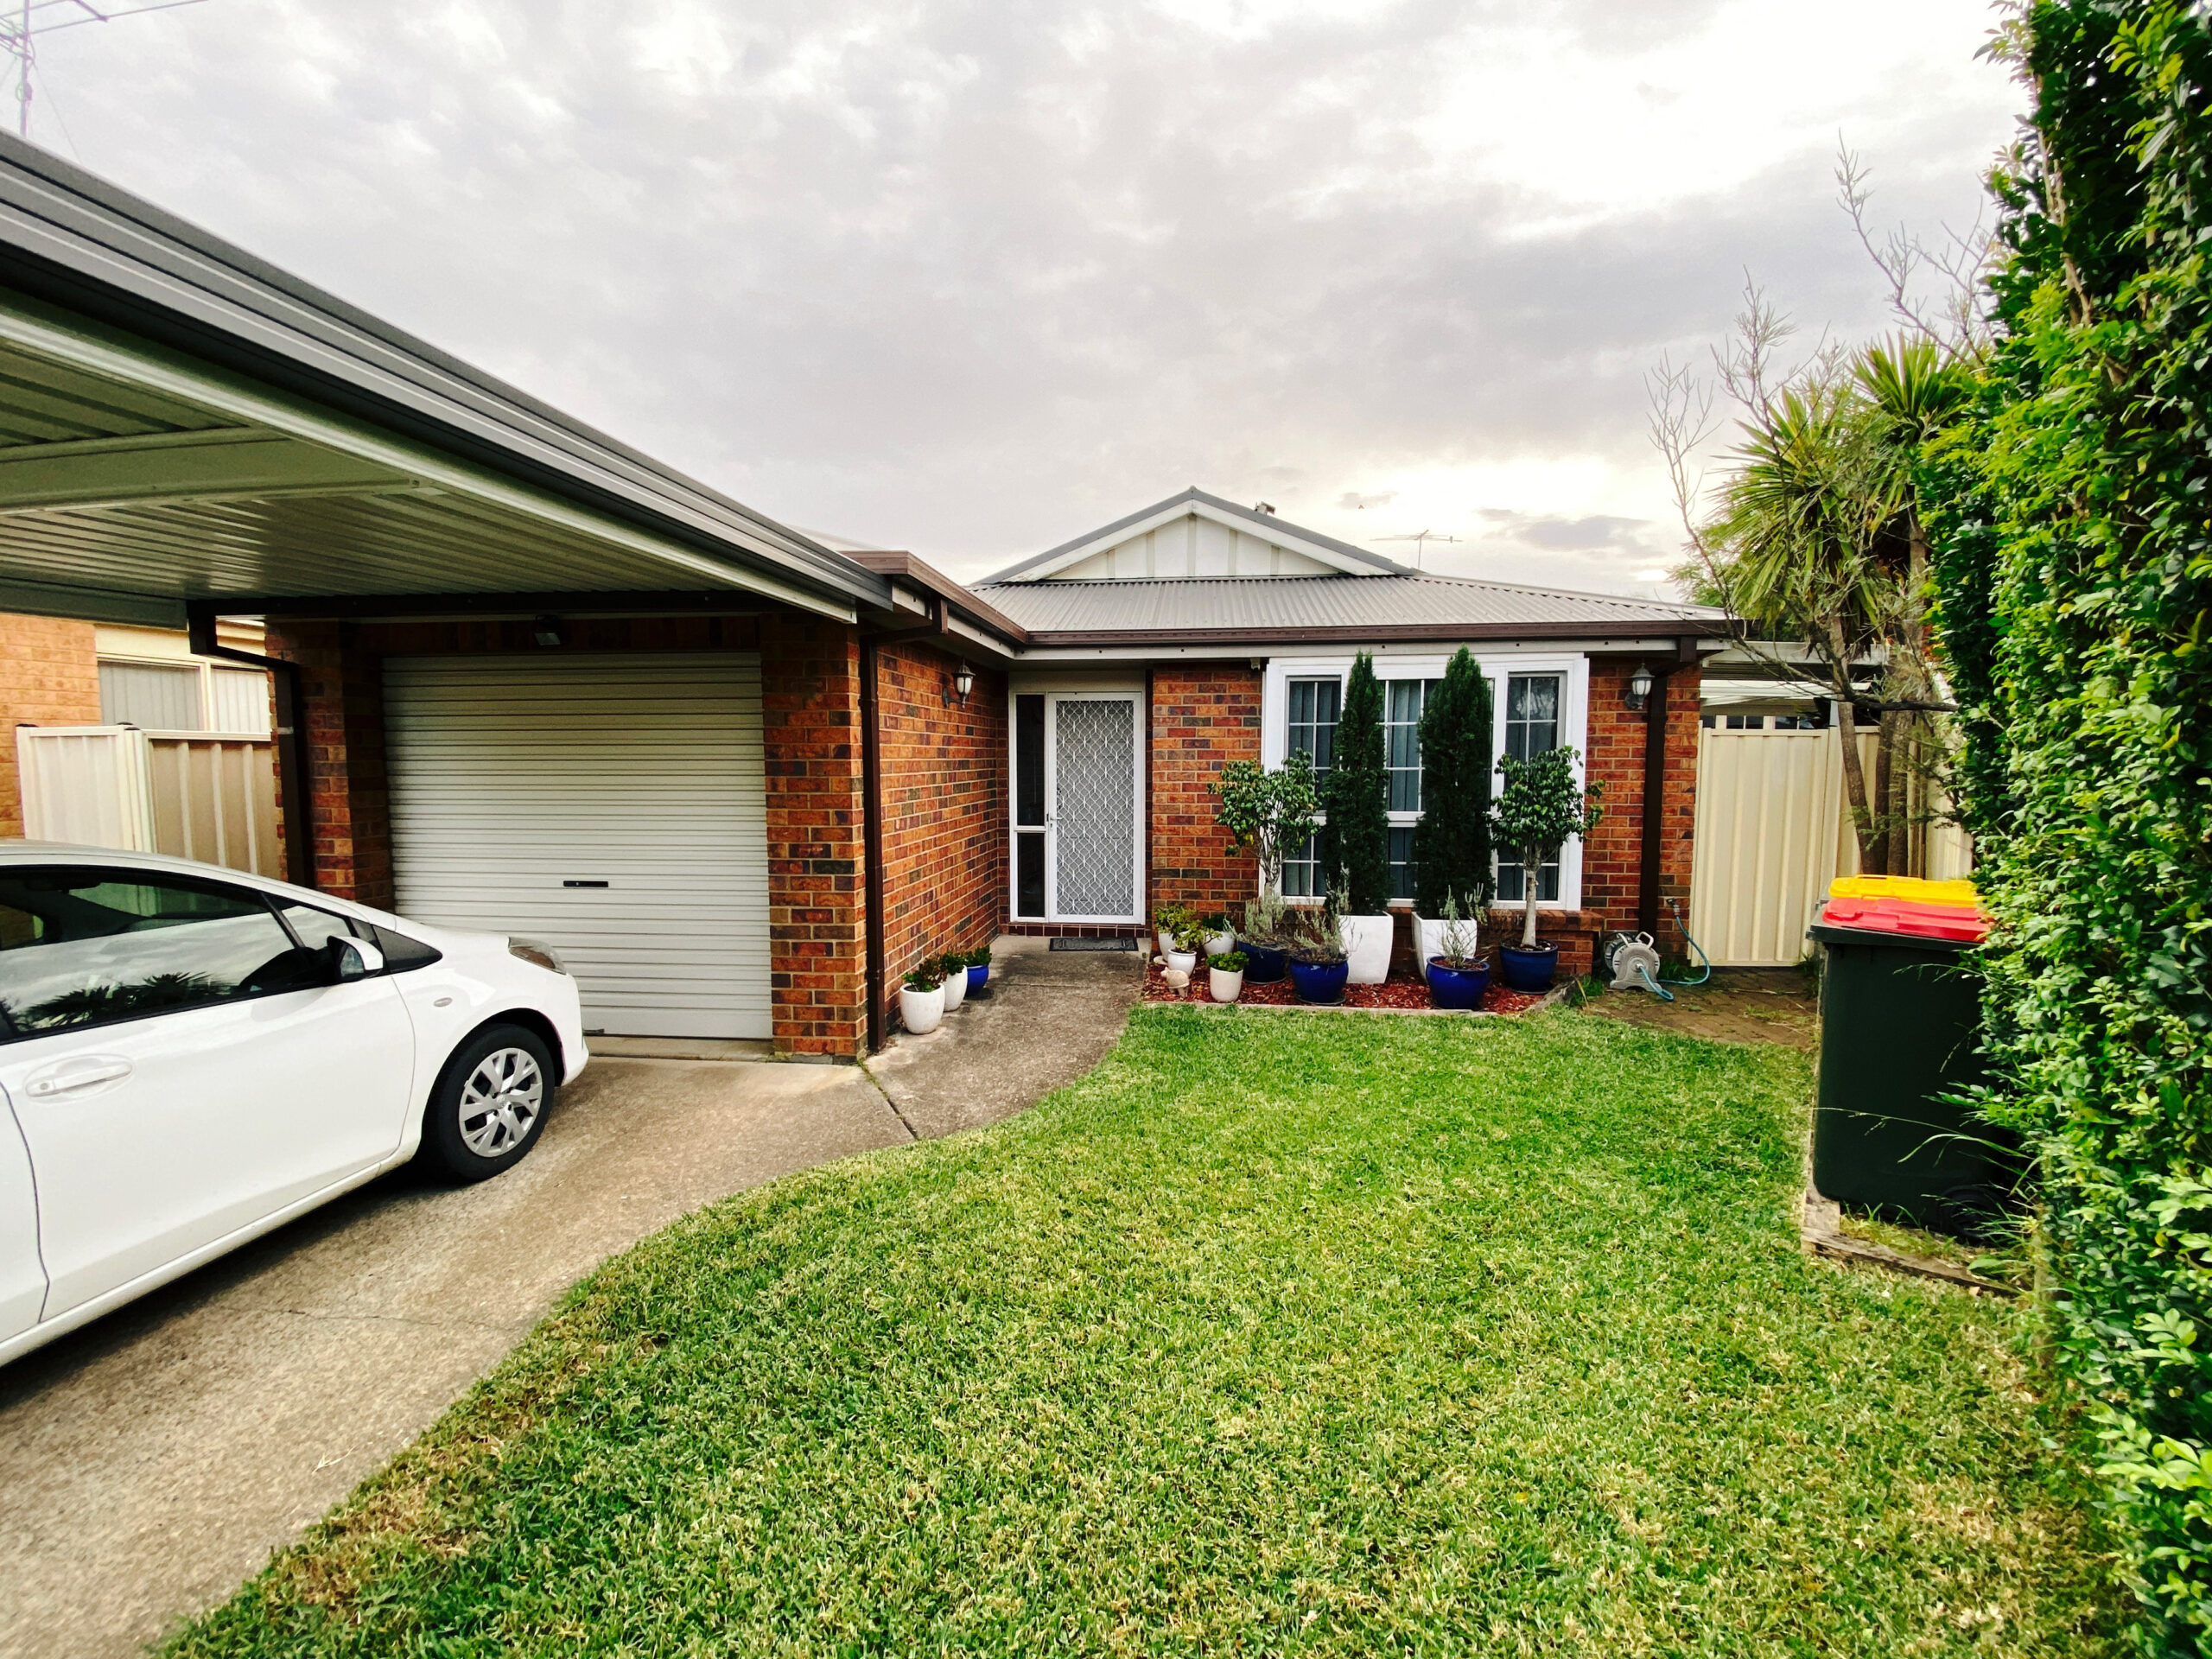
It’s funny looking at the old photos and comparing them to now (apologies for the dreadful quality, these are upscaled from the really tiny real estate photos).
BeforeTodayBeforeToday
I blogged about the move a few days after we’d first moved in and how we turned the “office” that was the garage back into an actual garage, and since then we have:
Had a whole new air conditioning system installed since the old one had probably been there since shortly after the house was built in the mid-90s and it was on its last legs (apparently I didn’t blog or post about this at all)
Had solar panels installed (and a new pergola at the same time, which ended up being garbage, and also a carport by a different company who were excellent; we also had the roof antenna taken down because it never worked and it was just a place for birds to sit on and shit, and we didn’t want them doing that all over the new solar panels)
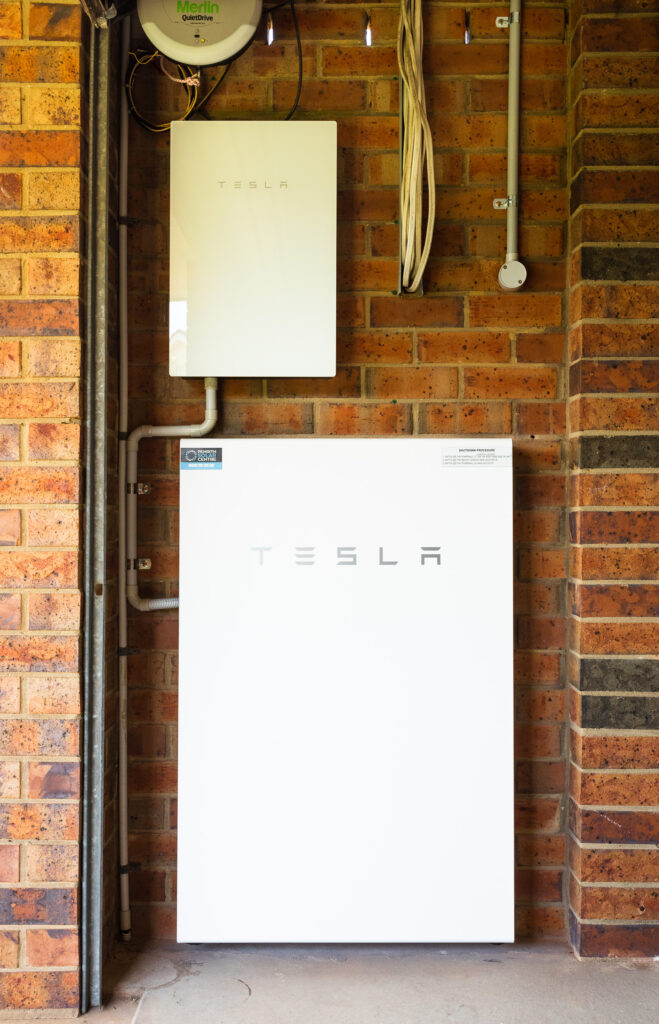
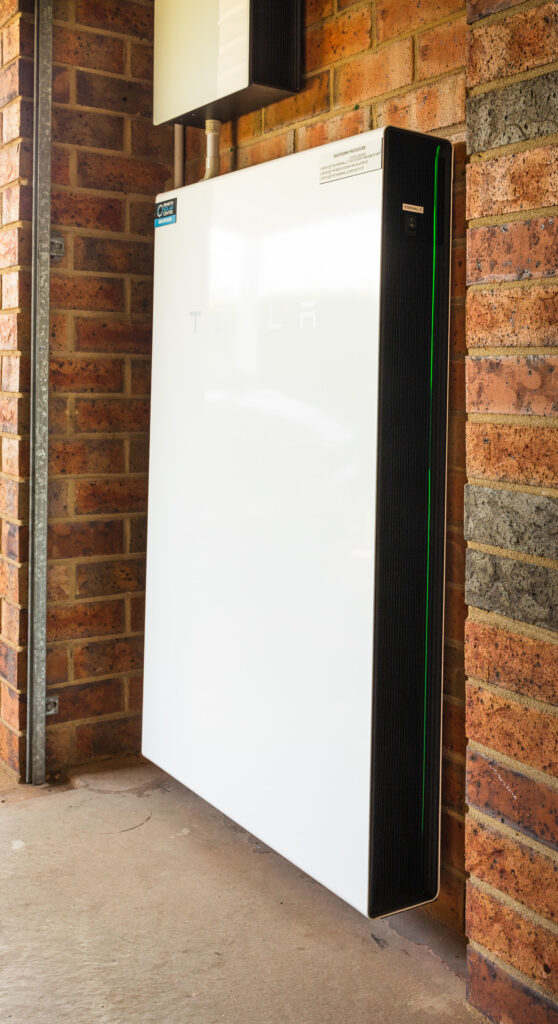
I posted back in March about our our shiny new solar panels and efforts to reduce our power usage, and as of two weeks ago our net electricity grid power usage is now next to zero thanks to a fancy new Tesla Powerwall 2 battery!
We originally weren’t planning on getting a battery back when we got our solar panels — and to to be honest they still don’t make financial sense in terms of a return on investment — but we had nine months of power usage data and I could see that for the most part the amount of energy the Powerwall can store would be enough for us to avoid having to draw nearly anything whatsoever from the grid*.
* Technically this isn’t strictly true, keep reading to see why.
My thinking was, we’re producing stonking amounts of solar power and are feeding it back to the grid at 7c/kWh, but have to buy power from the grid after the sun goes down at 21c/kWh. Why not store as much as possible of that for use during the night?
The installation was done by the same people who did the solar panels, Penrith Solar Centre, and as before, I cannot recommend them highly enough. Everything was done amazingly neatly and tidily, it all works a treat, and they fully cleaned up after themselves when they were done.
We have 3-phase power and the solar panels are connected to all three phases (⅓ of the panels are connected individually to each phase) and the Powerwall has only a single-phase inverter so is only connected to one phase, but the way it handles everything is quite clever: even though it can only discharge on one phase, it has current transformers attached to the other two phases so it can see how much is flowing through there, and it’ll discharge on its phase an amount equal to the power being drawn on the other two phases (up to its maximum output of 5kW anyway) to balance out what’s being used. The end result is that the electricity company sees us feeding in the same amount as we’re drawing, and thanks to the magic of net-metering it all balances out to next to zero! This page on Solar Quotes is a good explanation of how it works.
The other interesting side-effect is that when the sun is shining and the battery is charging, it’s actually pulling power from the grid to charge itself, but only as much as we’re producing from the solar panels. Because the Enphase monitoring system doesn’t know about the battery, it gives us some amusing-looking graphs whereby the morning shows exactly the same amount of consumption as production up until the battery is fully-charged!
We also have the Powerwall’s “Backup Gateway”, which is the smaller white box in the photos at the top of this post. In the event of a blackout, it’ll instantaneously switch over to powering us from the battery, so it’s essentially a UPS for the house! Again, 3-phase complicates this slightly and the Powerwall’s single-phase inverter means that we can only have a single phase backed up, but the lights and all the powerpoints in the house (which includes the fridge) are connected to the backed-up phase. The only things that aren’t backed up are the hot water system, air conditioning, oven, and stove, all of which draw stupendous amounts of power and will quickly drain a battery anyway.
We also can’t charge the battery off the solar panels during a blackout… it is possible to set it up like that, but there needs to be a backup power line going back from a third of the solar panels back to the battery, which we didn’t get installed when we had the panels put in in February. There was a “Are you planning on getting a battery in the next six months” question which we said no to. 😛 If we’d said yes, they would have installed the backup line at the time; it’s still possible to install it now, but at the cost of several thousand dollars because they need to come out and pull the panels up and physically add the wiring. Blackouts are not remotely a concern here anyway, so that’s fine.
In the post back in March, I included three screenshots of the heatmap of our power usage, and the post-solar-installation one had the middle of the day completely black. Spot in the graph where we had the battery installed!
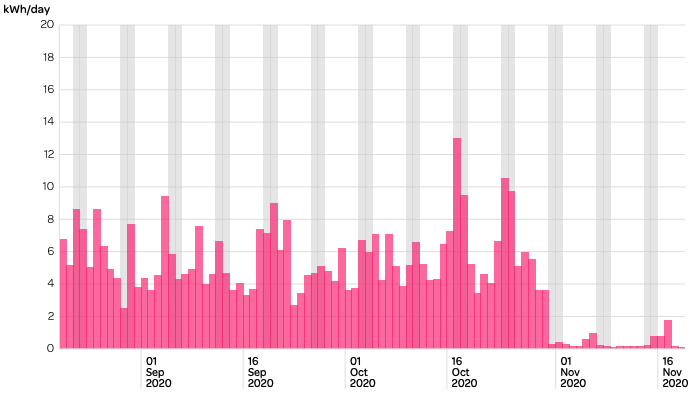
We ran out of battery power on the 6th of November because the previous day had been extremely dark and cloudy and we weren’t able to fully charge the battery from the solar panels that day (it was cloudy enough that almost every scrap of solar power we generated went to just powering the house, with next to nothing left over to put into the battery), and the 16th and 17th were both days where it was hot enough that we had the aircon running the whole evening after the sun went down and all night as well.
Powershop’s average daily use graph is pretty funny now as well.
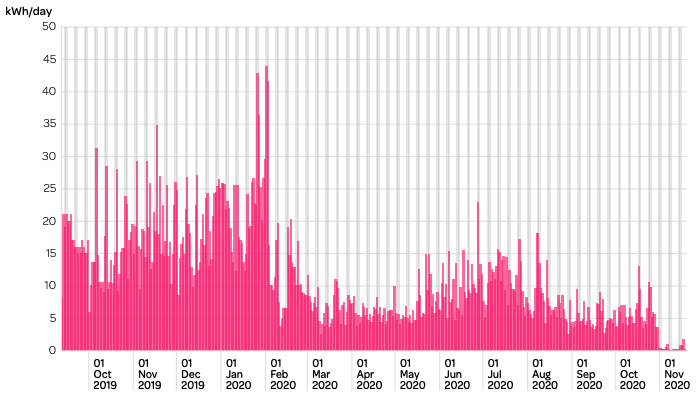
And even more so when you look all the way back to when we first had the smart meter installed, pre-solar!
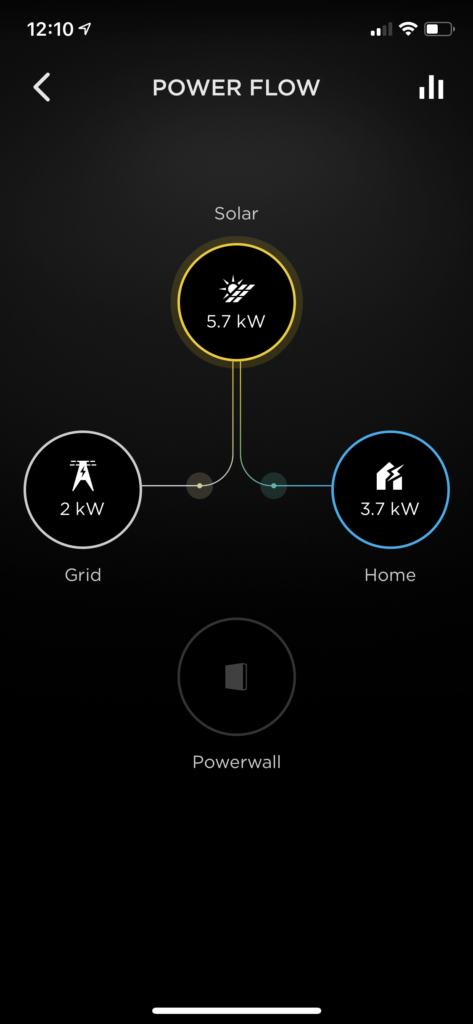
For monitoring the Powerwall itself, you use Tesla’s very slick app where you can see the power flow in real time. When the battery is actively charging or discharging, there’s an additional line going to or from the Powerwall icon to wherever it’s charging or discharging to or from.
You can’t tell from a screenshot of course, but those on the lines connecting the Solar to the Home and Grid icons animate in the direction that the power is flowing.
It also includes some historical graph data as well, but unfortunately it’s not quite as nice as Enphase’s, and doesn’t even have a website, you can only view it in the app. There’s a website called PVOutput that you can send your solar data to, and we have been doing that via Enphase since we got the solar panels installed, but the Powerwall also has its own local API you can hit to scrape the power usage and flows, and battery charge percentage. I originally found this Python script to do exactly that, but a) I always struggle to get anything related to Python working, and b) the SQLite database that it saves its data into kept intermittently getting corrupted, and the only way I’d know about it is by checking PVOutput and seeing that we hadn’t had any updates for hours.
So, I wrote my own in TypeScript! It saves the data into PostgreSQL, so far it’s been working a treat and it’s all self-contained in a Docker container. The graphs live here, and to see the power consumption and grid and battery flow details, click on the right-most little square underneath the “Prev Day” and “Next Day” links under the graph. Eventually I’m going to send all this data to my website so I can store it all there, but for the moment PVOutput is working well.
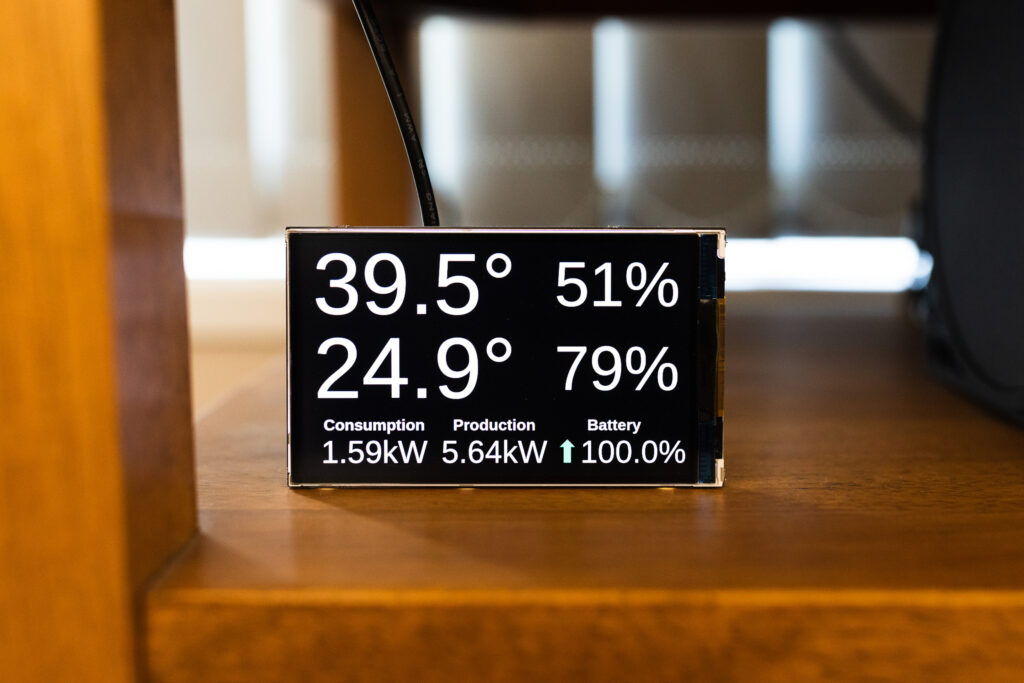
It also won’t shock anybody to know that I updated my little Raspberry Pi temperature/power display to also include the battery charge and whether it’s charging or discharging (charging has a green upwards arrow next to it, discharging has a red downwards arrow).
My only complaint with the local API is that it’ll randomly become unavailable for periods of time, sometimes up to an hour. I have no idea why, but when this happens the data in the Tesla iPhone app itself is still being updated properly. It’s not a big deal, and doesn’t actually affect anything with regards to battery’s functionality.
Ever since we moved into our house almost seven years ago now we’d been slowly making the place more energy efficient and reducing our power usage. First were double-glazed windows, then a new roof, then replacing all the light globes with LED ones, and slowly but surely replacing our various appliances with newer ones (the fridge was replaced shortly after we had our kitchen redone and used over a third less power than the old one, we got a dryer as well that uses a heap less power than trying to dry things in the combination washer/dryer, and a new air conditioner just before summer of 2018 to replace the ancient and increasingly-creaky one). Despite power bills going up at a fairly absurd rate over the past decade, we actually didn’t see much of an increase at all thanks to us being able to steadily use less power over time.
There’s an electricity company called Powershop that a few people at work use and are very happy with, and all their power is 100% carbon offset. We switched over to them in mid-September last year, and got our power meter upgraded — for free — to a smart meter in early October. The data from the meter is really fascinating, you can view it right on Powershop’s site and they give you a heat map of half-hour blocks throughout the whole day where you can see specifically when and how much power you’re using. A snapshot from part of October looked like this:
Brighter means more power being used, darker means less. You can clearly see the weekends during the day when we had the air conditioning on, and that much brighter section around 1:30-2:00am every night is the hot water system coming on. It was using 3-4 kilowatt-hours of power each and every night, and even though it’s on the off-peak pricing and thus not costing us a heap, it’s still pretty damn inefficient. I had a close look at the system and it had a manufacturing date of 2002, so we decided it was probably time to replace it anyway. I did a bunch of research and settled on a heat pump hot water system from a company called Sanden. Heat pumps work on the same general principle as refrigerators but in the exact opposite direction, they bring in the warm ambient air from outside to heat up the water. As a result, a heat pump hot water system can use 20% of the power of a regular hot water system. We got it installed in mid-December and it looks like a regular hot water system hooked up to an air conditioning unit!
(The scale is a bit off in this photo, I had to use the ultra-wide lens in my iPhone to get all of it in the shot as I was hard up against the fence. The photo was taken from about waist height, and the water tank comes up to about shoulder height or so). One neat thing this with system is that it’s absurdly quiet, they quote only 37 decibels when it’s running.
You can very clearly see the drop in power usage when after we got it installed, no more bright line! (The extended purple section in the wee hours of the morning is because that’s right when we had a spate of hot days and the air conditioner had to run more than normal overnight).
I worked out that the new system was using between 1 and 1.5kWh of power depending on what the outside temperature was (remember that it uses ambient air to heat the water, so warmer ambient air equals less power needed), which is a pretty nice improvement over the old system.
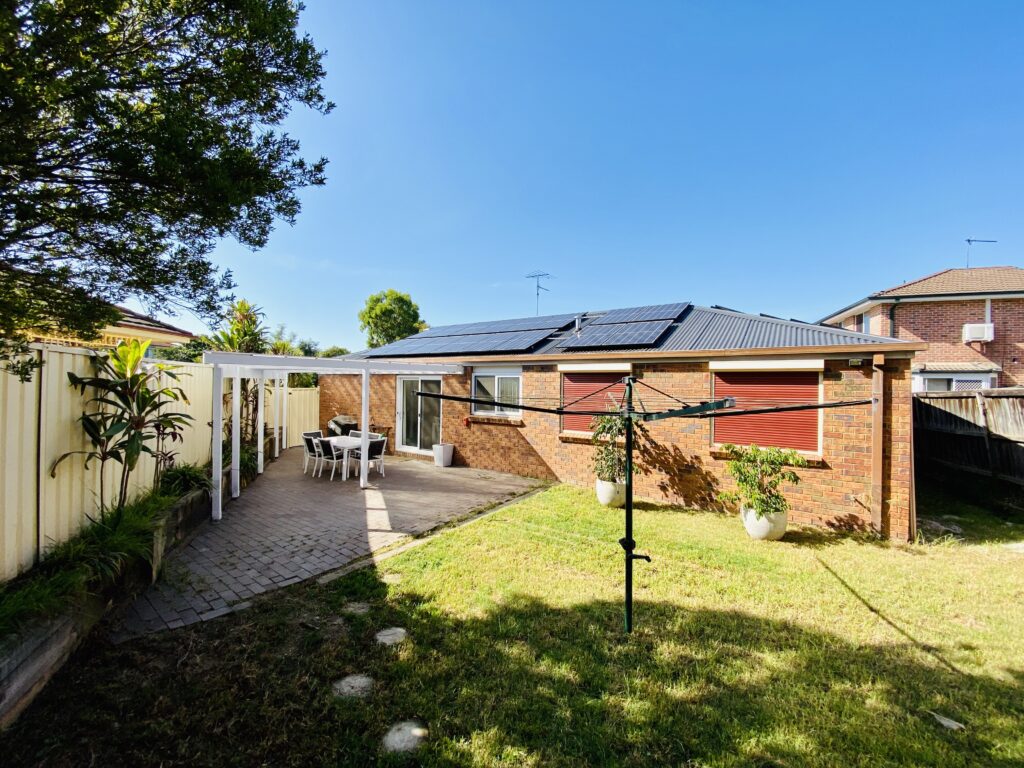
After all of this, we also decided to invest in a solar power system! There’s a fantastic website called Solar Quotes that has a ton of good info and will contact up to three installers for you to organise them to come out and give quotes. We ended up going with Penrith Solar Centre who were fantastic, and the system was installed on the 20th of last month, and it looks very handsome.
(You can also see we also had our pergola redone too, which was a bit of a shit-show and dragged on for way longer than it should have. You can see in the photo that we had it shortened a fair chunk as it was far larger than it needed to be, so now we have significantly more space for renovating our back yard when we eventually get around to doing that).
The total solar setup is 22 Hanwha Q-Cells panels — sixteen on the north-facing expanse and six on the western side — plus Enphase IQ7+micro-inverters, and we also get Enphase’s Envoy consumption monitoring setup so we can see in real-time how much power we’re using versus how much we’re exporting back to the grid! The monitoring includes panel-level monitoring of each individual panel so if anything goes wrong with one of them, it’s immediately obvious and the solar installers can immediately see which one needs fixing or replacing.
The Envoy system took a bit of time to be activated but even before that we were able to get a sense of how much our usage had changed via Powershop’s usage heat map. You can clearly see the day the solar was installed because all the days after that have big black sections where we were using no power from the grid at all:
The day at the top there, the 1st of March, we were doing all of the clothes washing — so using the washing machine and the dryer — as well as having the oven on for lunch, the dishwasher running, and the the air conditioner on for most of the day, and yet only used 11.46kWh for the day, compared to what would normally be more like 30-35kWh.
Powershop also have the inverse of the usage heat map if you have solar, which is the feed-in heat map, showing how many kilowatt-hours you’ve sent back to the grid.
The especially bright yellow blocks in the middle on the 28th are just a bit under 3kWh! You can also see on the 26th of February when the clouds came over after lunch.
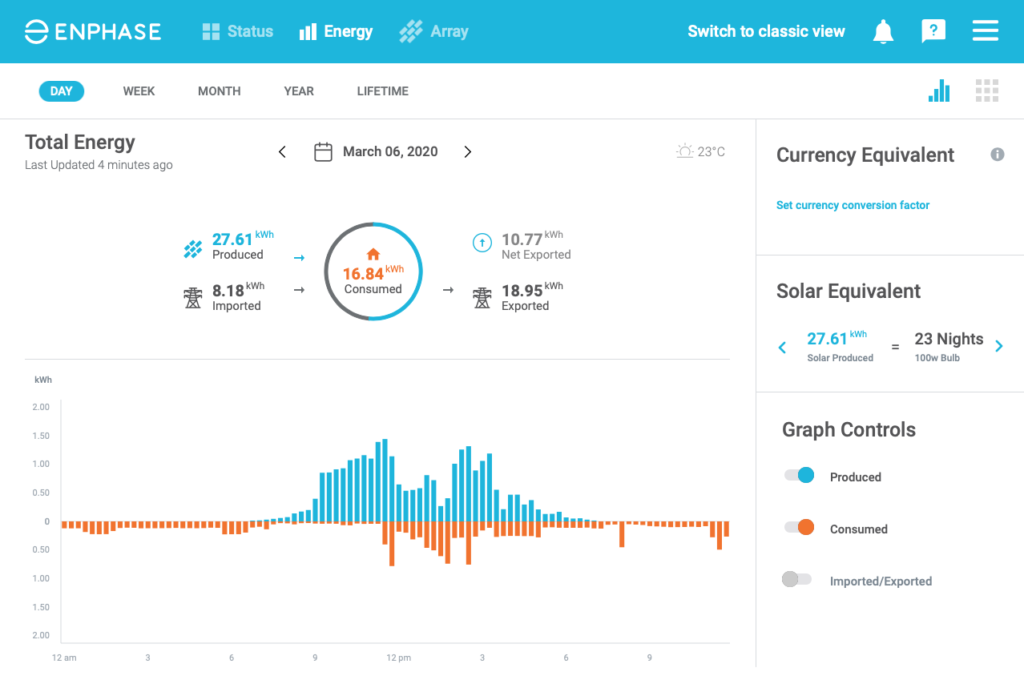
The Envoy system gives us essentially what Powershop’s heat maps do, but in real-time, and it also monitors each individual solar panel so if anything breaks with one of them or we see that it’s producing way less power, we immediately have the knowledge of which panel it is which makes Penrith Solar Centre’s job far easier if they need to come out and fix something. You also get consumption versus generation graphs in 15-minute increments as well! The blue is how much we’re producing from the solar panels and the orange is how much we’ve used. It took me a bit to work out what the circle at the top meant, but it means in total we’ve consumed 16.84kWh all up, and of that, the section of the circle is how much we consumed directly from the solar panels, whereas the grey portion is power imported from the grid.
Now that we’re generating a bunch of our own power, the other thing I wanted to do was to have our hot water run off the solar panels in the middle of the day, instead of using off-peak in the wee hours of the morning, especially since heat pump systems work best when the ambient temperature is warmer… not super useful in the middle of winter at 1am! Fortunately the Sanden system we have comes with a block-out timer so you can explicitly set when you want it to be running. I had the Penrith Solar people swap the hot water over to the regular non-off-peak meter and I configured the block-out timer so the system only comes on in the middle of the day when we’re producing power from our solar panels (and conveniently when the ambient temperature is at it highest so it needs to use even less power).
I’ll be very interested to see how this goes during winter, our power usage is generally less — we don’t use the air conditioner’s heating function because it dries everything out too much, but instead just use oil-filled radiant heaters — but from talking to people at work, the solar panels also generate only about 30% of the electricity compared to the height of summer thanks to the shorter days and lower sun.
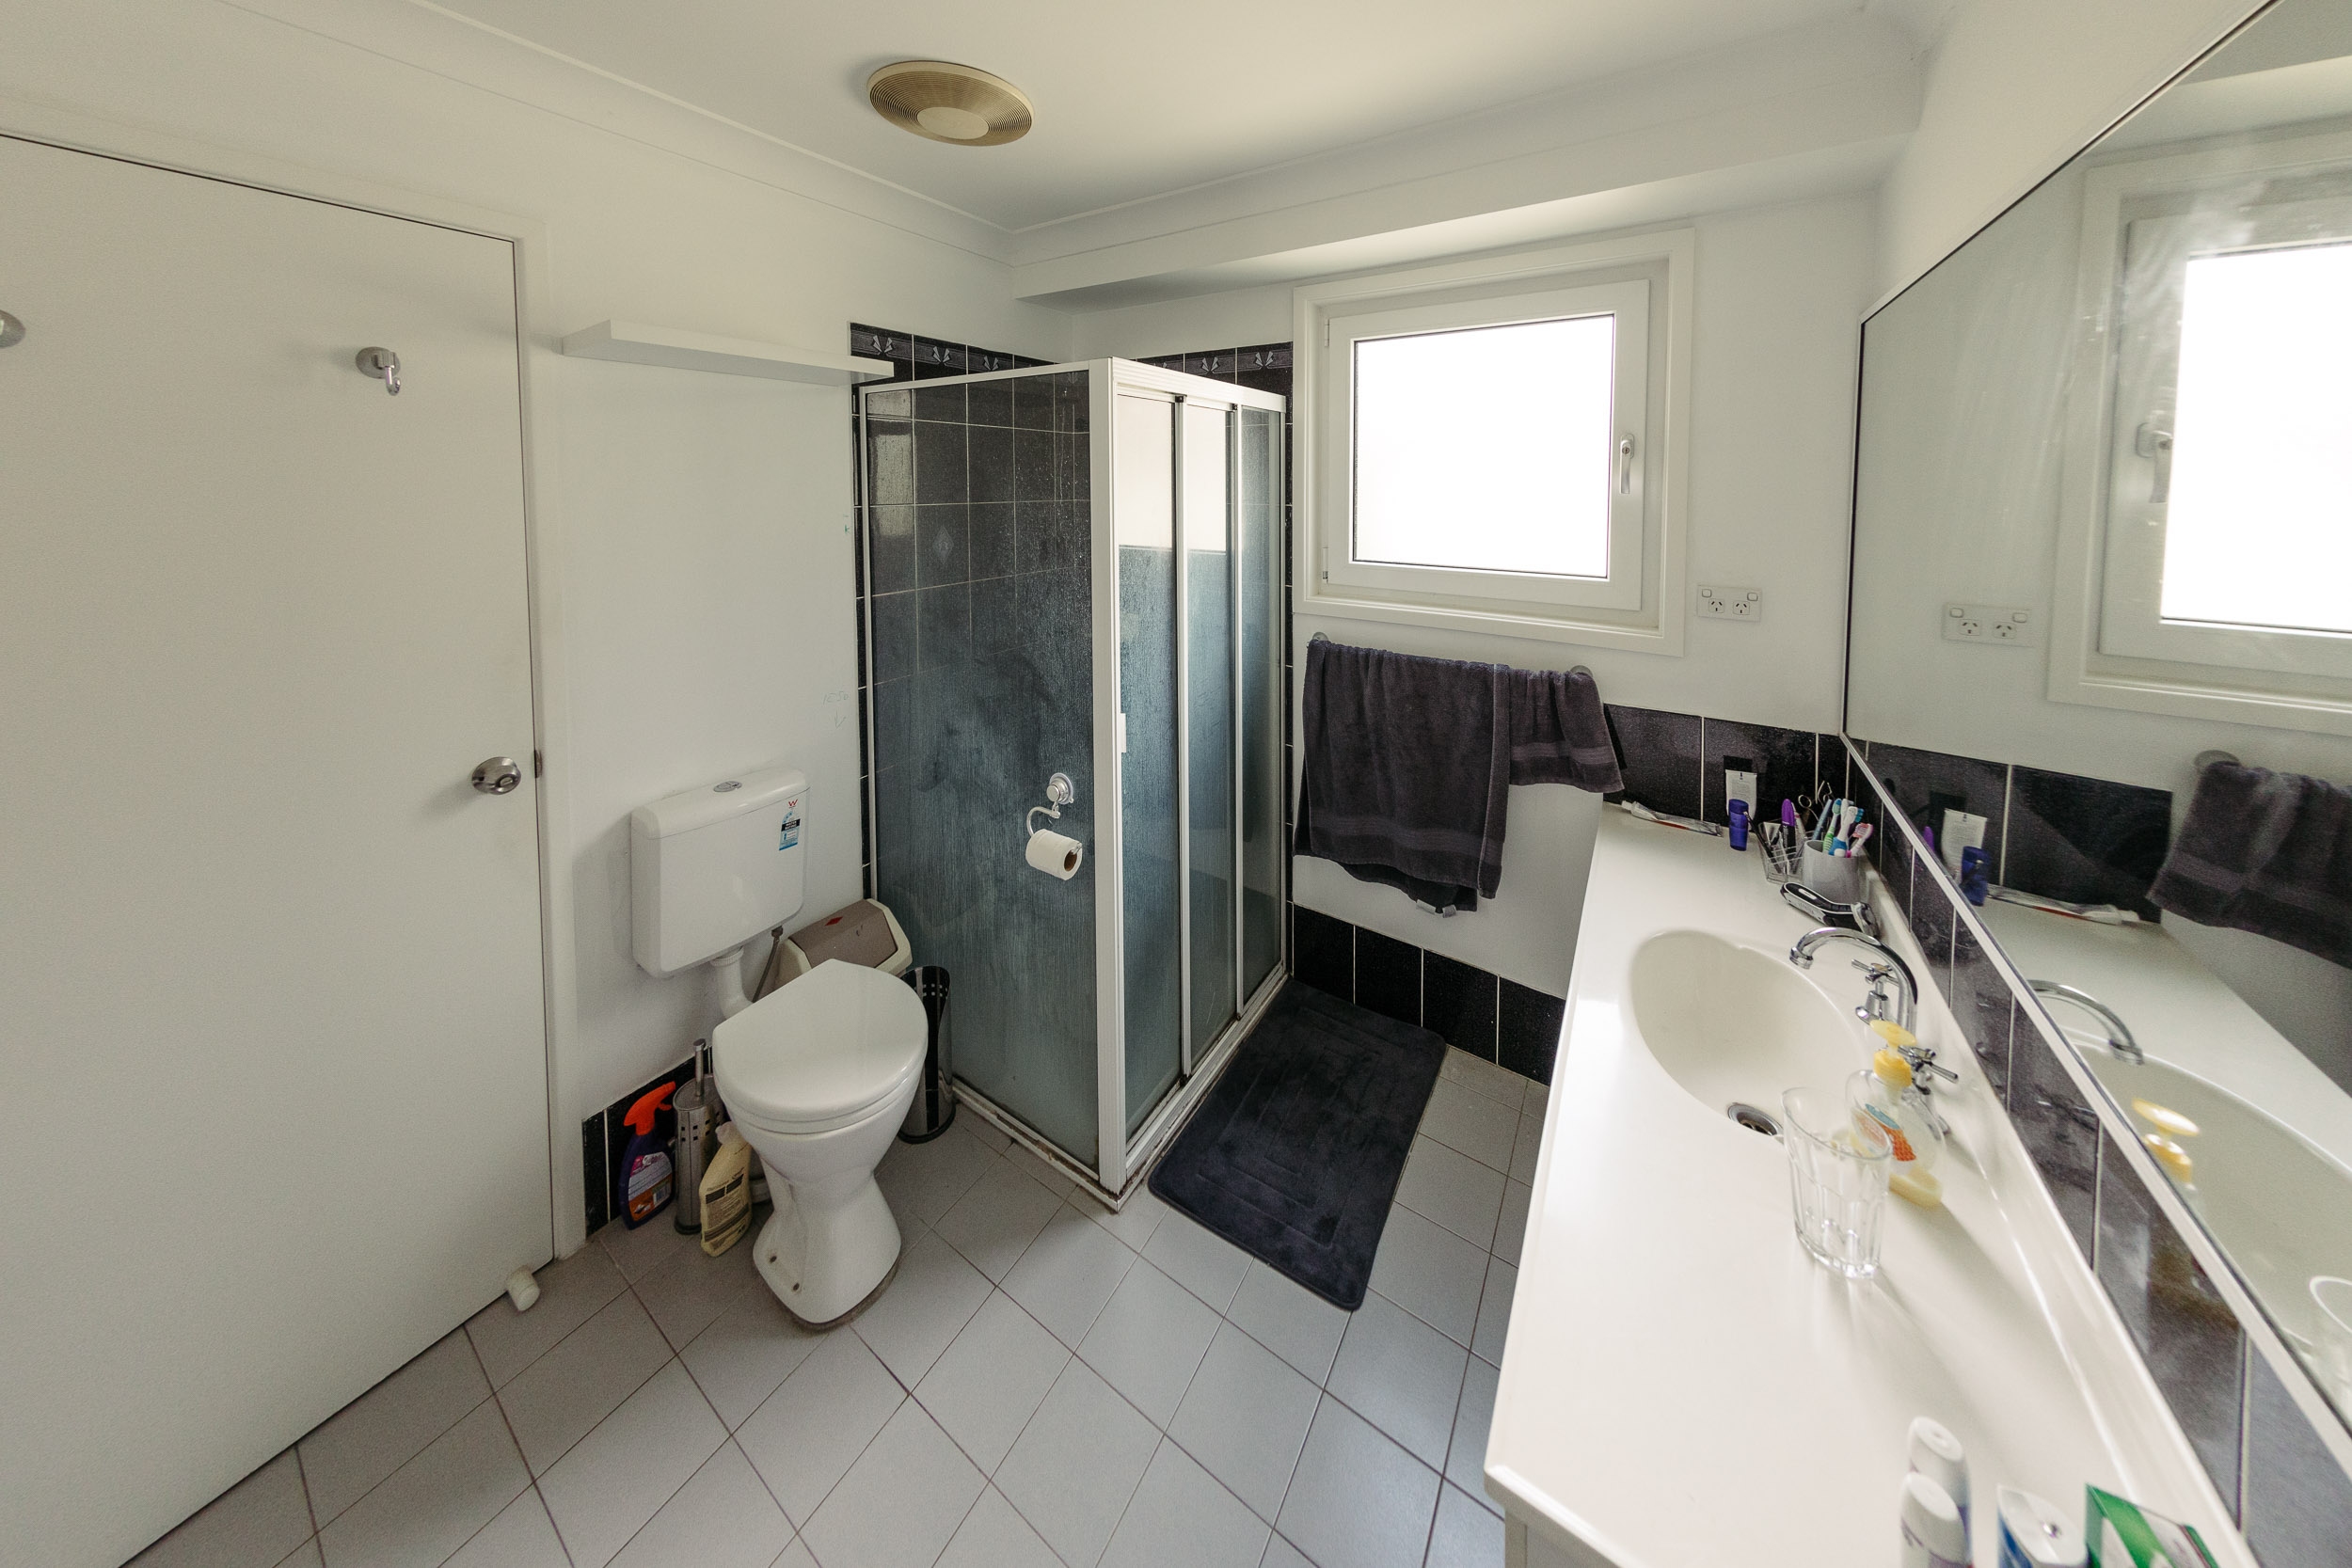
The bathroom in our house was always a little bit crap, it’d clearly been done on the cheap and many years ago, and we wanted to get a new one put in. Conveniently, my parents were going away on holidays for three weeks last month so we decided that this was a pretty perfect time to do it. We schlepped our stuff over to their place and stayed over there while the old bathroom was ripped out and a brand new shiny one put in! (We also got the second toilet redone in the same style, so there were no toilets at all hence the inability to stay at home while this was being done; also Beanie would have lost his mind when with the tradies being over all the time).
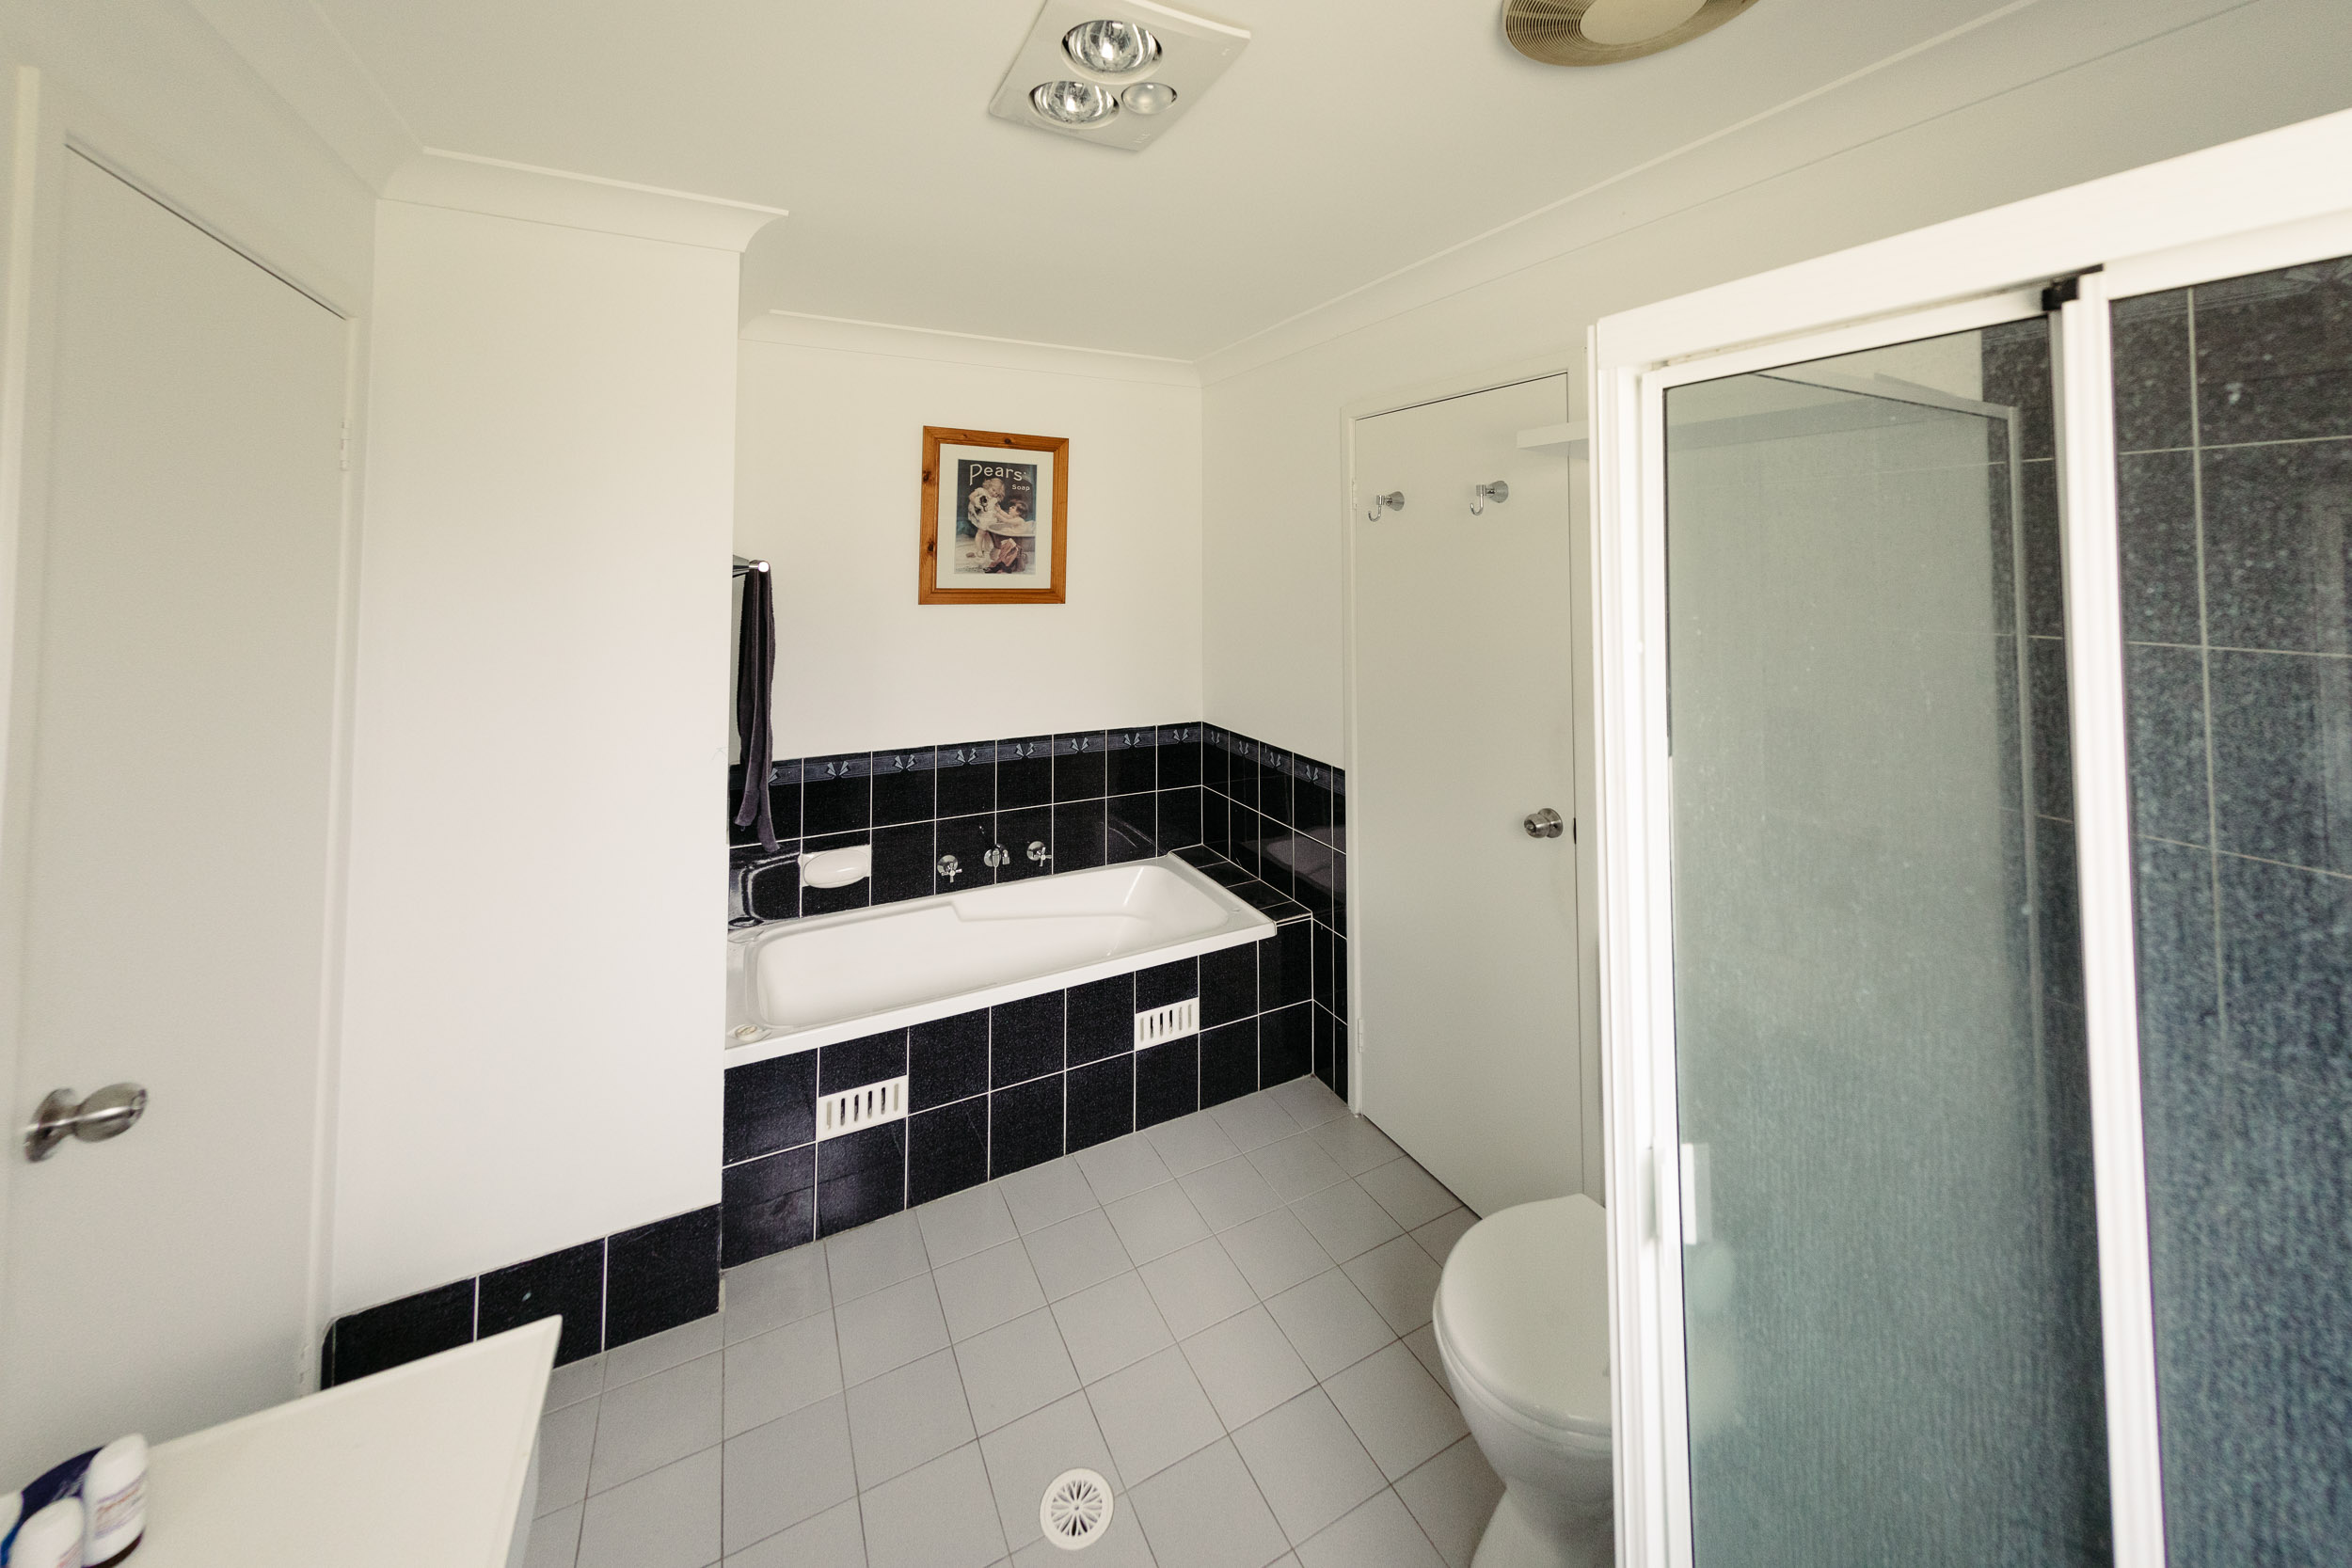
I borrowed a really wide-angle lens from a friend in order to properly take before and after photos, this is the old bathroom (the shower screen is filthy because we’d given up on cleaning it by this point).
The grout on the floor was all dirty and discoloured, the tiles were really thin, clearly cheap, and also quite ugly, and the vanity was really cheap-feeling, and we’d had to clean mould out of the inside of the cupboards more than once.
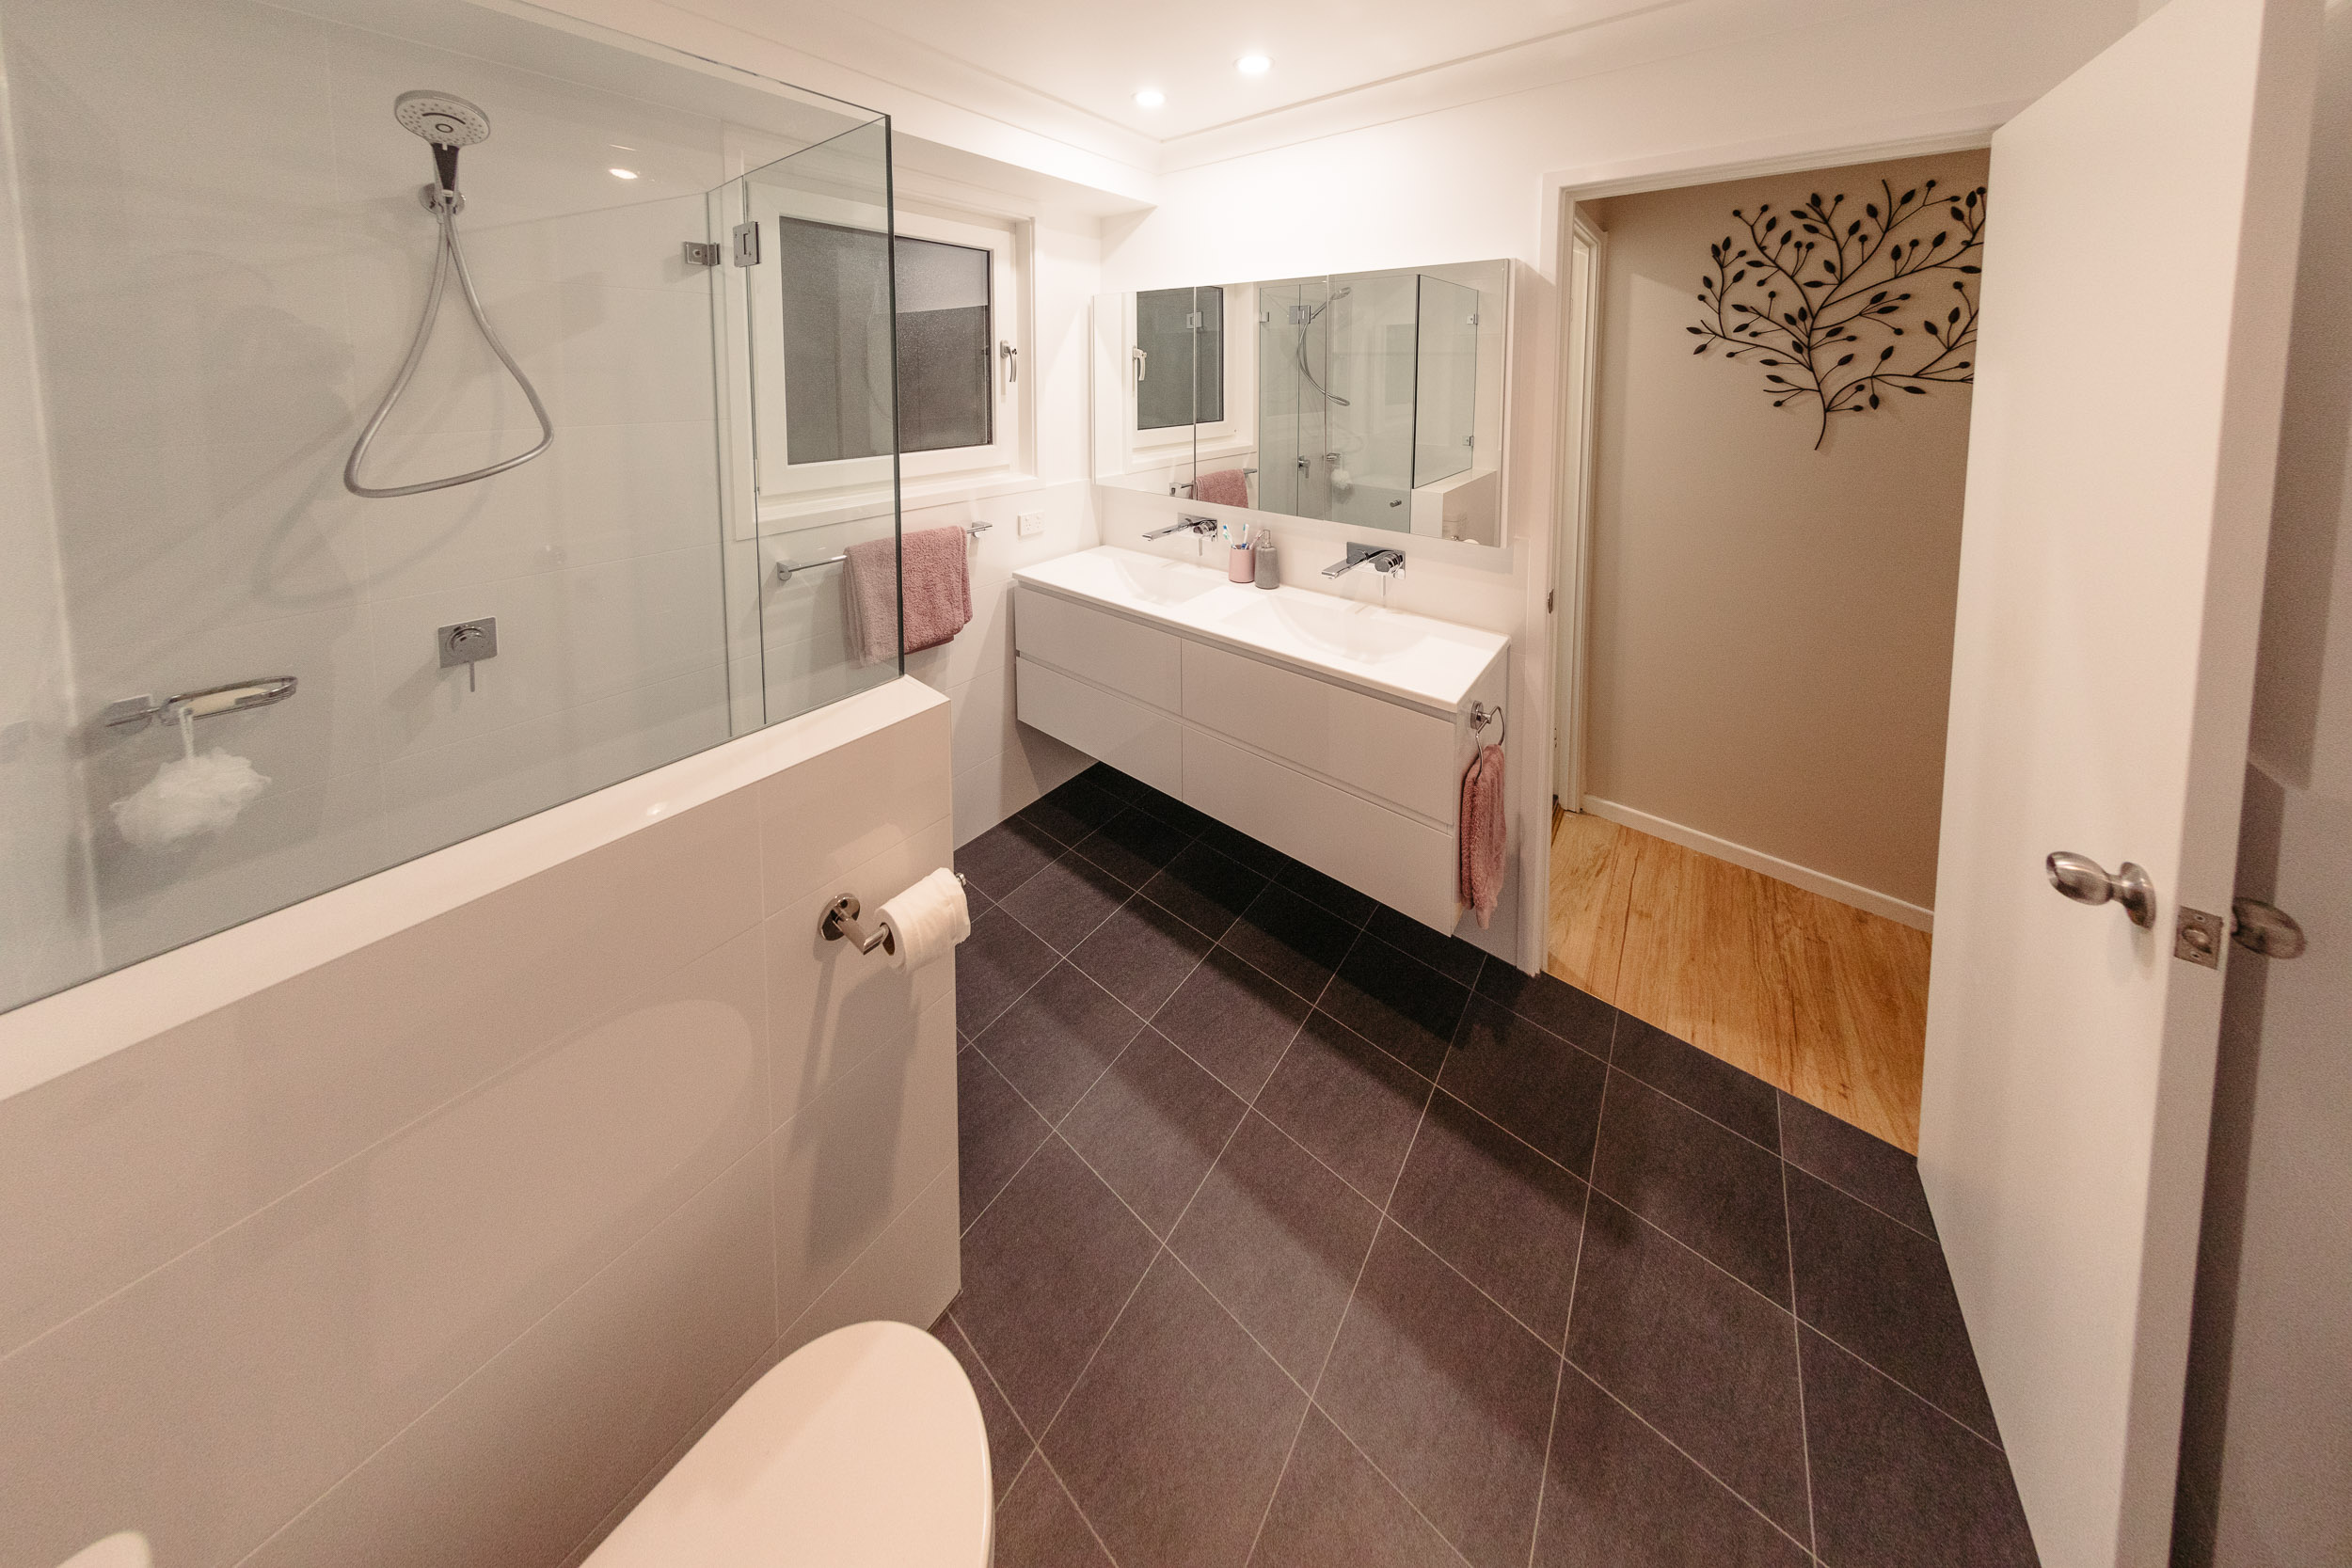
Kristina was interested in doing the bathroom in a much more modern and minimalist style than we’d done with the kitchen, to try to minimise the amount of nooks and crannies that would need to be cleaned, and to ensure it didn’t end up looking cluttered. We decided on white wall tiles, and slate grey floor tiles, plus a wall-hung vanity and wall-mounted taps.
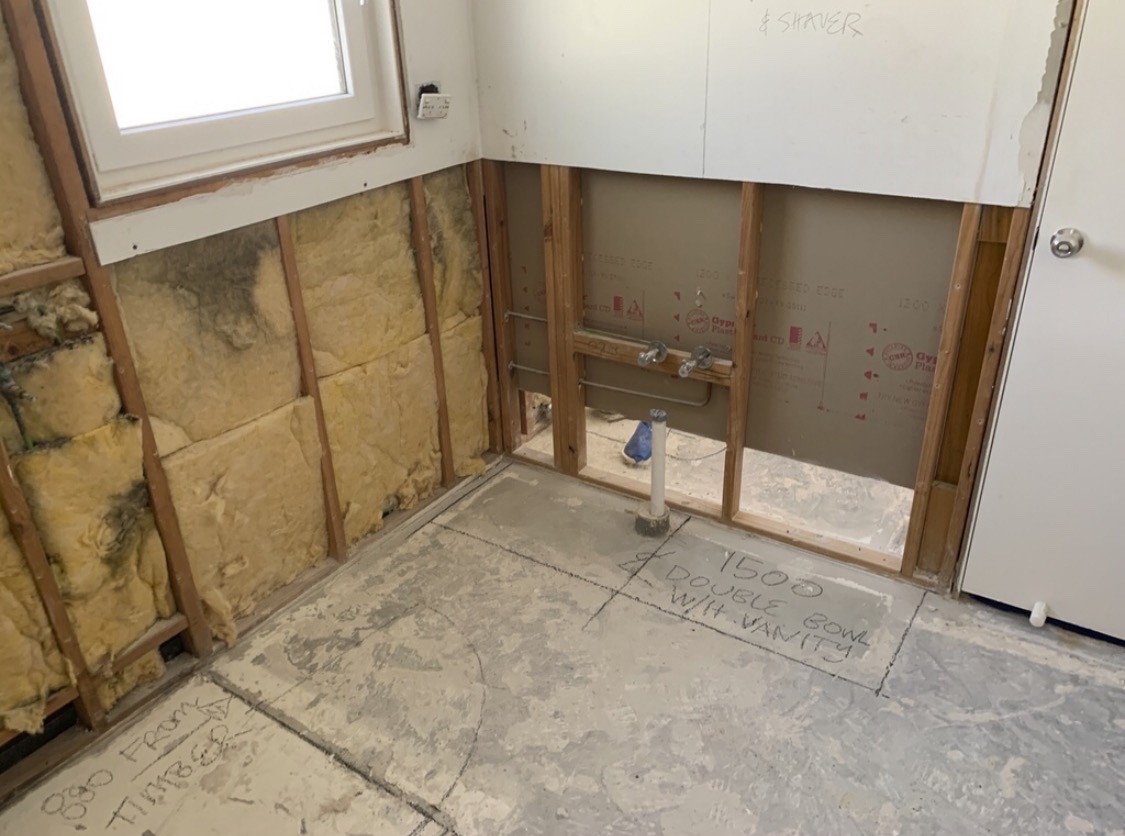
The guy who was overseeing the whole lot sent us daily updates on how it was going, and it was fascinating to see everything ripped out and just the bare frame and insulation after they’d finished on the first day.
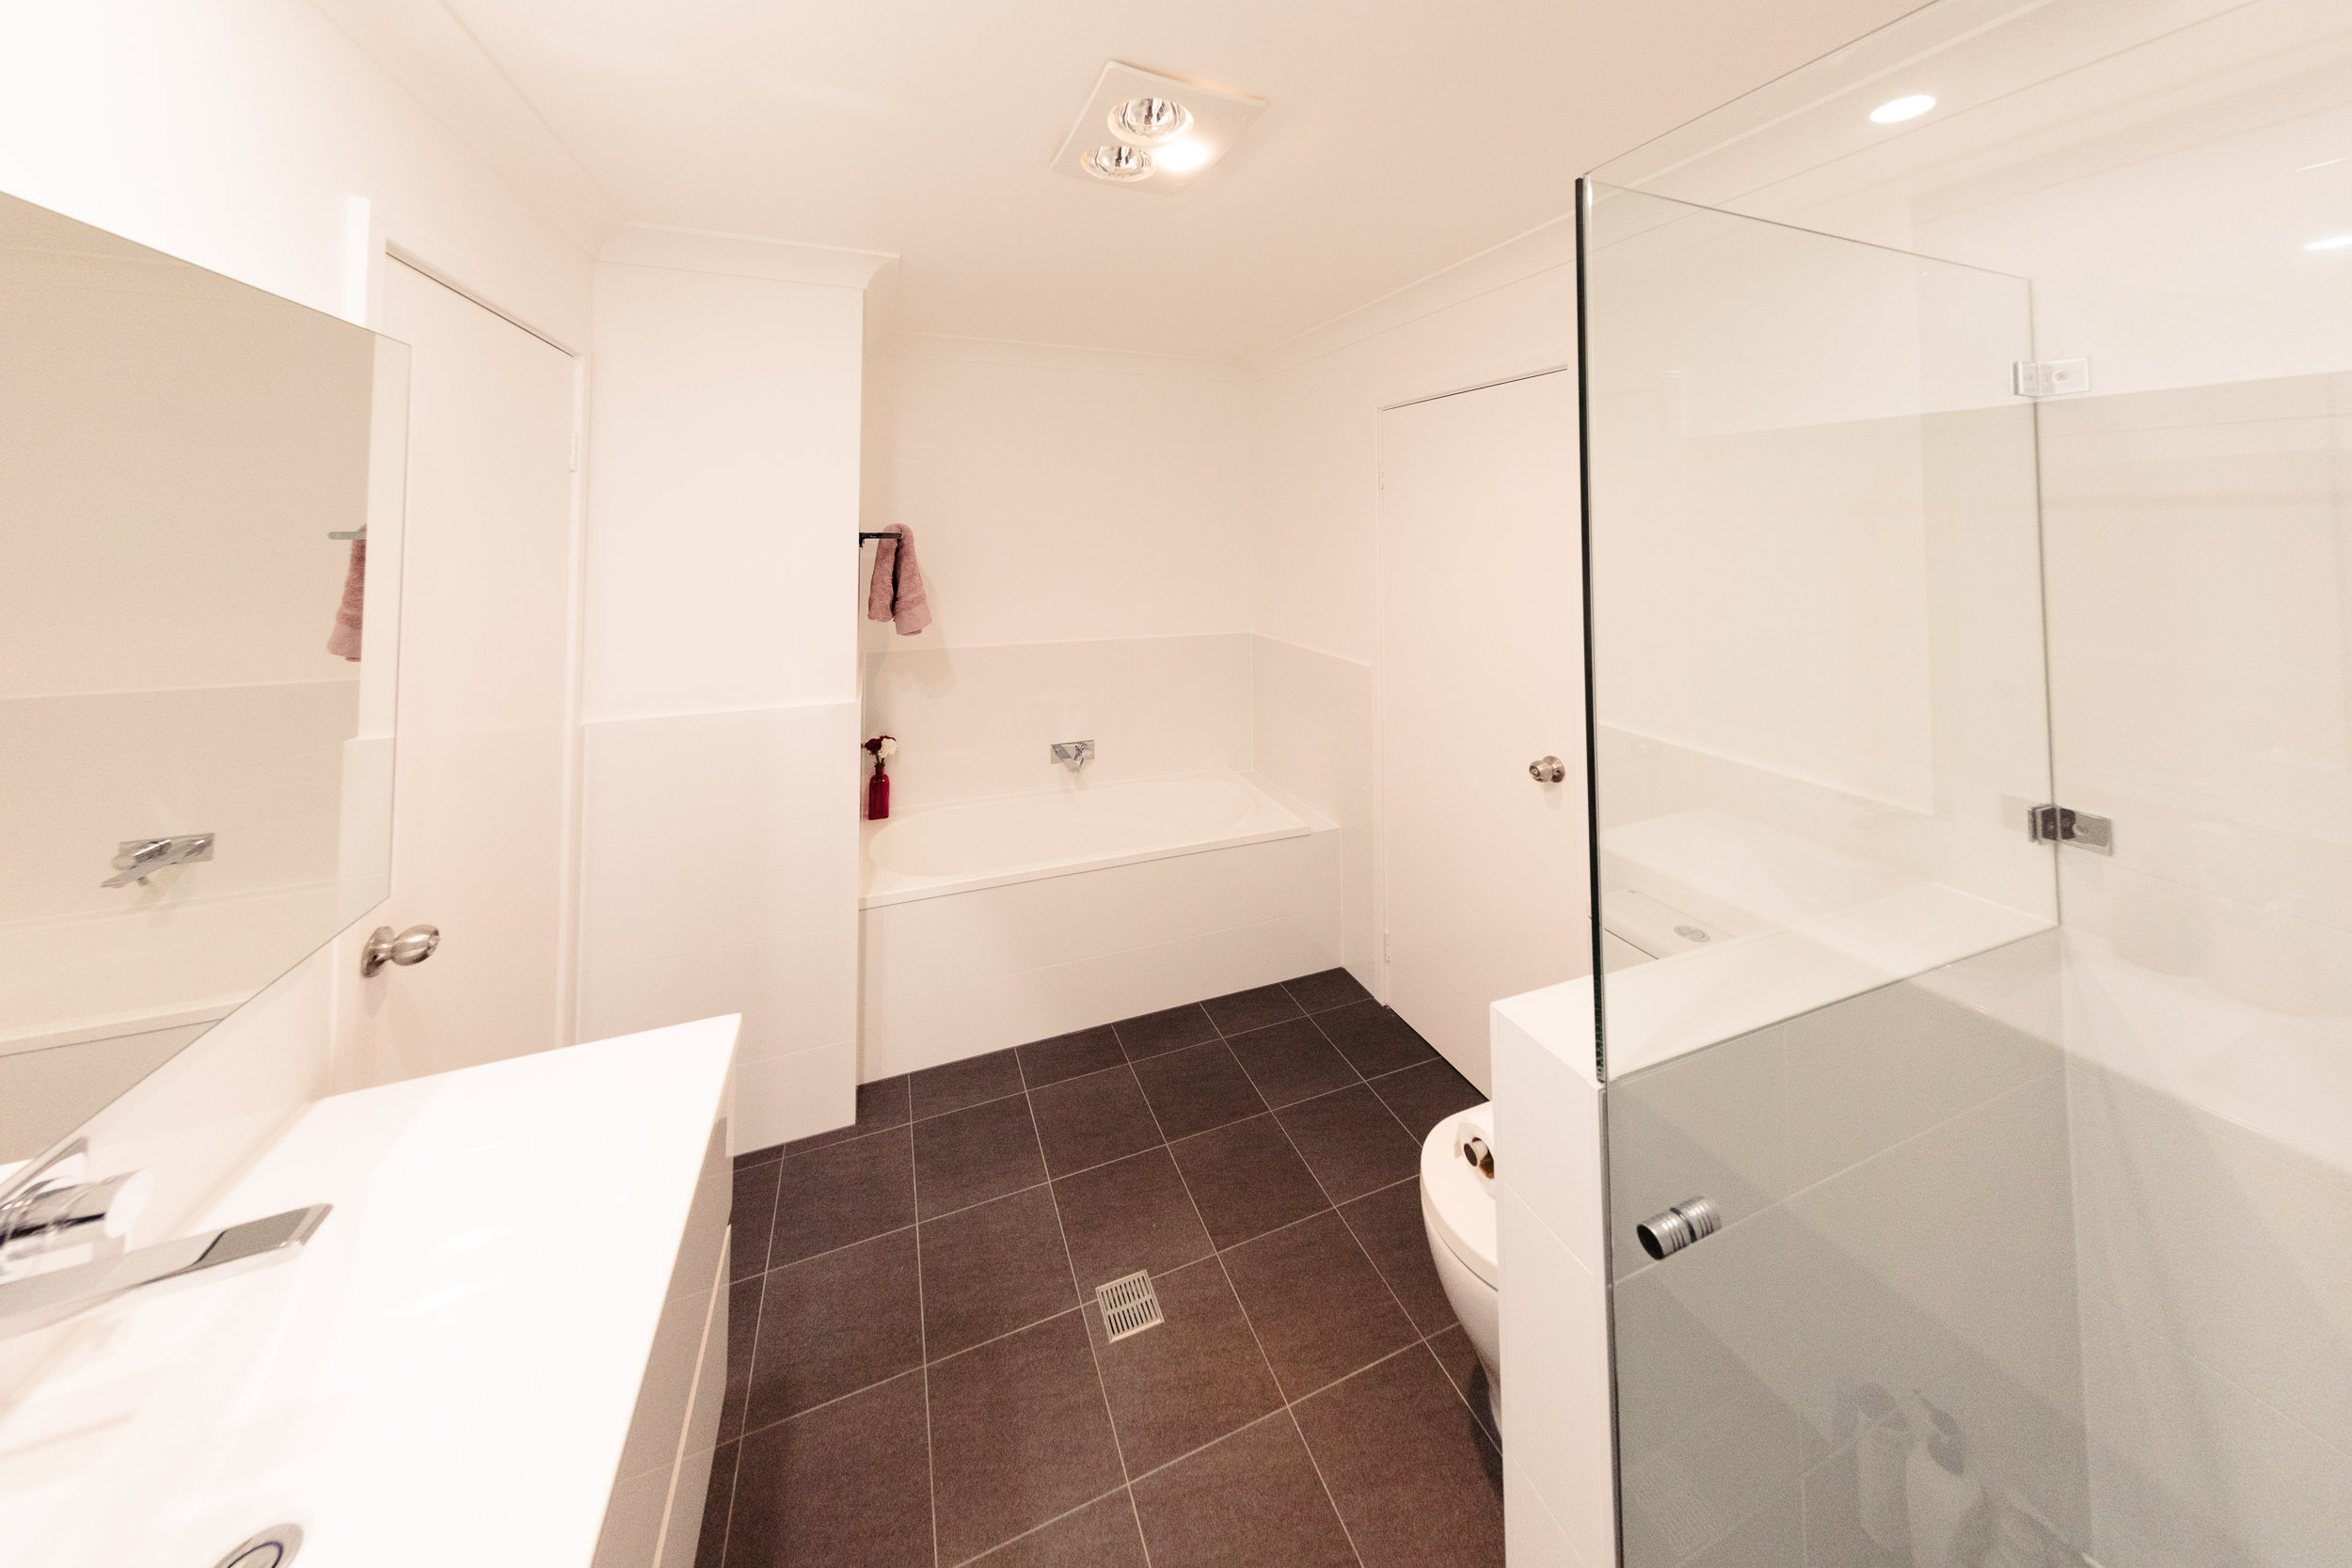
After that, each day’s updates were just more and more things being put in, we were able to come back on the Saturday of the third week though the shower screen itself wasn’t in by that point. On the Friday of the following week the guy came to install it, and with that it was done, and it looks absolutely amazing!
There’s lovely LED lights above the vanity, and the mirror is actually a shaving cabinet so we can put stuff into it and not have to be rummaging around in a dark cupboard. As we discovered with the kitchen and the drawers in there, drawers are far superior to cupboards for anything but really shallow depths.
We didn’t even get anything moved in terms of layout, it’s all in the exact same position as it was before, but it just feels so much larger and more spacious, it’s wonderful!
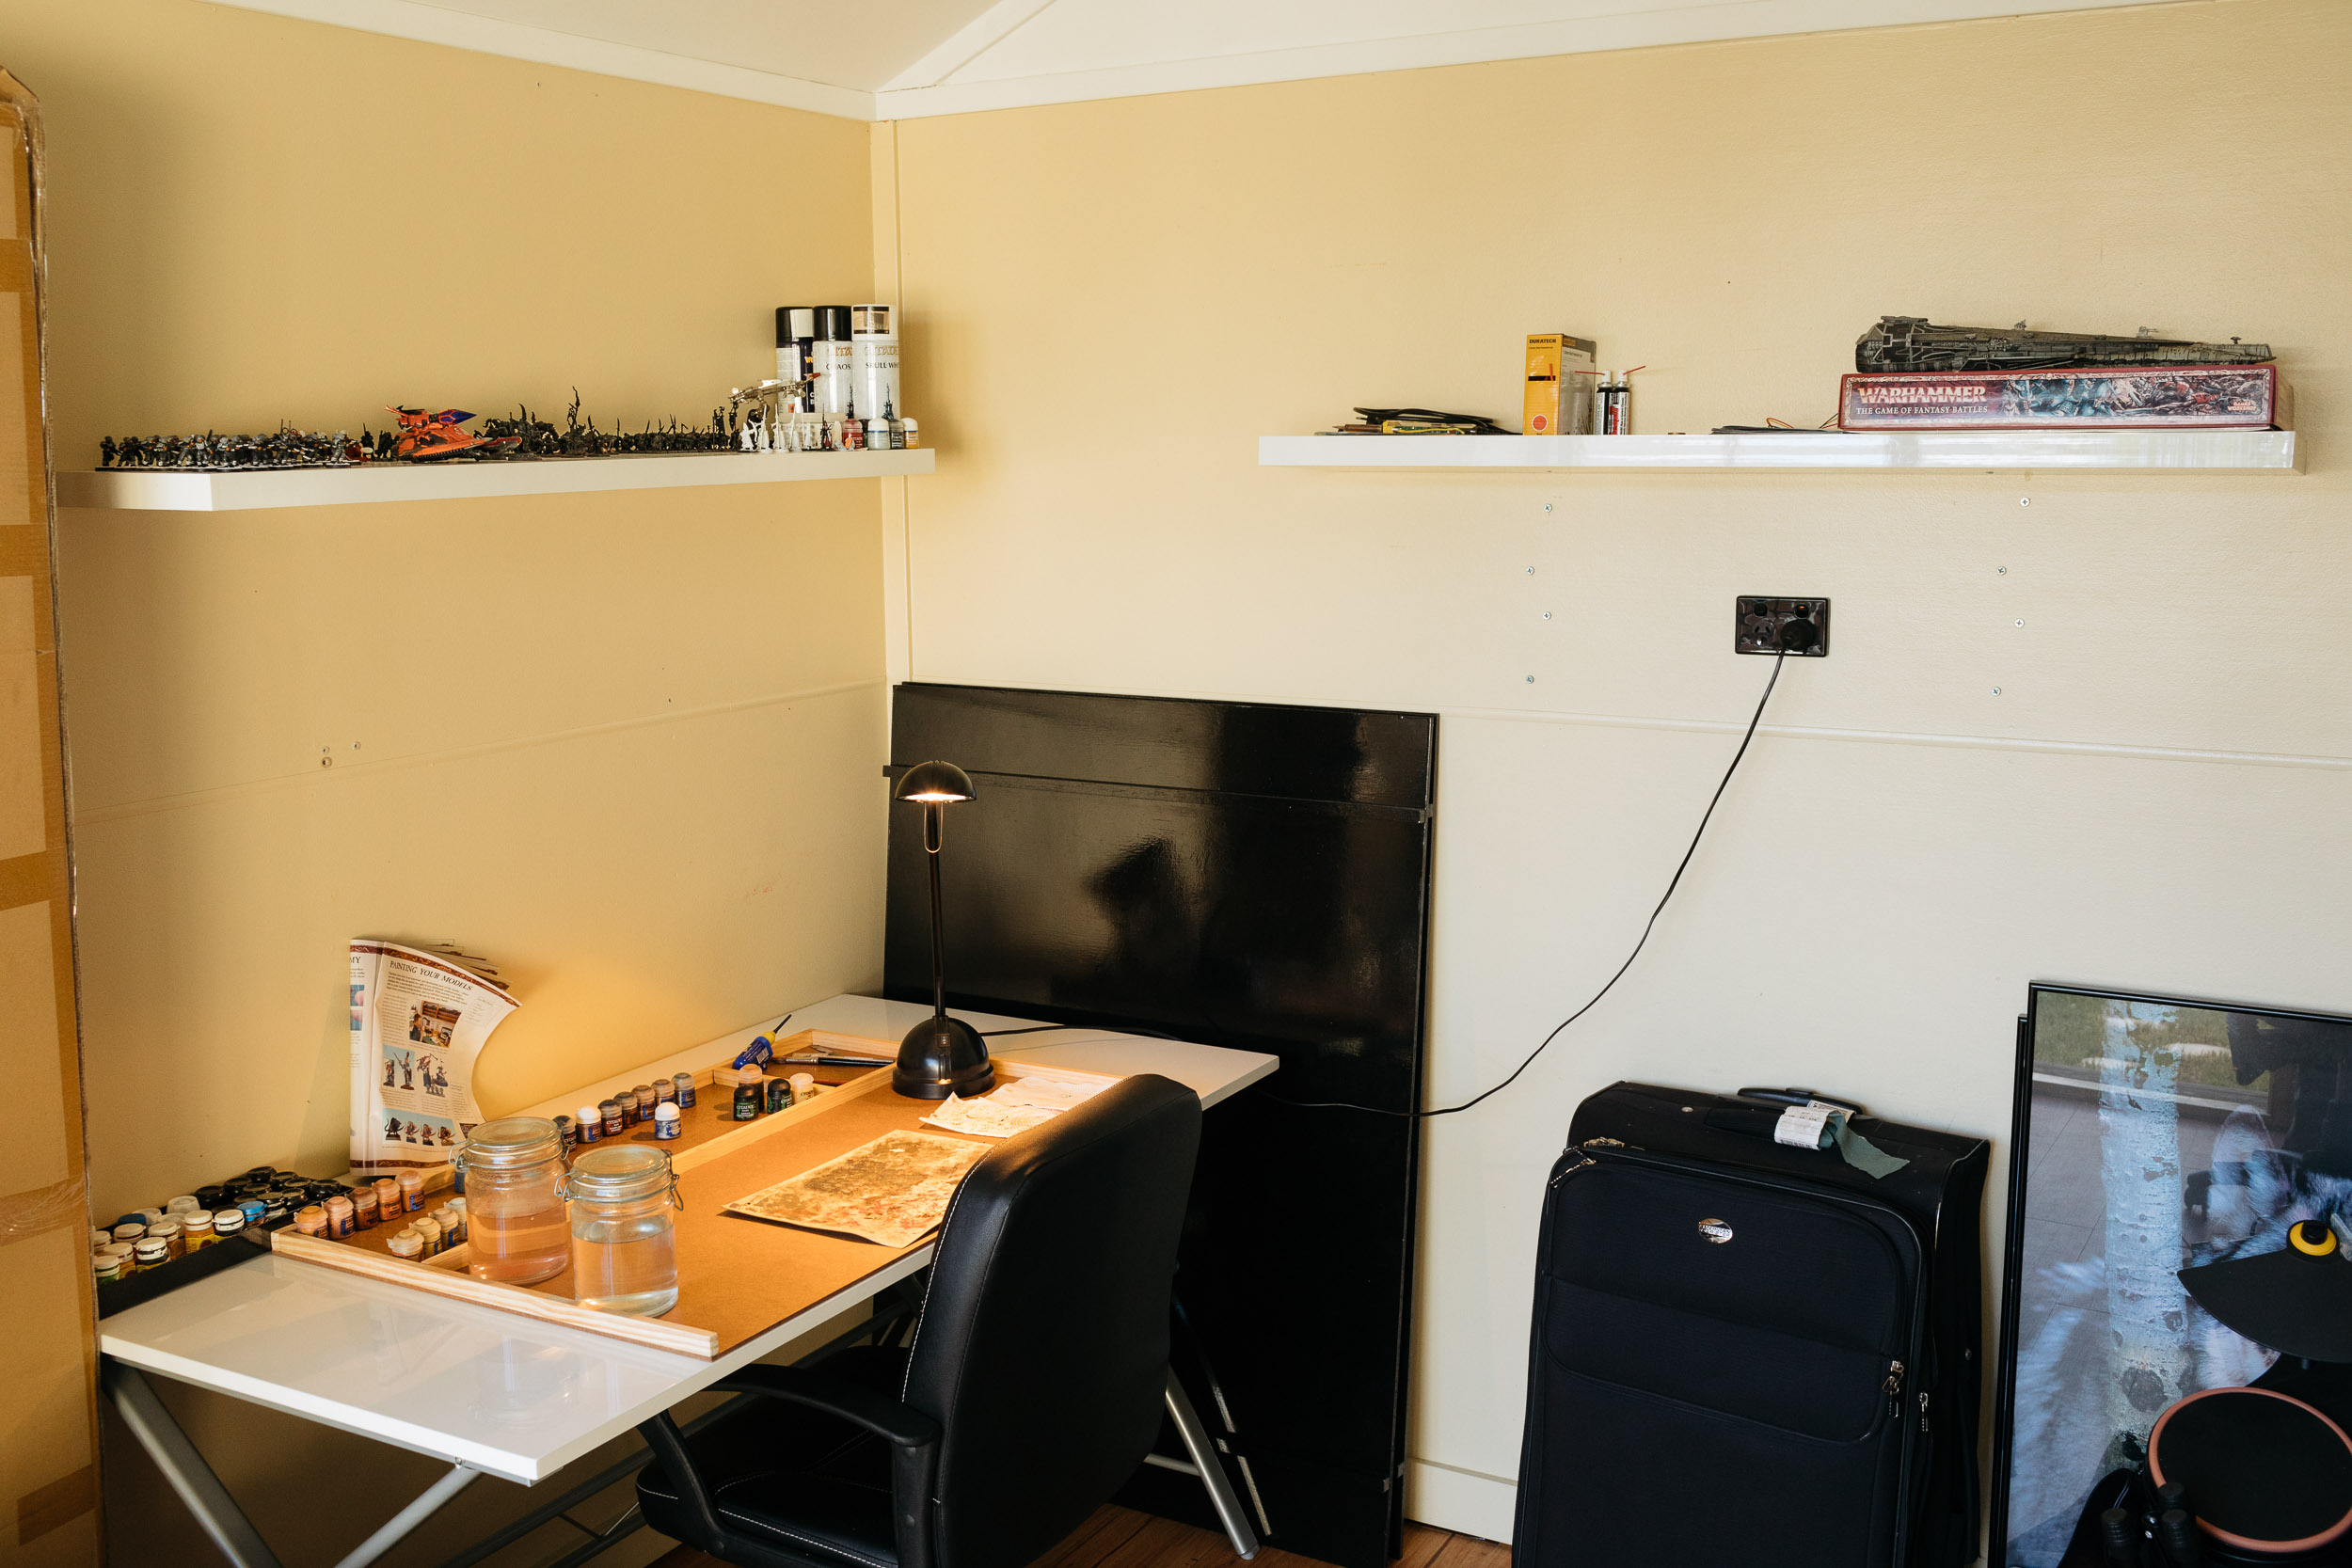
I mentioned in my last post that I’d brought all the paints and miniatures and everything inside because it was too hot in the back room to do any actual painting. Moving everything back and forth turned out to be a massive pain, so I decided to build myself a painting board that I could have everything sitting on, then just pick up and move back and forth as necessary.
After about $20 at Bunnings and some Liquid Nails as well as actual nails, it’s ready to go! The board ended up being somewhat larger than I was expecting, and it was a very tight squeeze with all the other stuff on the desk. Fortunately we still had the two shelves we’d originally put up in the office three and a half years ago and had since removed when we rearranged everything two years ago, so I put them up and moved basically everything that was on the desk onto them instead, and now everything is neat and tidy and organised!
So despite having gotten the back room set up for miniature painting over three and a half years ago, I hadn’t actually done any of it since then. 😛 I also realised I hadn’t actually taken a photo of the setup.
I bought Games Workshop’s latest game Shadespire early last month, it does have miniatures to paint but only eight in the core set, and it’s a board game where the games last about half an hour or so versus the multi-hour affairs that are traditional Warhammer/Warhammer 40,000 games. I figured that with the holidays around and time to kill, and not having the prospect of endless amounts of miniatures to paint, I’d give it a go. I’m pleased to say that I clearly still have the painting skills!
I’ve finished five of them so far, so only three to go, and took some proper photos of them with the full external flash/umbrella setup.
(I’ll admit that I cheated slightly and didn’t actually paint any of these in the back room, however… during the week and a bit that I was doing them, the weather was really hot and the dinky little air conditioning unit in the back room wasn’t remotely up to keeping things cool, so I ended up bringing all the paints and bits inside and did them at the dining table).
The game Shadespire itself is really neat as well. I’ve only played a handful of games, but rather than just “Kill the other team” you also have specific objectives to accomplish as well. Have a read of Ars Technica’s review of it, they’re a lot more thorough and eloquent than I could be. 😛
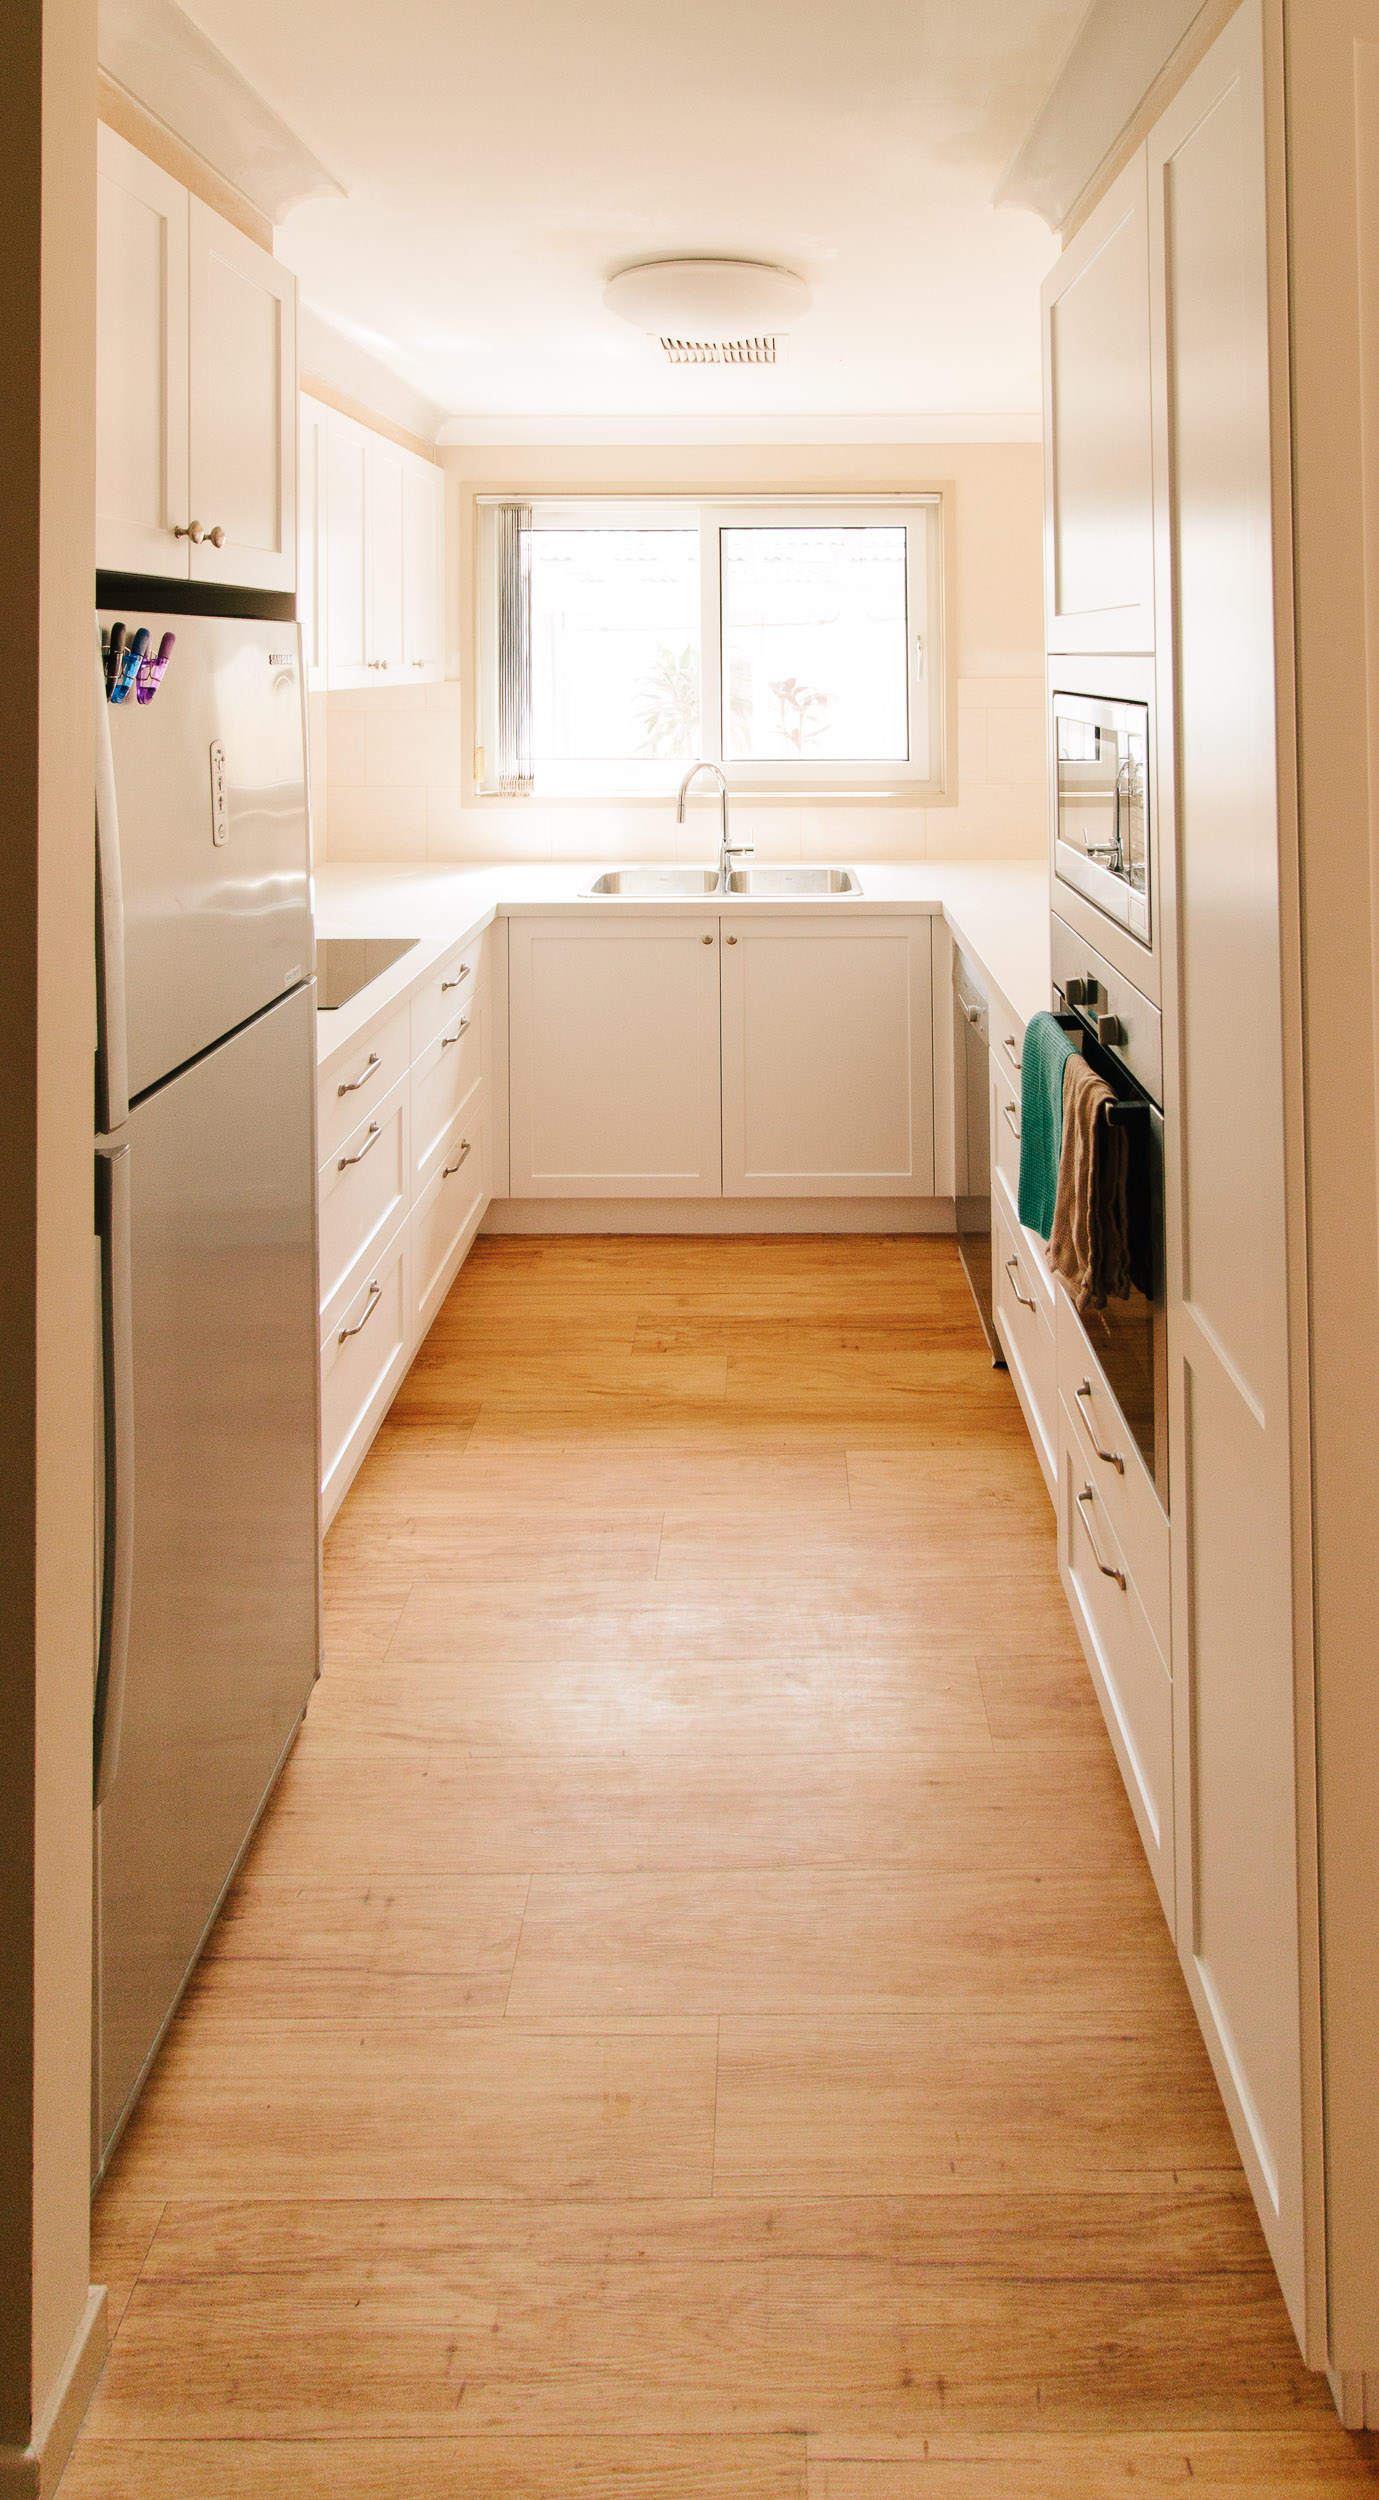
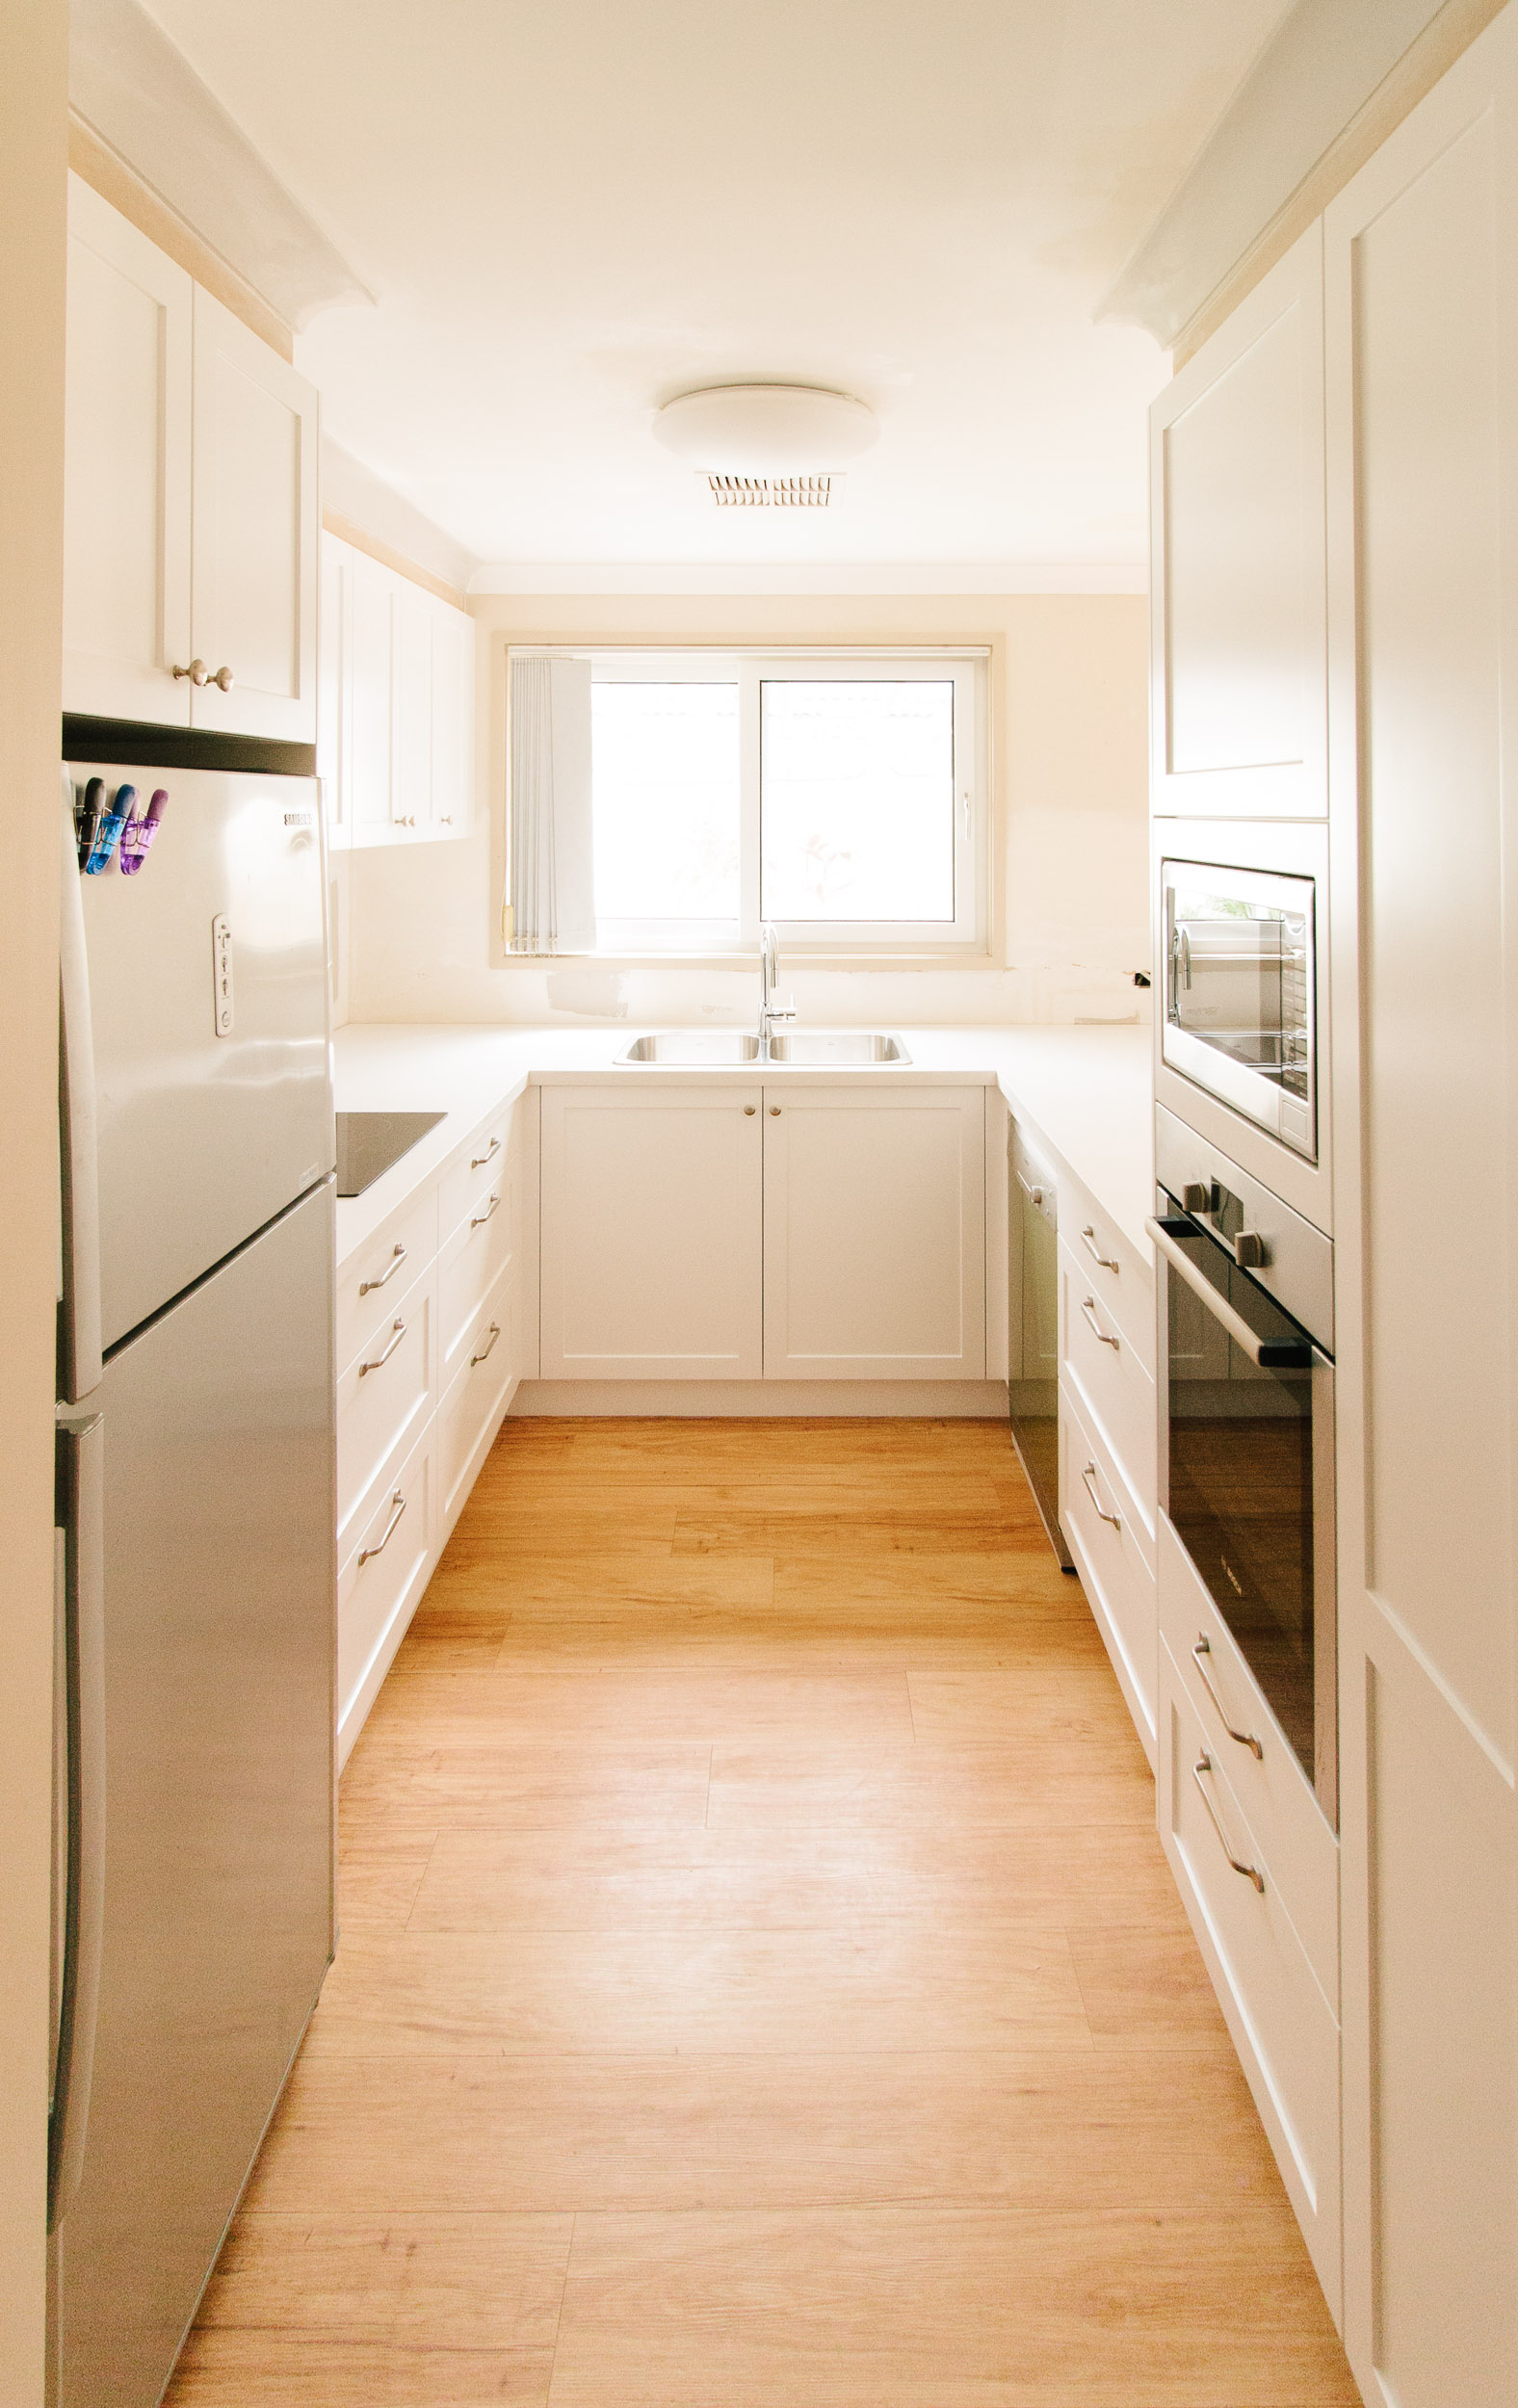
My previous kitchen progress post showed everything in place and working, but with the final painting not done and nothing actually in the kitchen. We’ve since had all of the trim (skirting boards, doors, door frames) repainted in white, as well as all those unpainted kitchen parts, and it all looks magnificent!
We had the tiler out this morning to put the backsplash in, and the kitchen is basically finished now. The bits above the cupboards still need painting, but in terms of every day use, it’s done, and looks brilliant! The plumbing and electrics were all hooked up yesterday, and you have no idea how delightful it is to actually have a dishwasher now after three-and-a-half years of not having one.
We’ve not used the new induction cooktop properly in anger yet, but we made pasta last night, I put the “Boost” mode on, and it took the water from cold to a roiling boil in five minutes flat. I also seasoned the stainless steel frying pans that we bought from IKEA and had written off as being useless because they stick (apparently seasoning is essential) though they’ve not been put to the test yet. The only casualty in the change to induction is the wok, which despite having a fridge magnet stick to the bottom of it, isn’t sensed by the cooktop. Kristina did a bunch of reading and the best type to get is a carbon steel one, so we’ve got one on the way.
I also saw Lacuna Coil live last night, for the first time in seven years (due to them not having toured here in that long), and they absolutely ruled. They played all the songs I was hoping for. ? I saw them back in 2007 as well, and was a fair bit closer then but with a significantly crappier phone camera (and also a far far higher tolerance for shitty photos, evidently). 😛 Irritatingly, I had to leave half-way through the last song or I was going to miss the last train home due to there being trackwork this weekend. I’m currently running on about five hours of sleep because I didn’t get home until just before 1:30am, and woke up at 6:40am because the tiler was coming. Note to self, don’t schedule things early on a Saturday morning in future.
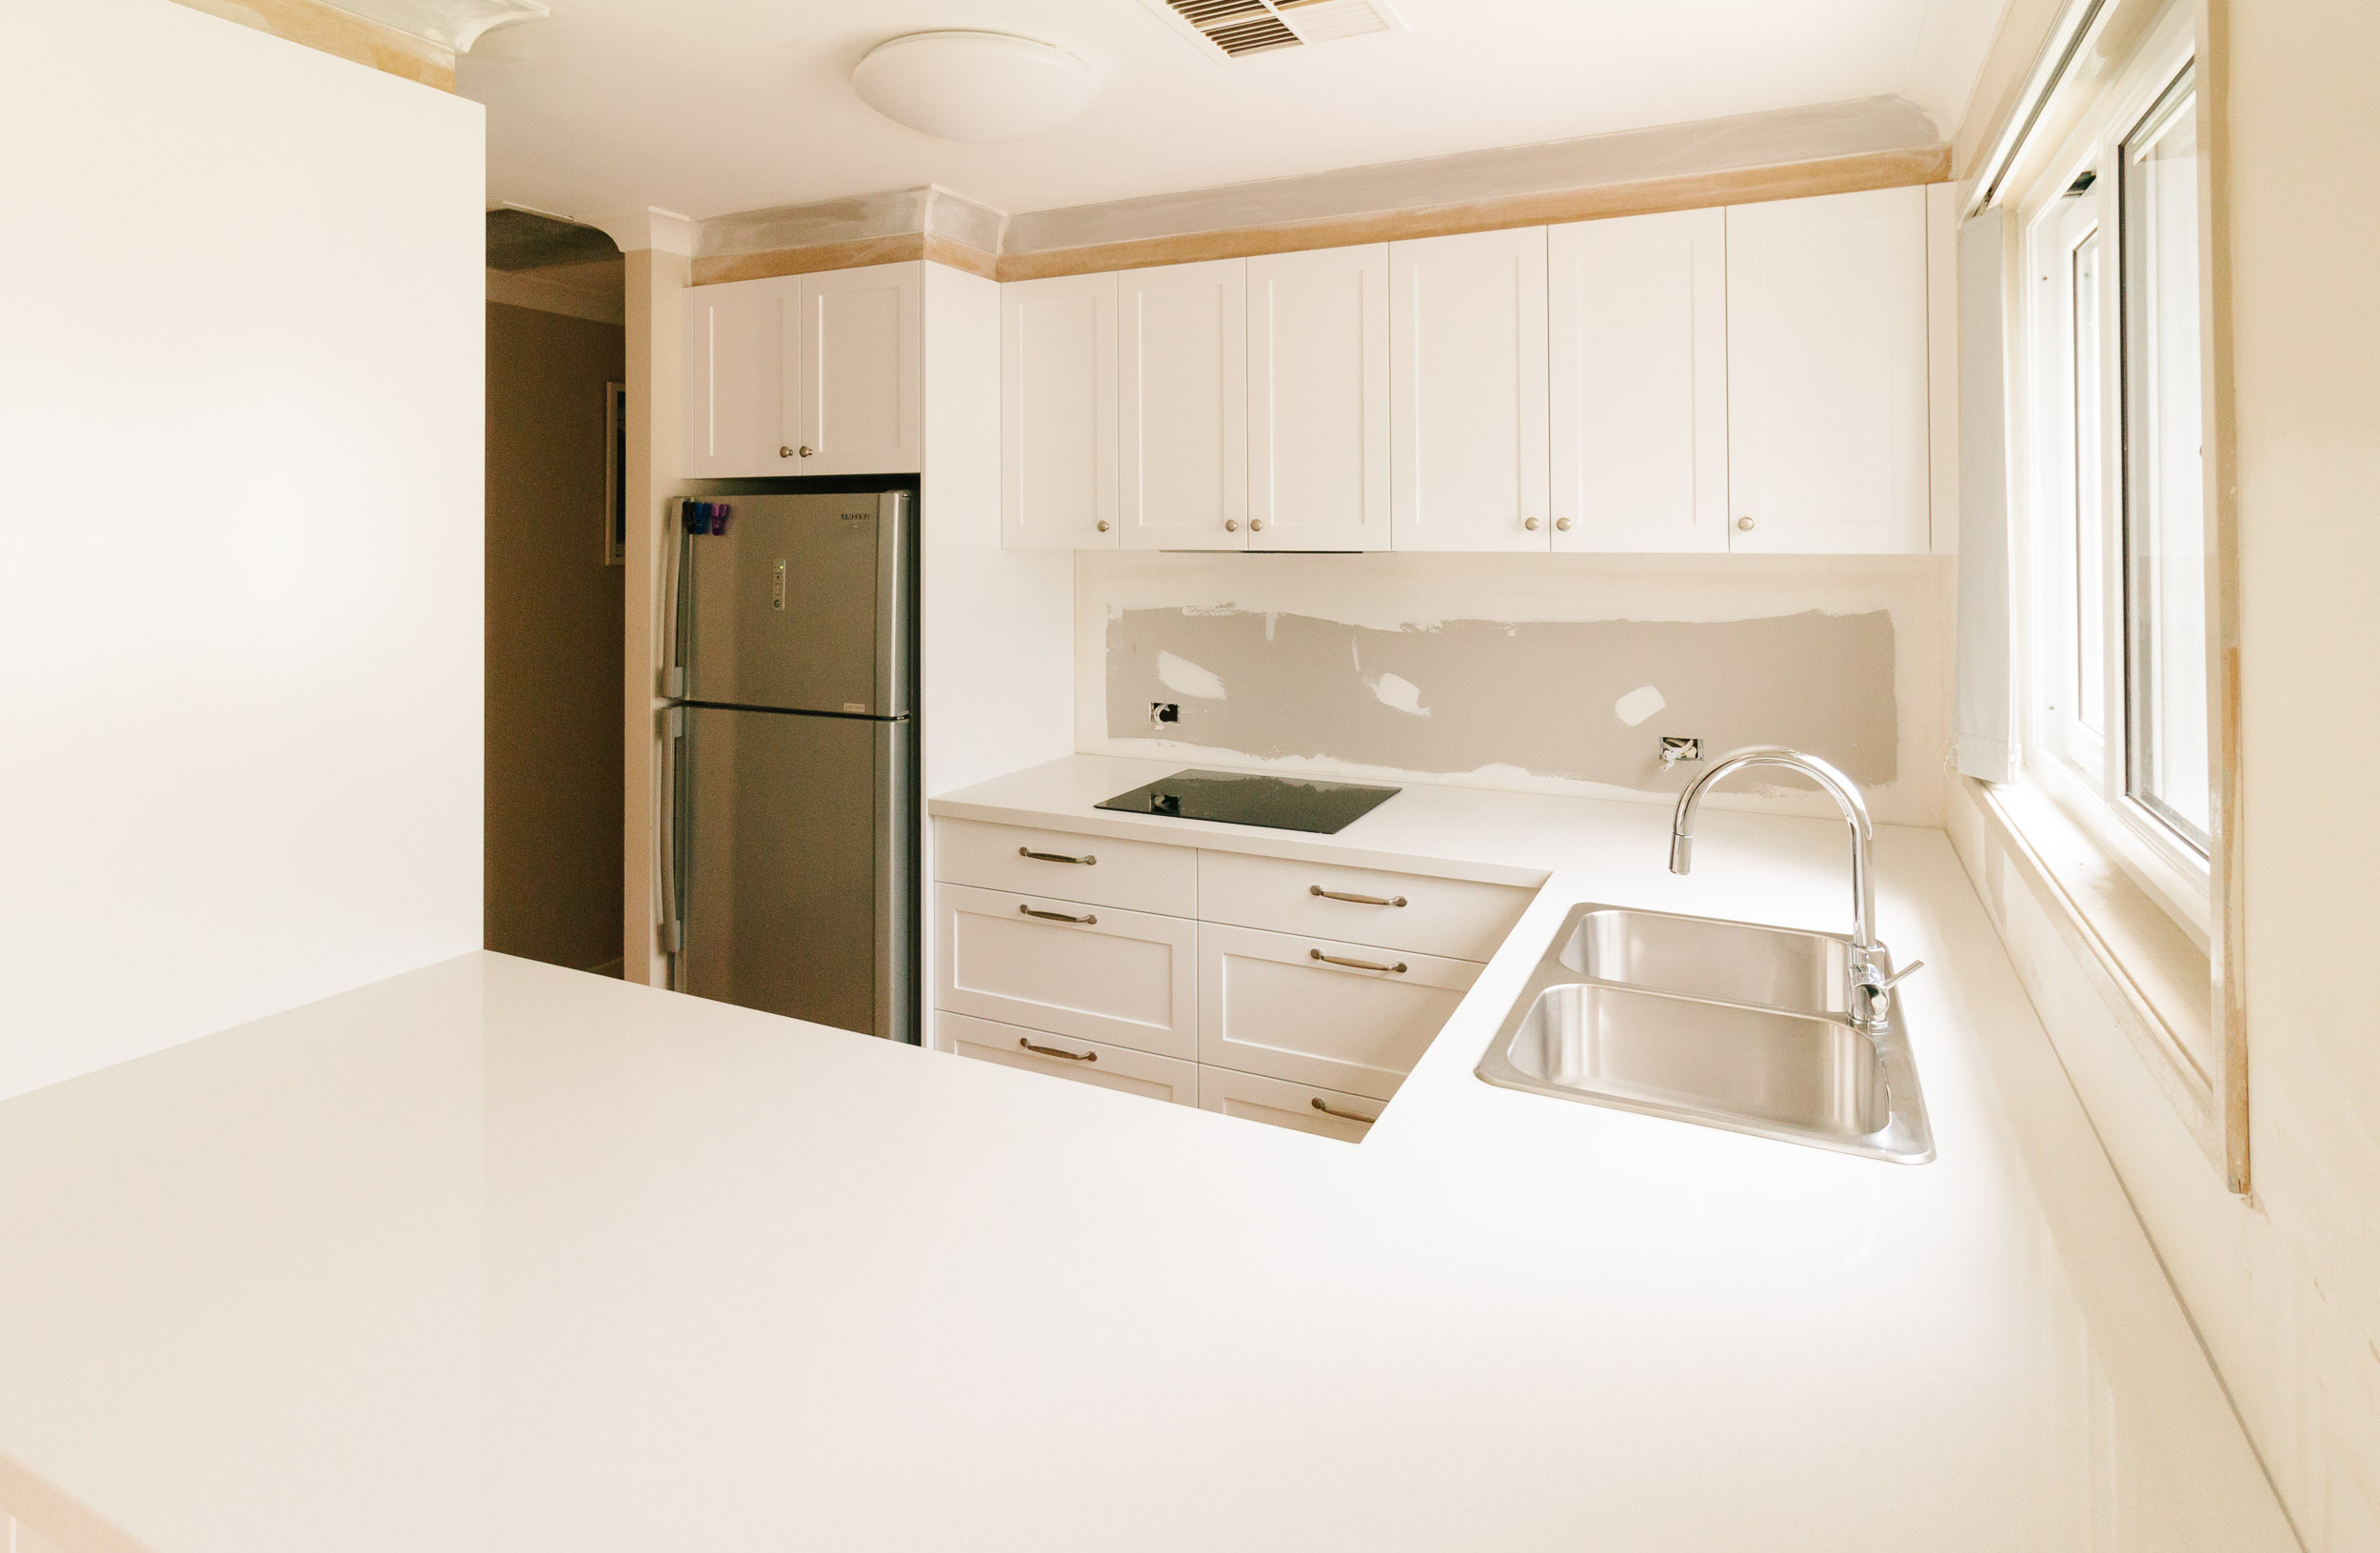
The benchtops were installed today, and the sink and cooktop put into place, though neither were hooked up.
You guys, it’s starting to look like we have a real kitchen now!
The cooktop was about the same size as our previous one, perhaps slightly narrower due to not needing the control knobs on the side, but it looks hilariously smaller since the benches are so much larger.
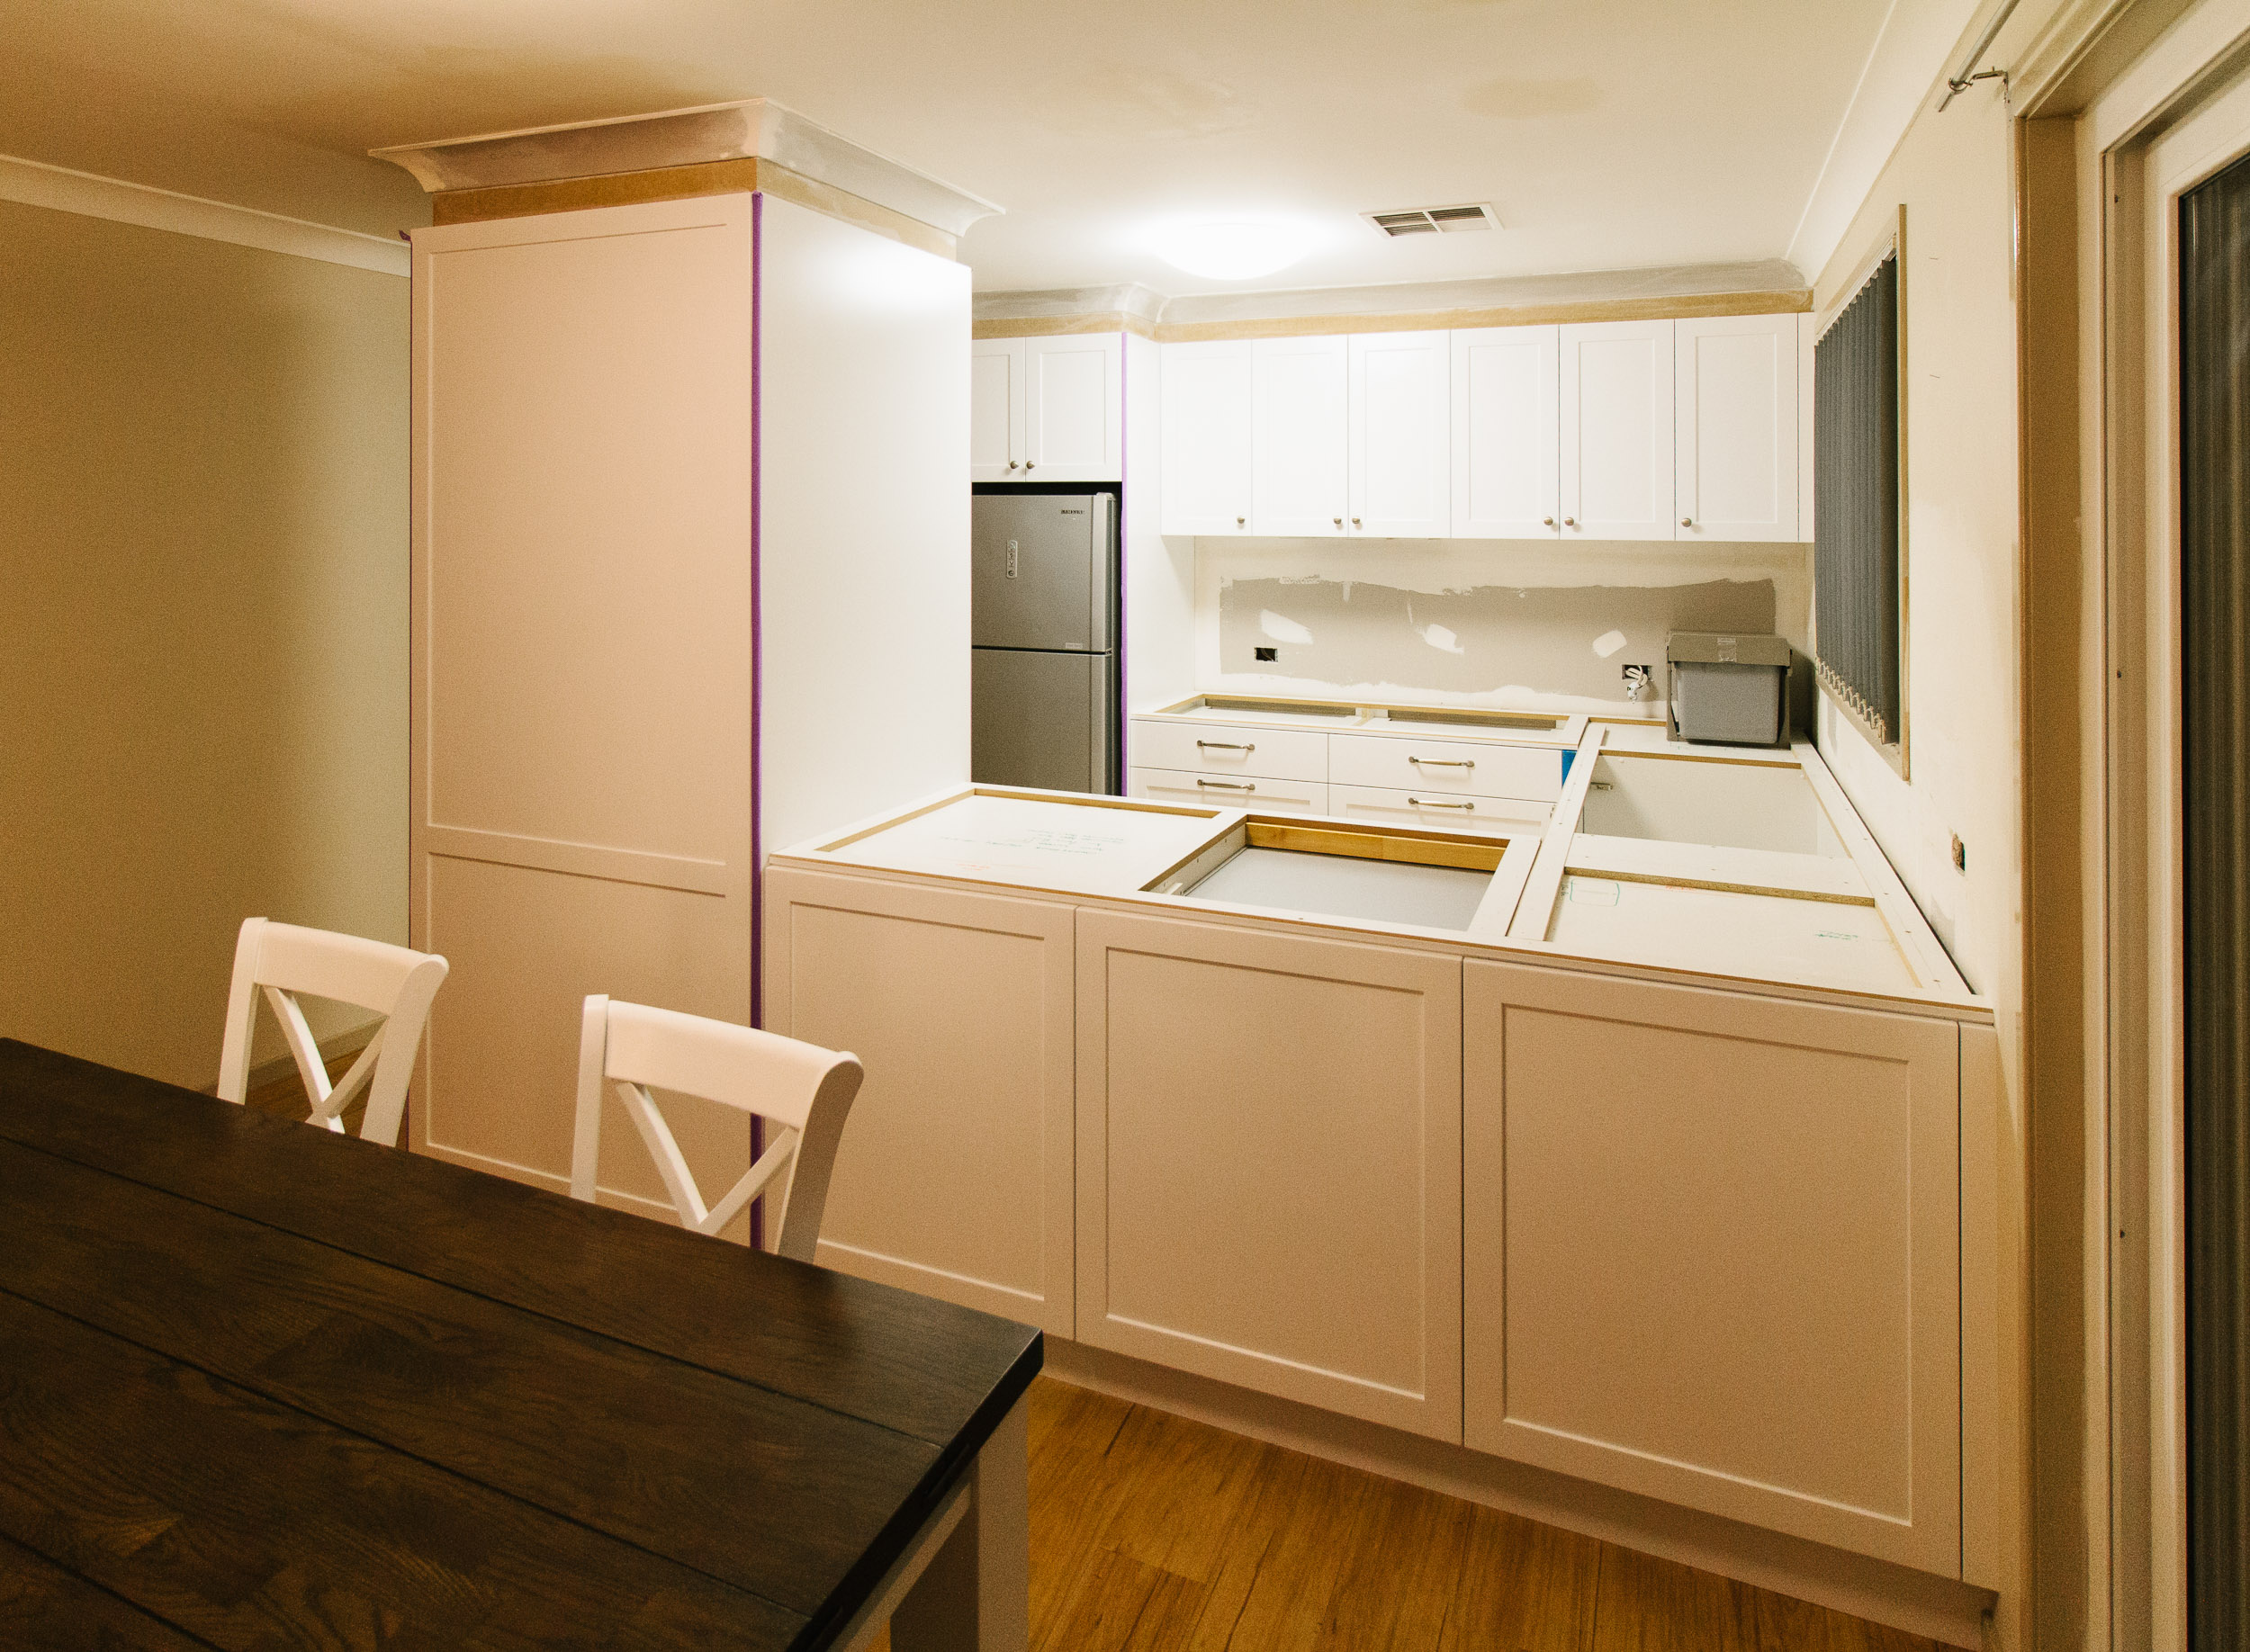
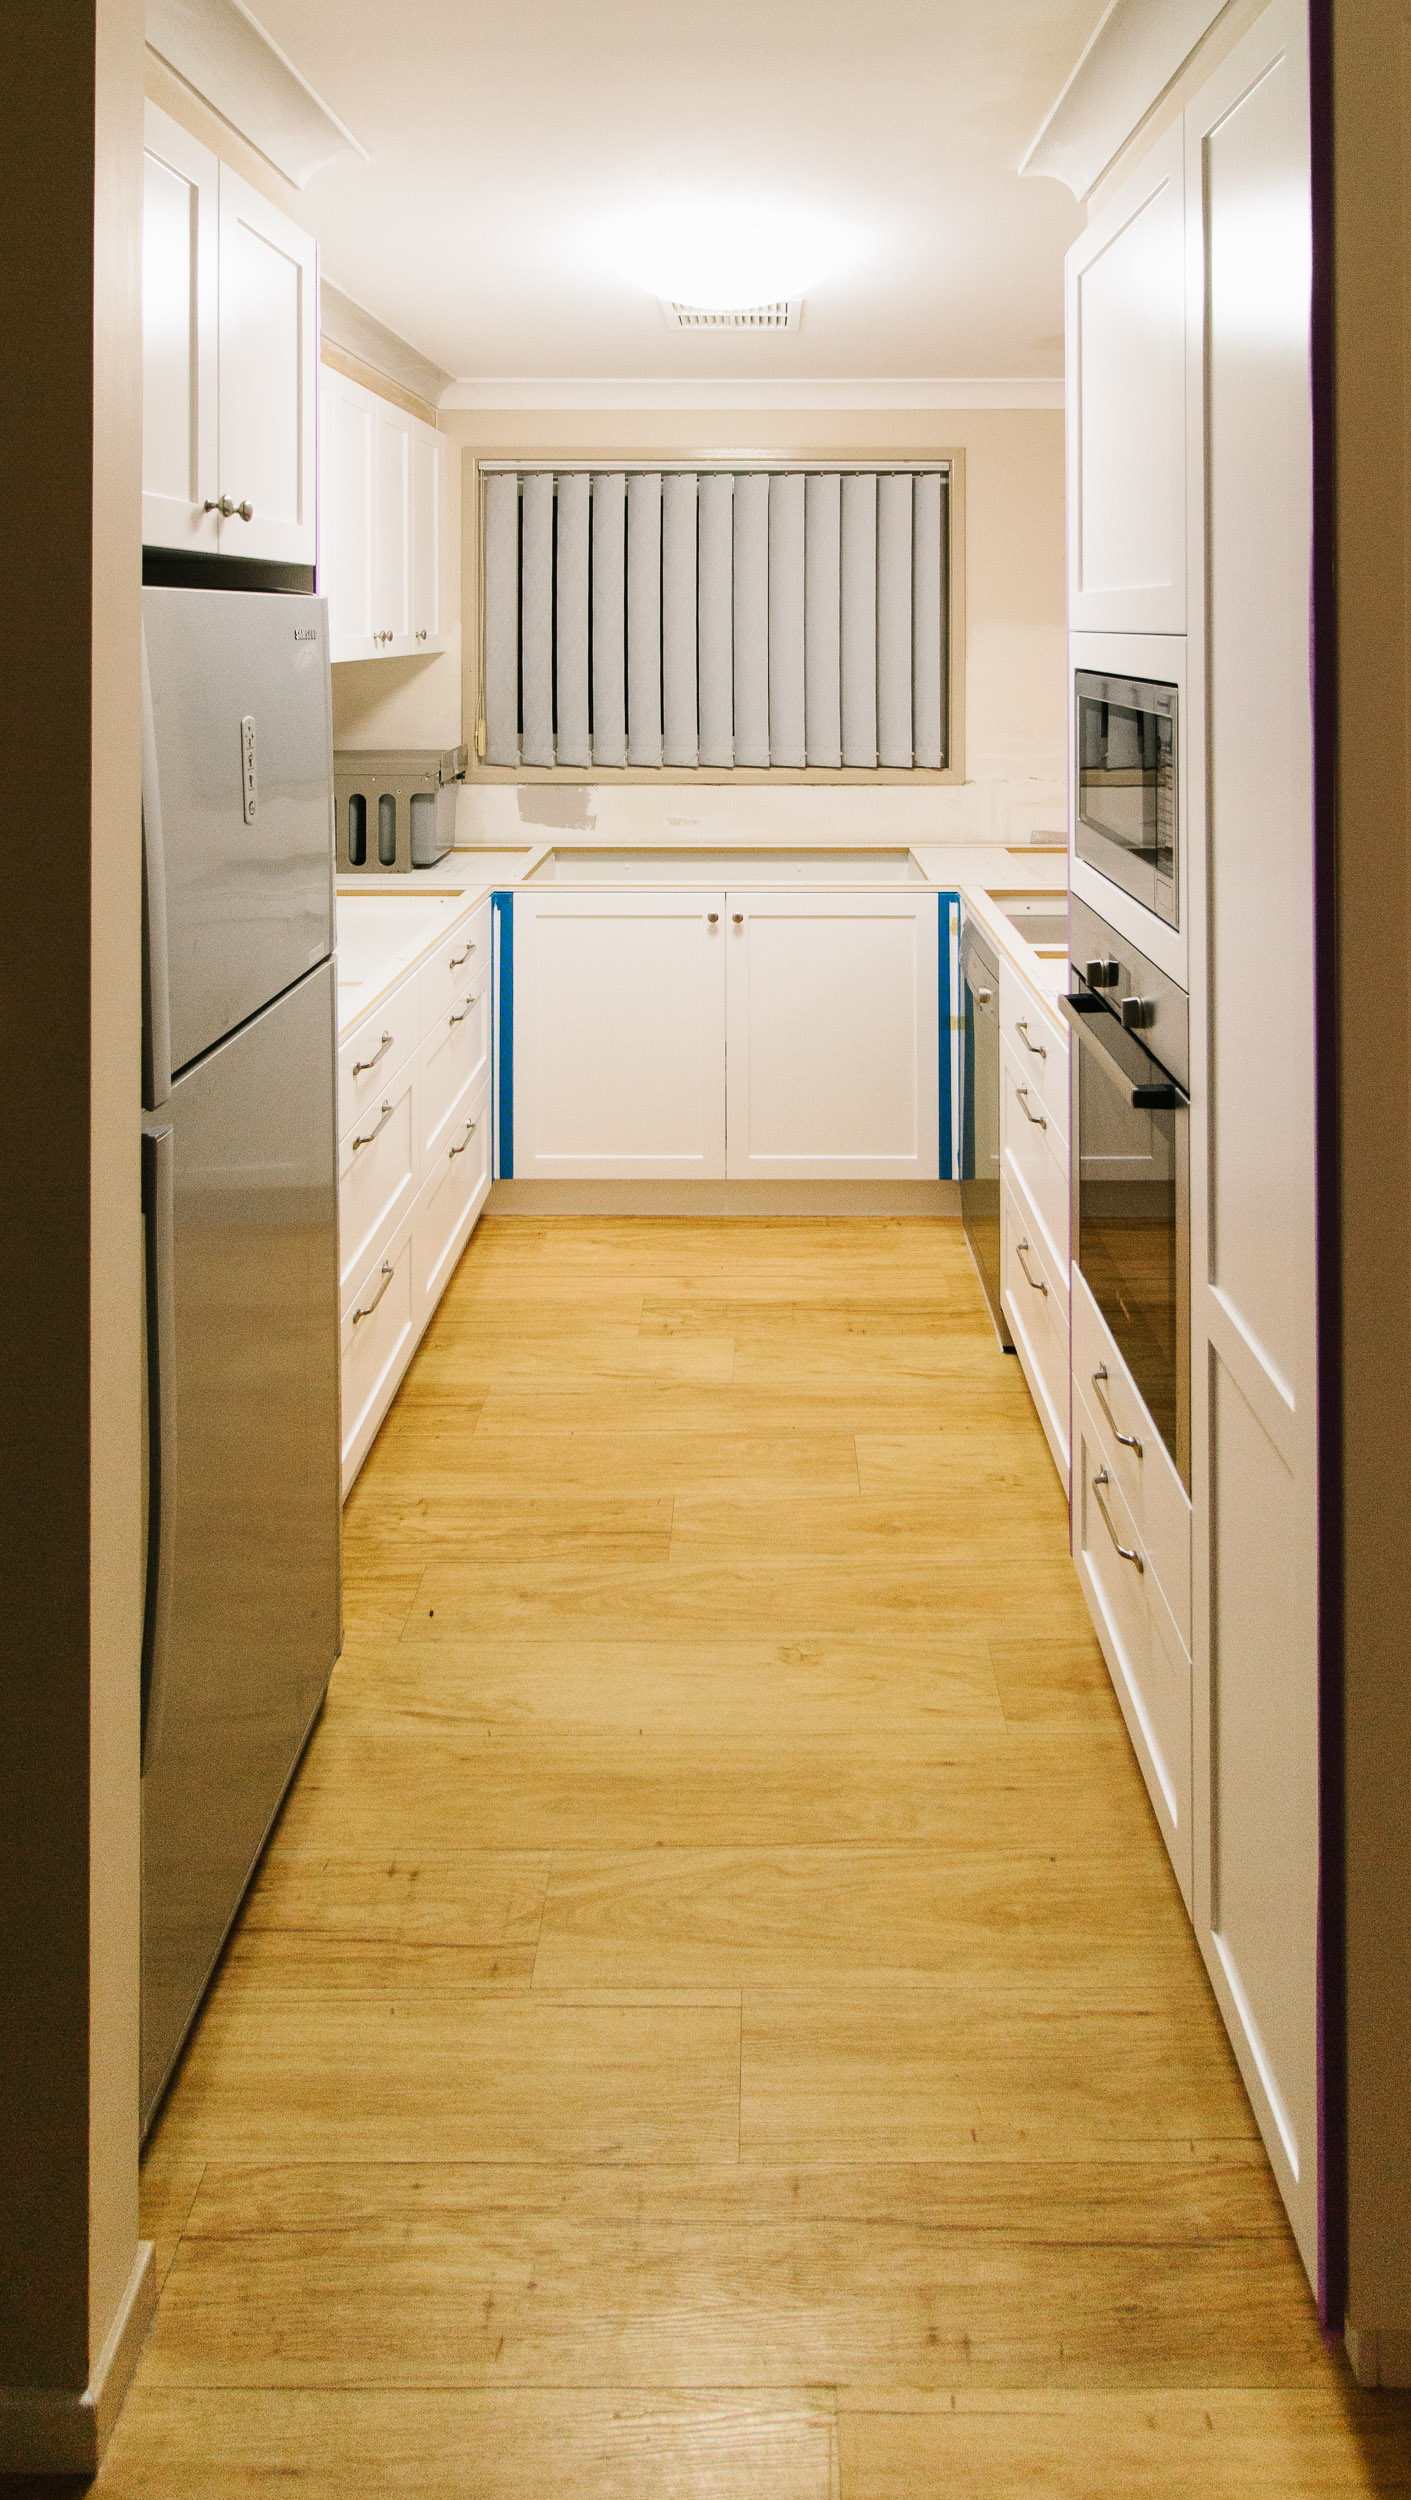
The kitchen people were finished with the cabinetry today so we’re back at home!
And OH MY GOD, they have done an unbelievably good job. The kitchen looks amazing and they haven’t even put the benchtops on yet, nor done any of the tiling for the splashback (the blue and purple stripes in the picture are tape that they haven’t taken off yet).
It really shows up how shitty the old kitchen was (compare how this unfinished kitchen looks to the old one in my last post), and how utterly wasteful with space it was. There’s a bit less floor space than the old one, but so much more storage!