Here in New South Wales, last year’s bushfires over late spring and into summer were astoundingly bad, and there were days where Sydney had the poorest air quality on the entire planet. Everyone was watching the PM2.5 values, and there were days where Kristina couldn’t go outside because of her asthma. I figured it’d be neat to set up a Raspberry Pi-powered air quality sensor and had ordered the sensor back in February but didn’t get around to putting it into service until now.
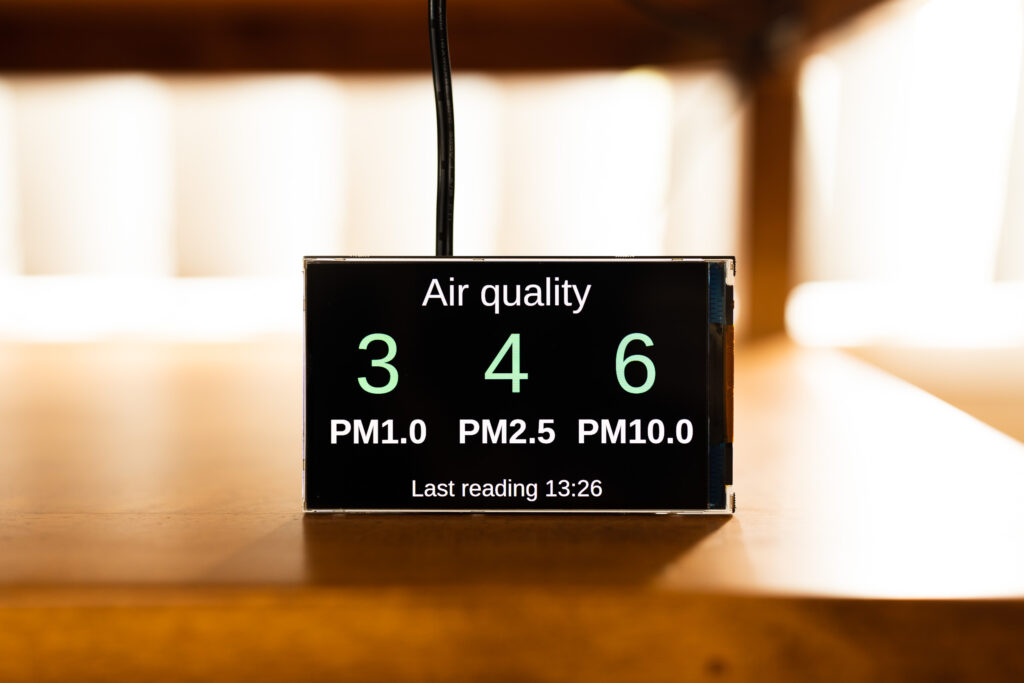
This is the bit that lives inside so we can easily see the latest reading:
It uses the same sort of setup as my Pimoroni display, and I updated my pi-home-dashboard to add a second page to display the values from the air quality reader.
The sensor itself is a Plantower PMS5003 sensor and is attached to the same Raspberry Pi that the outdoor temperature sensor is on. Adafruit’s instructions on getting it set up were pretty straightforward, and they also give some sample code for how to read it, but it’s in Python which I intensely dislike (I don’t really even have any strong feelings about the language itself one way or the other, but I’ve never had a good experience with the damn package management around it, so I do my damnedest to avoid it). I was able to write the same logic in TypeScript instead — though had to consult the clever people on Ars Technica because parsing the output from the sensor involves things like bit-shifting which is quite low-level and something I’m utterly unfamiliar with — and chucked the whole thing up on Codeberg. It takes ten readings and averages them, and has an HTTP endpoint for pulling the latest values.
I’ve set the front-end up so the colour of the numbers will change to orange and red depending on how bad the air quality is, but hopefully it’s a long while before we actually see that in action!
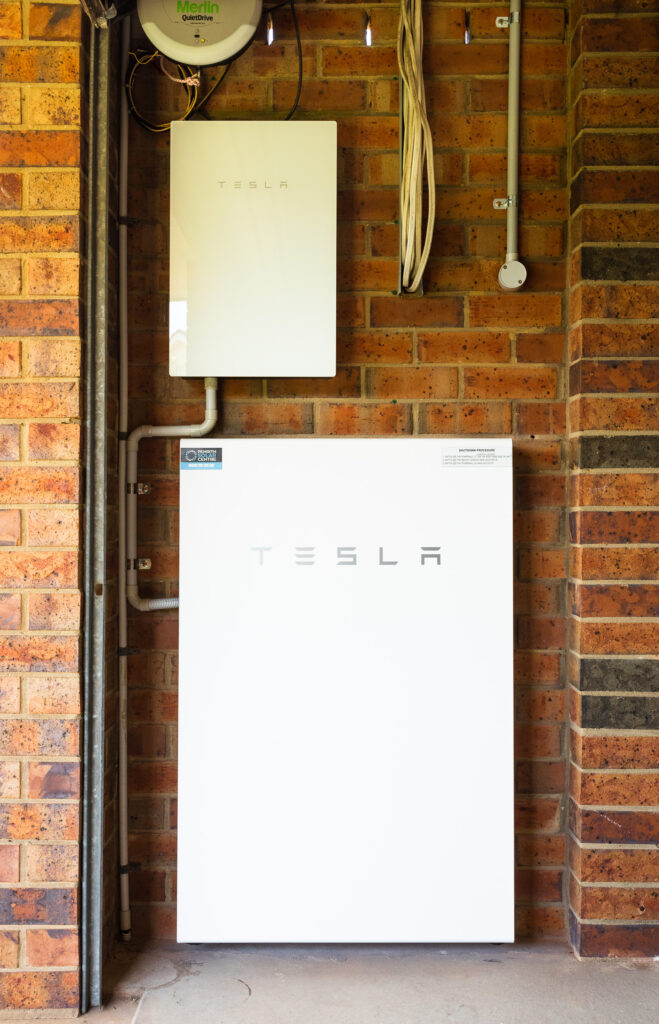
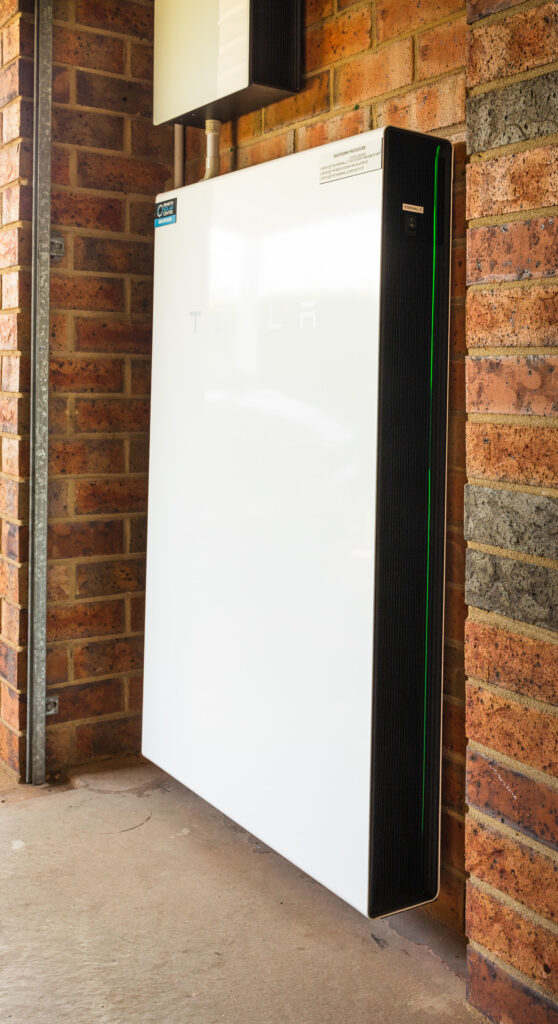
I posted back in March about our our shiny new solar panels and efforts to reduce our power usage, and as of two weeks ago our net electricity grid power usage is now next to zero thanks to a fancy new Tesla Powerwall 2 battery!
We originally weren’t planning on getting a battery back when we got our solar panels — and to to be honest they still don’t make financial sense in terms of a return on investment — but we had nine months of power usage data and I could see that for the most part the amount of energy the Powerwall can store would be enough for us to avoid having to draw nearly anything whatsoever from the grid*.
* Technically this isn’t strictly true, keep reading to see why.
My thinking was, we’re producing stonking amounts of solar power and are feeding it back to the grid at 7c/kWh, but have to buy power from the grid after the sun goes down at 21c/kWh. Why not store as much as possible of that for use during the night?
The installation was done by the same people who did the solar panels, Penrith Solar Centre, and as before, I cannot recommend them highly enough. Everything was done amazingly neatly and tidily, it all works a treat, and they fully cleaned up after themselves when they were done.
We have 3-phase power and the solar panels are connected to all three phases (⅓ of the panels are connected individually to each phase) and the Powerwall has only a single-phase inverter so is only connected to one phase, but the way it handles everything is quite clever: even though it can only discharge on one phase, it has current transformers attached to the other two phases so it can see how much is flowing through there, and it’ll discharge on its phase an amount equal to the power being drawn on the other two phases (up to its maximum output of 5kW anyway) to balance out what’s being used. The end result is that the electricity company sees us feeding in the same amount as we’re drawing, and thanks to the magic of net-metering it all balances out to next to zero! This page on Solar Quotes is a good explanation of how it works.
The other interesting side-effect is that when the sun is shining and the battery is charging, it’s actually pulling power from the grid to charge itself, but only as much as we’re producing from the solar panels. Because the Enphase monitoring system doesn’t know about the battery, it gives us some amusing-looking graphs whereby the morning shows exactly the same amount of consumption as production up until the battery is fully-charged!
We also have the Powerwall’s “Backup Gateway”, which is the smaller white box in the photos at the top of this post. In the event of a blackout, it’ll instantaneously switch over to powering us from the battery, so it’s essentially a UPS for the house! Again, 3-phase complicates this slightly and the Powerwall’s single-phase inverter means that we can only have a single phase backed up, but the lights and all the powerpoints in the house (which includes the fridge) are connected to the backed-up phase. The only things that aren’t backed up are the hot water system, air conditioning, oven, and stove, all of which draw stupendous amounts of power and will quickly drain a battery anyway.
We also can’t charge the battery off the solar panels during a blackout… it is possible to set it up like that, but there needs to be a backup power line going back from a third of the solar panels back to the battery, which we didn’t get installed when we had the panels put in in February. There was a “Are you planning on getting a battery in the next six months” question which we said no to. 😛 If we’d said yes, they would have installed the backup line at the time; it’s still possible to install it now, but at the cost of several thousand dollars because they need to come out and pull the panels up and physically add the wiring. Blackouts are not remotely a concern here anyway, so that’s fine.
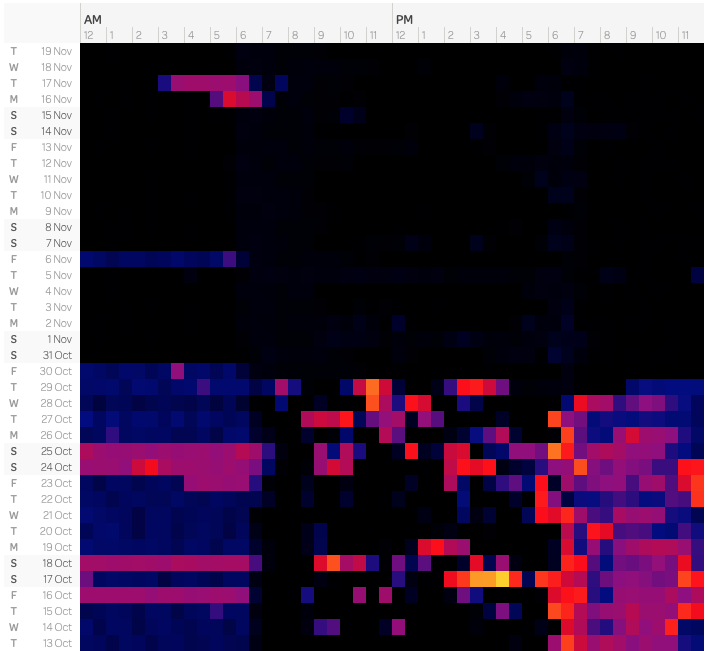
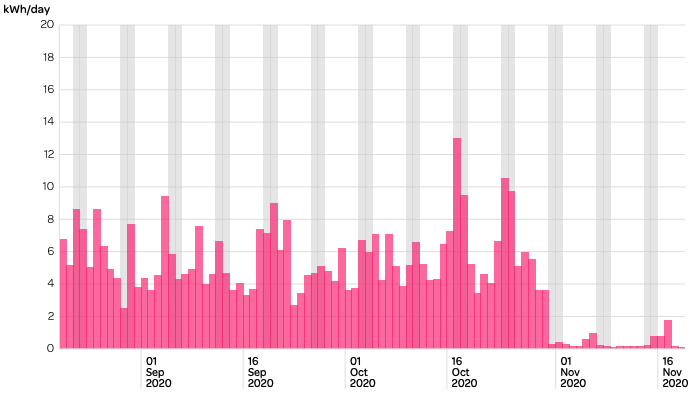
In the post back in March, I included three screenshots of the heatmap of our power usage, and the post-solar-installation one had the middle of the day completely black. Spot in the graph where we had the battery installed!
We ran out of battery power on the 6th of November because the previous day had been extremely dark and cloudy and we weren’t able to fully charge the battery from the solar panels that day (it was cloudy enough that almost every scrap of solar power we generated went to just powering the house, with next to nothing left over to put into the battery), and the 16th and 17th were both days where it was hot enough that we had the aircon running the whole evening after the sun went down and all night as well.
Powershop’s average daily use graph is pretty funny now as well.
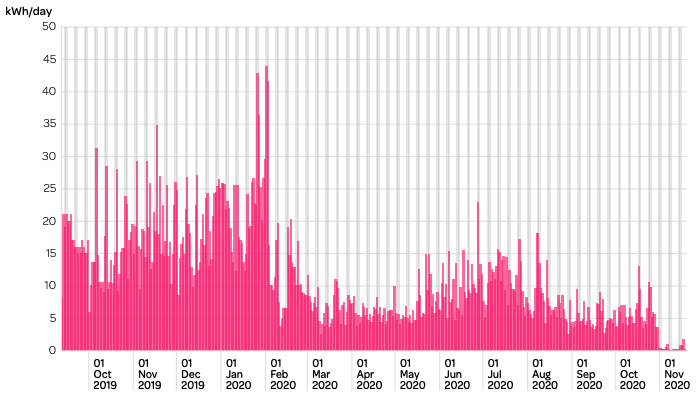
And even more so when you look all the way back to when we first had the smart meter installed, pre-solar!
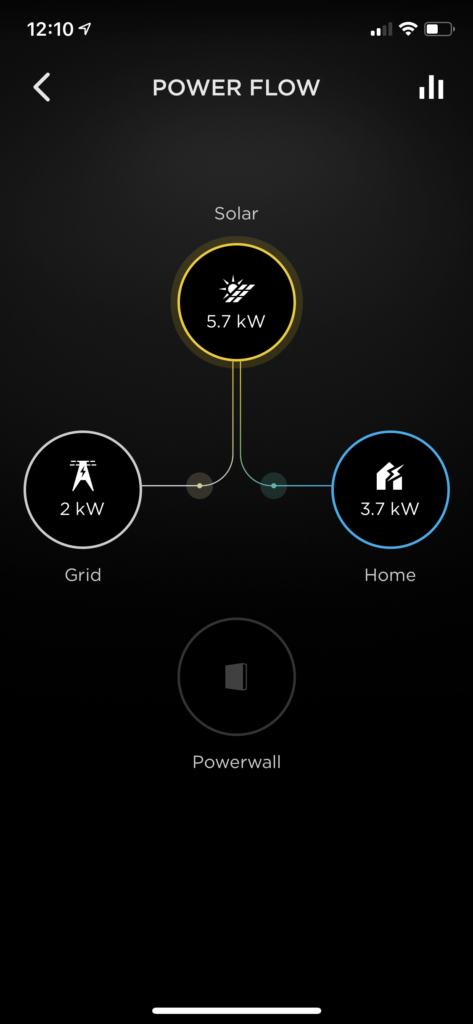
For monitoring the Powerwall itself, you use Tesla’s very slick app where you can see the power flow in real time. When the battery is actively charging or discharging, there’s an additional line going to or from the Powerwall icon to wherever it’s charging or discharging to or from.
You can’t tell from a screenshot of course, but those on the lines connecting the Solar to the Home and Grid icons animate in the direction that the power is flowing.
It also includes some historical graph data as well, but unfortunately it’s not quite as nice as Enphase’s, and doesn’t even have a website, you can only view it in the app. There’s a website called PVOutput that you can send your solar data to, and we have been doing that via Enphase since we got the solar panels installed, but the Powerwall also has its own local API you can hit to scrape the power usage and flows, and battery charge percentage. I originally found this Python script to do exactly that, but a) I always struggle to get anything related to Python working, and b) the SQLite database that it saves its data into kept intermittently getting corrupted, and the only way I’d know about it is by checking PVOutput and seeing that we hadn’t had any updates for hours.
So, I wrote my own in TypeScript! It saves the data into PostgreSQL, so far it’s been working a treat and it’s all self-contained in a Docker container. The graphs live here, and to see the power consumption and grid and battery flow details, click on the right-most little square underneath the “Prev Day” and “Next Day” links under the graph. Eventually I’m going to send all this data to my website so I can store it all there, but for the moment PVOutput is working well.
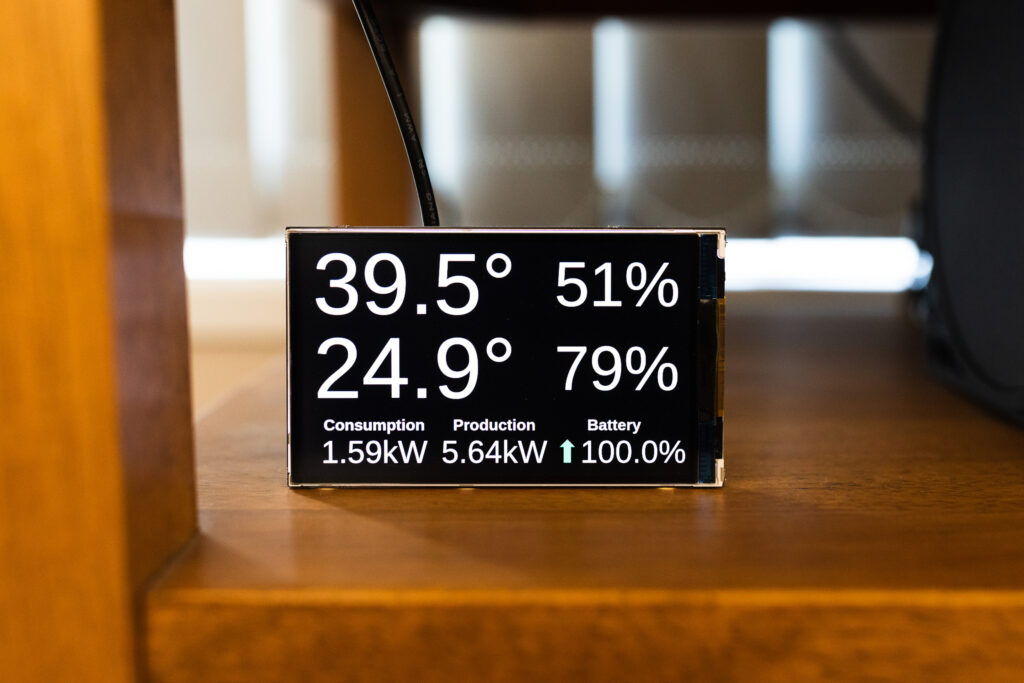
It also won’t shock anybody to know that I updated my little Raspberry Pi temperature/power display to also include the battery charge and whether it’s charging or discharging (charging has a green upwards arrow next to it, discharging has a red downwards arrow).
My only complaint with the local API is that it’ll randomly become unavailable for periods of time, sometimes up to an hour. I have no idea why, but when this happens the data in the Tesla iPhone app itself is still being updated properly. It’s not a big deal, and doesn’t actually affect anything with regards to battery’s functionality.
Kristina and I had a date night last night in which we ate trashy food and then took the Xbox 360 out of storage and fired up Guitar Hero: Warriors of Rock. It was an excellent time except that my Guitar Hero World Tour guitar had stopped registering downward strums, and only upwards strums worked.
I figured I’d pull it apart today and see what was up, and thanks to this guide I figured it out, and am documenting it here for posterity (my problem wasn’t one of the ones described in that guide, but it was very handy to see how to disassemble the thing in the first place).
Tools needed for disassembly
Philips-head #0 and #1 screwdriver
Torx T9 screwdriver
Process
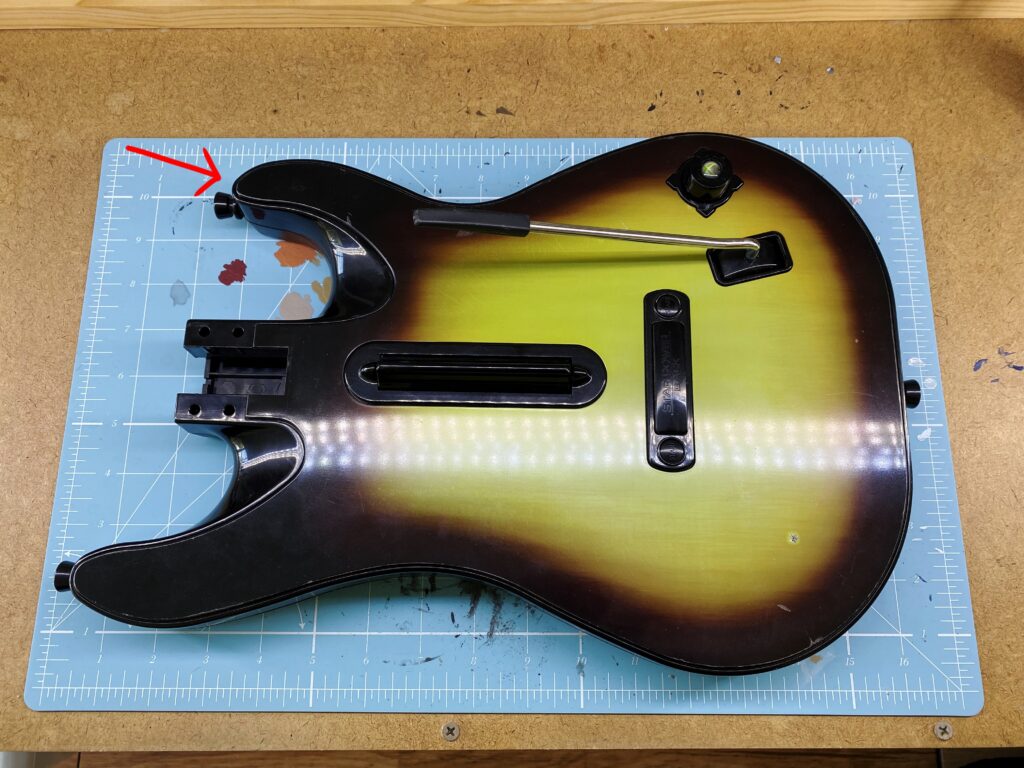
Firstly the neck needs to be removed, and the “Lock” button at the back towards the base of the guitar set to its unlocked position.
Next, the faceplate needs to be removed. This can be done by just getting a fingernail or a flathead screwdriver underneath either of the top bits of the body, pointed to with a arrow here, and gently prying it away from around the edges.
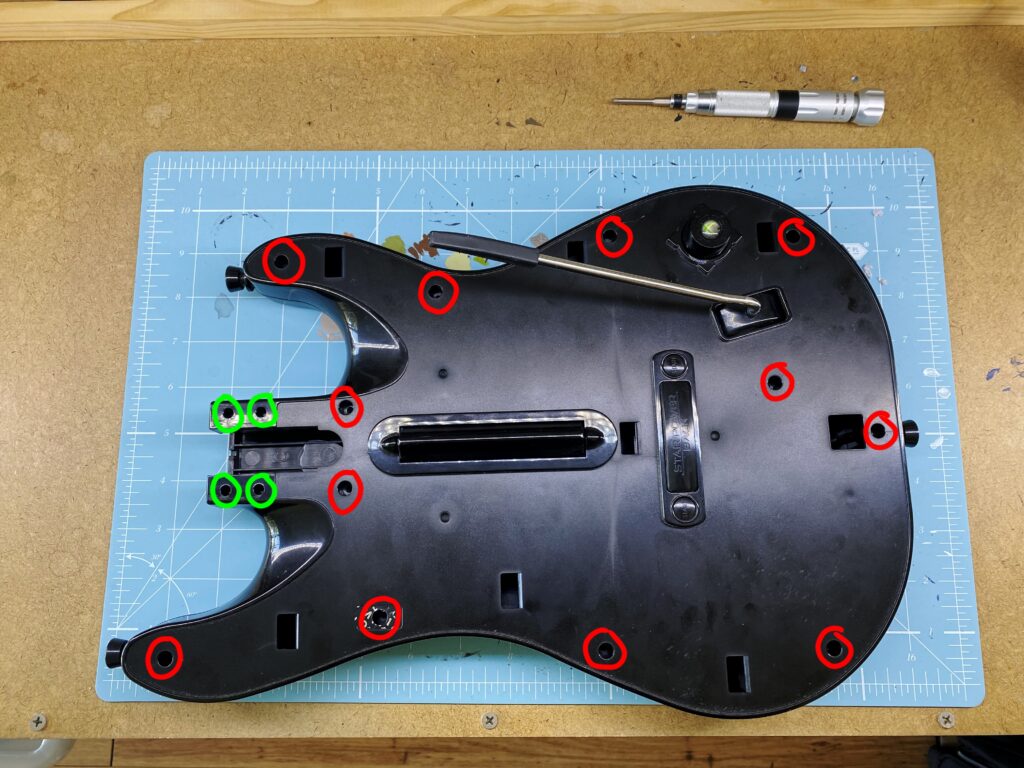
After that, there’s twelve Torx T9 screws to remove, circled in red, and another four Philips-head #0 ones, marked in green.
Once they’re all out, you can gently separate the front of the guitar where all the electronics live from the back of it.
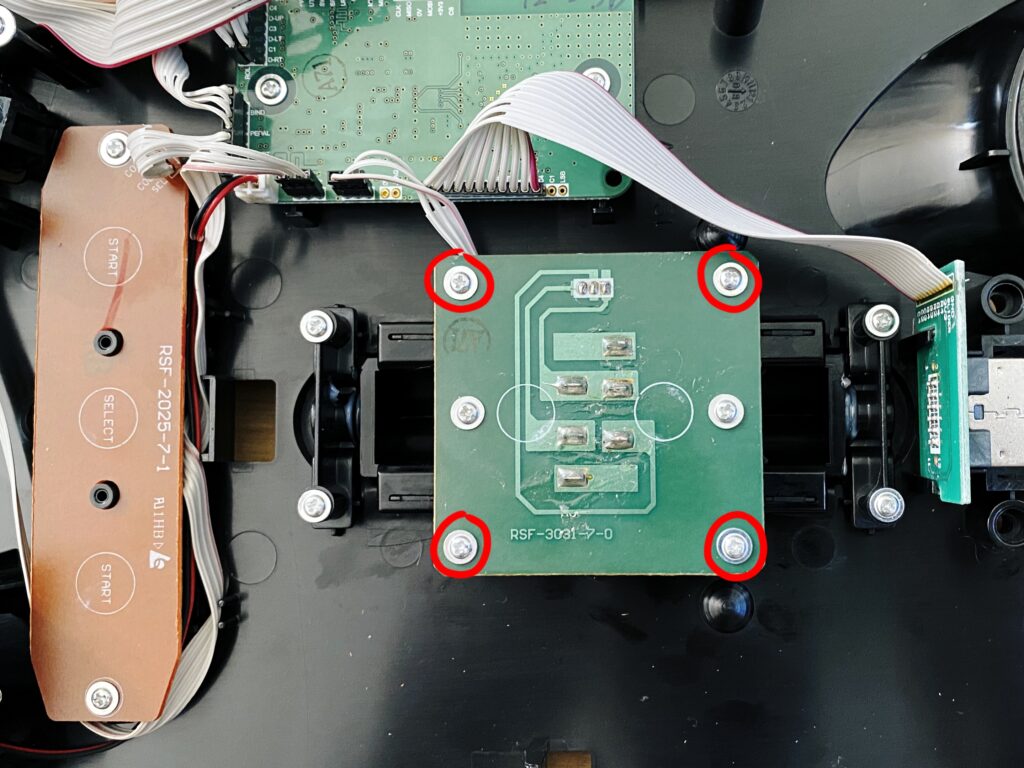
Next there’s four Philips-head #1 screws to remove to get the circuit board that contains the actual clicky-switches away from the strum bar itself. Leave the middle two alone as they attach the guides for the springs of the strum bar.
After this, it’s a bit of a choose-your-own-adventure, as what you do next really depends on what’s wrong with the strum bar. On the underside of the circuit board above are the switches, it’s definitely worth making sure they both click nice and solidly when you press on them directly. If they don’t, it’s apparently possible to source exact replacements (“275-016 SPDT Submini Lever Switch 5A at 125/250VAC”) and fix it with a bit of soldering, but thankfully this wasn’t necessary in my case.
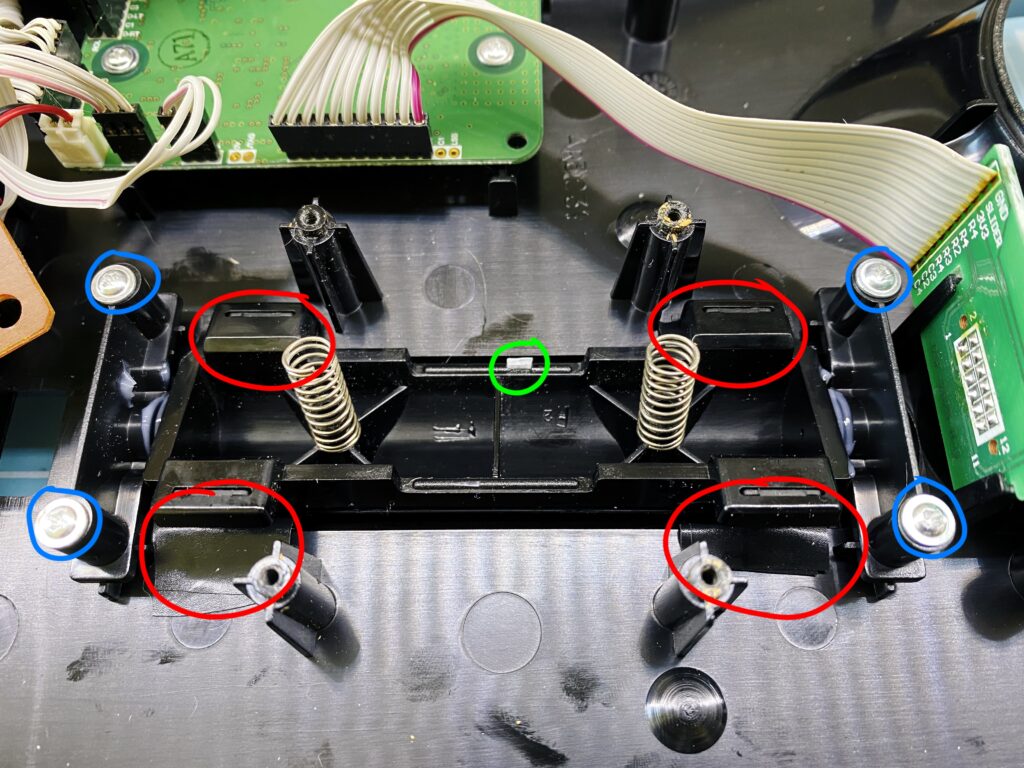
In the next image, undoing the Philips-head #1 screws circled in blue will allow you to take the strum bar assembly itself out and give it a re-lubricating (don’t use WD40, use actual proper lubricating grease) to make it rock back and forth a bit more smoothly. Another improvement you can make is adding a couple of layers of electrical tape to the areas I’ve circled in red. They’re where the strum bar physically hits the inside of the case, and the electrical tape can dampen the noise a bit.
What the strum bar problem ultimately ended being in my case is that the middle indented section where the switch rests against the strum bar to register a downstroke had actually worn away and could no longer press the switch in far enough to click. My solution, circled in green, was to chop a tiny piece of plastic from a Warhammer 40,000 miniature sprue and glue it—with the same plastic glue I use for assembling plastic miniatures—to the strum bar. Then I reassembled everything and it’s as good as new!
Back at the start of 2018 I blogged about my Raspberry Pi temperature display setup and it’s been pretty excellent and utterly reliable since then, but because of its small size — the display is only 2 inches — it wasn’t particularly visible from across the room. That, combined with the discovery that the Envoy power consumption monitoring system we had installed with the solar panels has a locally-accessible API that you can use to get real-time production and consumption data (which lives at http://<ip-of-the-envoy-box>/production.json?details=1), made me start looking into larger displays so I could include both temperature/humidity data and our power consumption.
My first port of call was the 2.7-inch version of the original 2-inch display. I ordered it on the 6th of April then… nothing showed up. I’d assumed the PaPiRus was MIA and had instead ordered a 4-inch, 800×480-pixel display in the form of Pimoroni’s HyperPixel4 display, the non-touch version. The Raspberry Pi registers it as a regular display so you run a full desktop environment windowing system on it rather than the way the PaPiRus works.
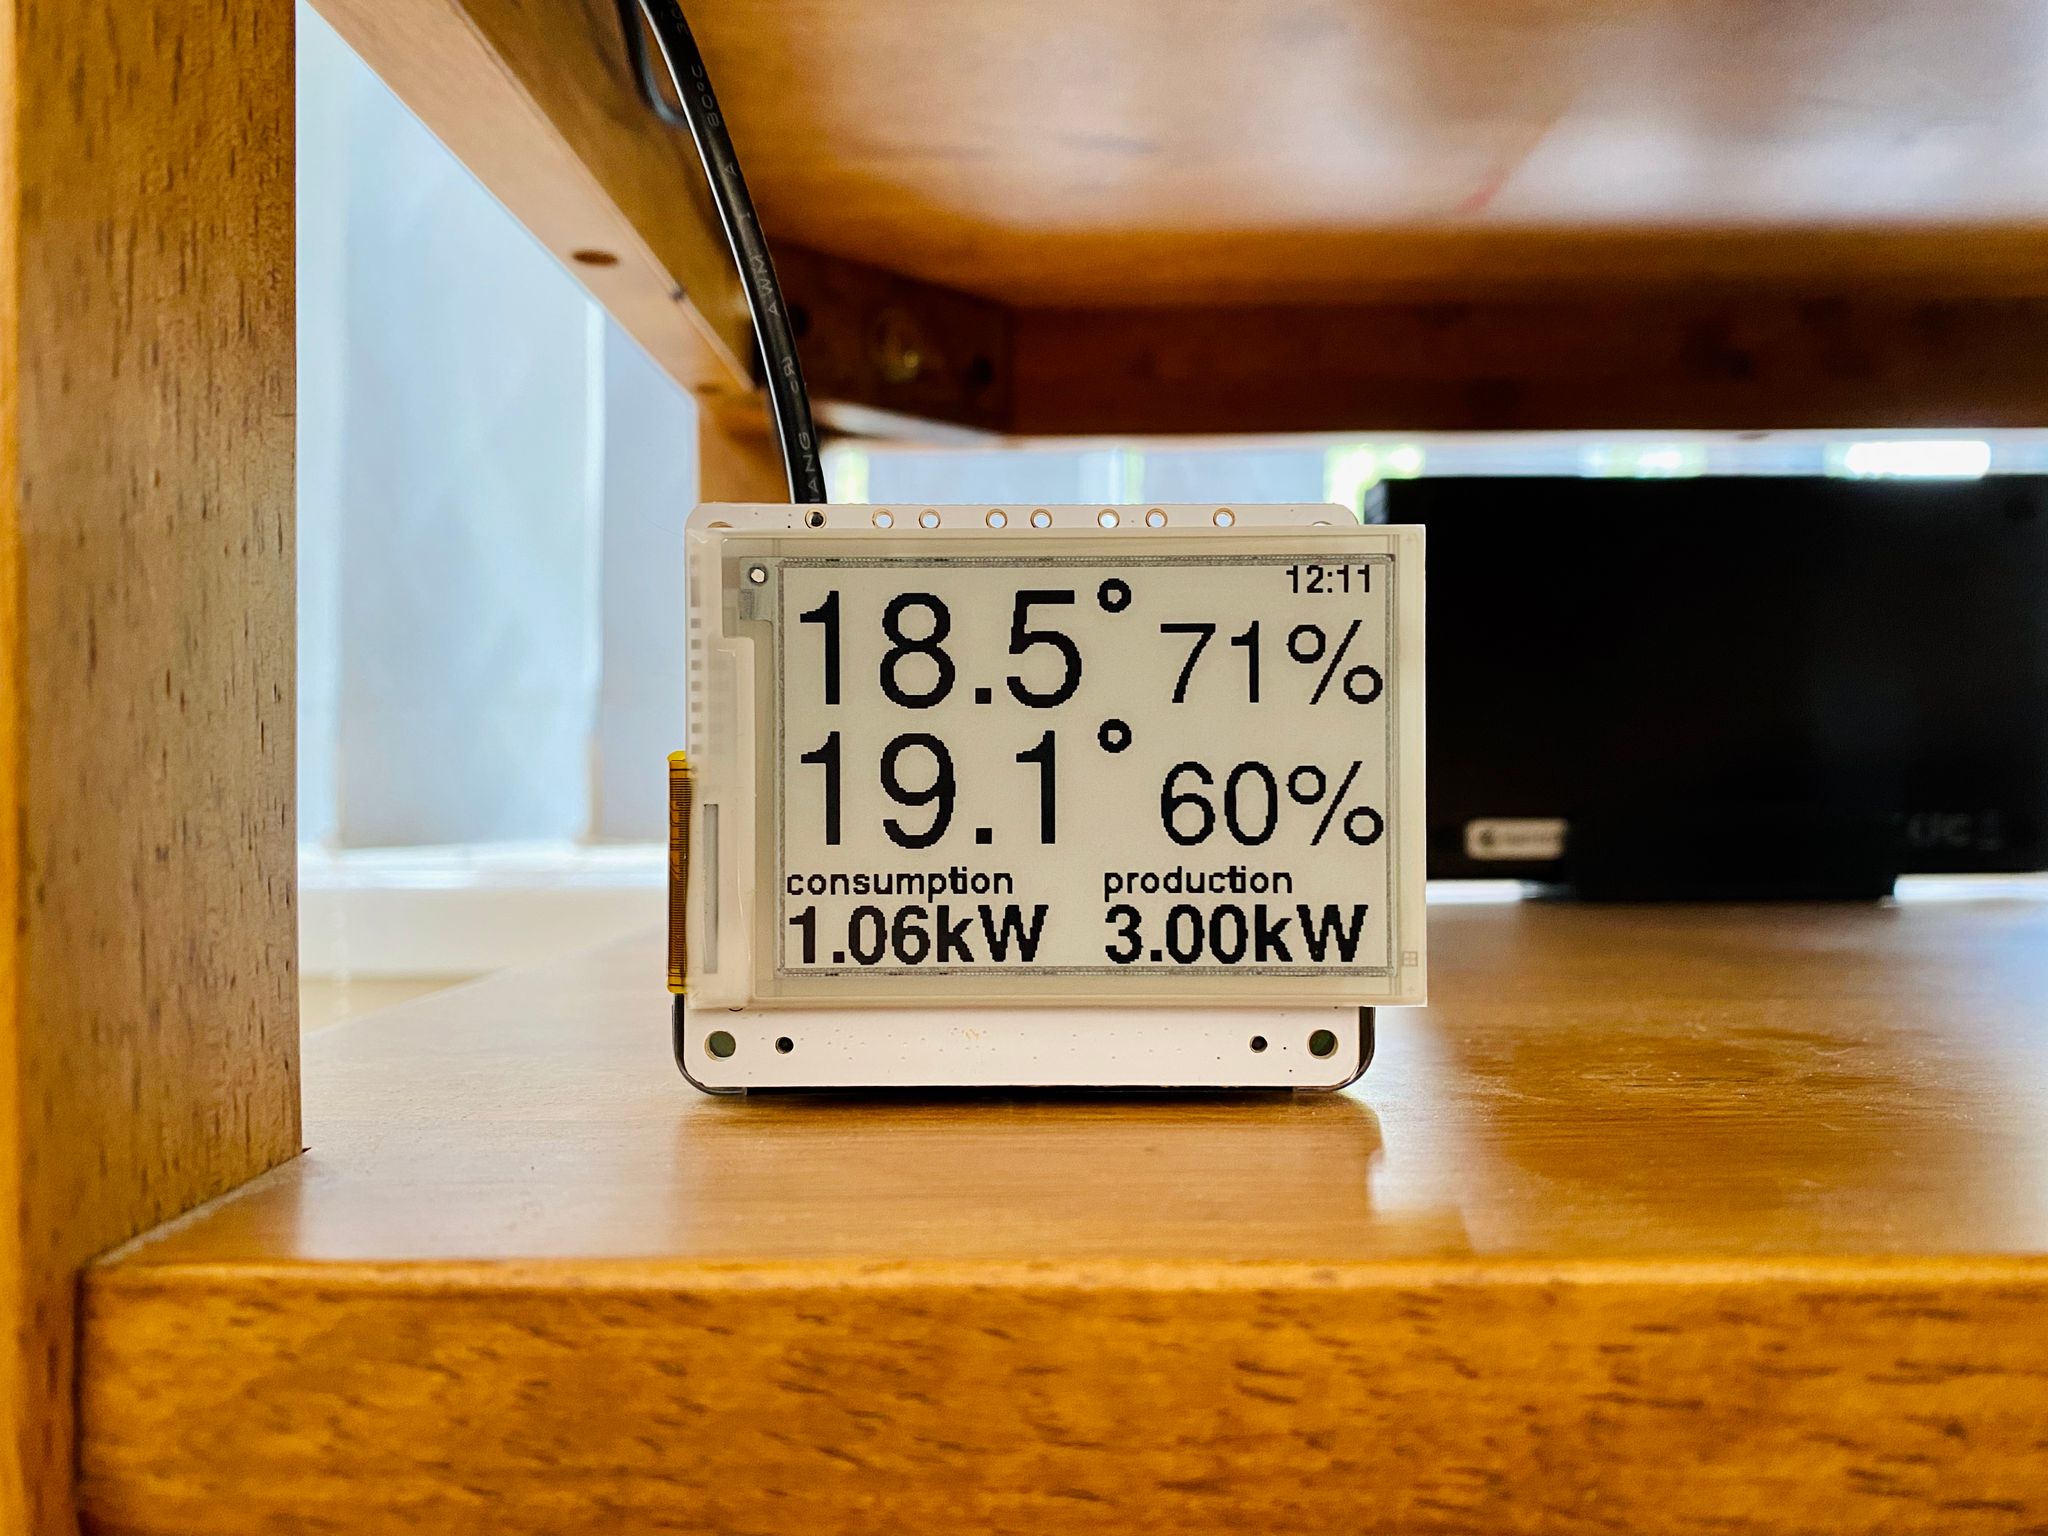
Of course, about a week after ordering the HyperPixel 4, the PaPiRus finally arrived! The 2.7-inch version of the PaPiRus is 264 pixels wide by 176 pixels high, so not exactly high-resolution. There’s actually quite a lot of freedom to tweak the position of the elements on screen pixel-by-pixel, but I quickly discovered that that’s extremely tedious when doing it directly on the Raspberry Pi itself because it takes several seconds for it to contact the required endpoints to pull in the data and then refresh the whole display. As well as writing text, the display can also display (1-bit) bitmap images, so I decided to change tack and instead of using the PaPiRus’s text API I wrote a probably-slightly-overengineered Node.js application that would run on the Raspberry Pi 4B, fetch the data from the outdoor and indoor sensors as well as the Envoy, use the Javascript Canvas API to lay everything out, and then convert it to a bitmap image that the Python script on the Pi Zero W would fetch every minute and then update the display with.
The biggest advantage of this system is that I could run it locally on my regular computer to quickly tweak the positioning without having to wait for the PaPiRus display to refresh each time, and I set it up so I could invert the colours to be white on black instead so I could clearly see the boundaries of the canvas. I put the code up if anyone is interested in poking through it, and the end result looks like this:
Having over-engineered my Node.js solution, the HyperPixel4 display arrived maybe a couple of weeks later! It’s extremely slick-looking, but unfortunately the little plastic nubs that are meant to keep the screen in place in the house aren’t actually big enough to hold it in, and I managed to have the display itself pop out and crack some of the wires that feed the display and it caused all sorts of display weirdness. I emailed the place that makes the HyperPixel display about it and they were super nice and helpful and sent me out a replacement display with no questions asked! While I was waiting for the new one to arrive, the old broken one was partially working enough that I could at least get everything up and running how I wanted it, anyway.
Because using the HyperPixel is the same as if you’d hooked up an HDMI display and were using the Pi as a regular computer, I started from the full-blown Raspbian desktop image, not the Lite one. It was relatively straightforward to get everything going (mostly just installing and configuring the driver from Pimoroni’s GitHub repository), but there were some additional things I needed to do to get everything working as I wanted. I settled on a Node.js backend and React frontend setup (the separate backend was necessary because CORS; I couldn’t hit the Envoy URL directly from the browser on the Pi, so I have to have the Node.js backend pull in the data and then feed it to the React app), both of which are running in a Docker image on the Raspberry Pi 4B.
By default the HyperPixel4 runs at full brightness, so I followed this to turn it way down, and also to set up a cron job to entirely turn the display off at midnight and turn it back on at 8am.
To get the Pi to open Chromium full-screen on boot, I followed these instructions.
Raspbian comes by default with a VNC server installed, just not enabled. To enable it and allow access directly from macOS’s “Connect to Server” dialog in the Finder:
Run sudo raspi-config, go to Interface Options > VNC and enable it.
Run vncpasswd -service to set a VNC password (note if it’s longer than eight characters, only the first eight are used when connecting).
Create the file /etc/vnc/config.d/common.custom with the contents: Authentication=VncAuth
Then Restart the VNC service with sudo systemctl restart vncserver-x11-serviced
And lastly, to disable the Pi from turning the screen off after activity, I followed these steps.
My ~/.config/lxsession/LXDE-pi/autostart ultimately ended up looking like this:
@lxpanel --profile LXDE-pi
@pcmanfm --desktop --profile LXDE-pi
point-rpi
@chromium-browser --start-fullscreen --start-maximized --app=http://fourbee:3003
@xset s off
@xset -dpms
@xset s noblank
@sudo /home/pi/Source/rpi-hardware-pwm/pwm 19 1000000 135000
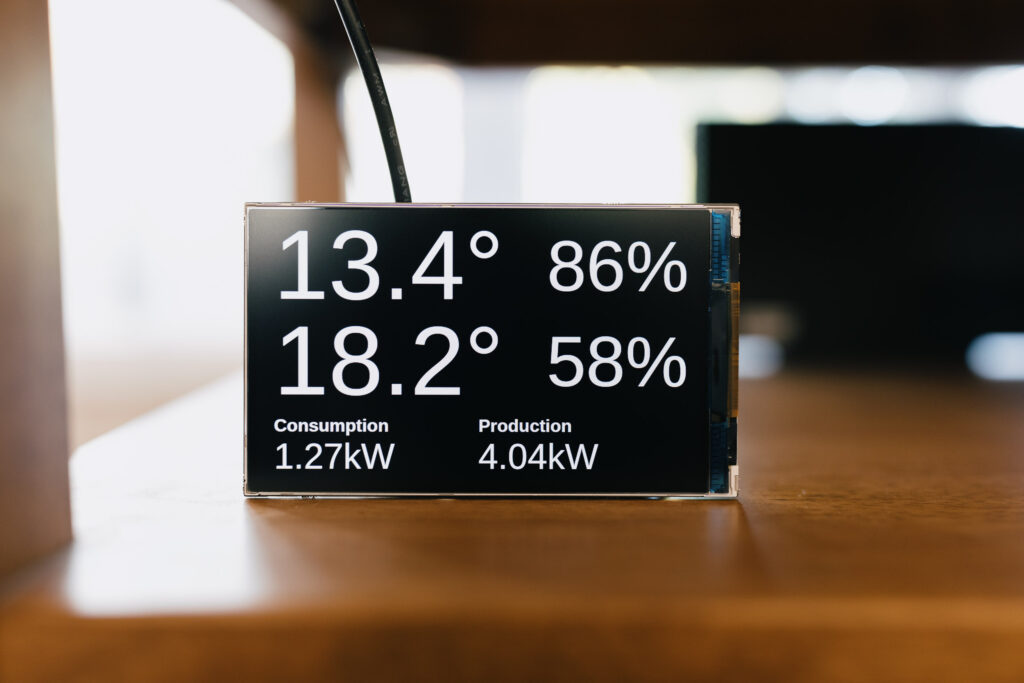
And the whole setup looks like this:
It’s quite the improvement in visibility and I can easily read it from all the way in the kitchen! It updates itself automatically every 30 seconds, and there’s no e-ink full-display-refresh screen-blanking when it does.
Three years ago I posted about how I’d gone back and recovered all my old websites I’d published over the years and packed them up into a Docker image, and last year I’d idly mused that I should go back and recover the multitude of websites that I’d designed but never actually uploaded anywhere. I finally got around to doing that over the weekend, and they’re all up on archive.virtualwolf.org! Some are the original HTML source, some are just the Photoshop mockups, but that now contains the almost sum total of every single website I’d created (and there’s a lot of them). The only one missing is the very very first one… The Dire Marsh news updates are from early 1998, but I’d copied most of the layout from the previous site as evidenced by the (broken) visitor at the left that says “<number> half-crazed Myth fanatics have visited this site since 21/12/97”.
Prior to building way too many websites, I’d been introduced to the Warhammer 40,000 and Dune universes when I was 13 and had immediately proceed to totally rip them off get inspired and write my own little fictional universe along the same lines. This was all in 1996 and very early 1997, I even still have all the old files sitting in my home folder with the original creation dates and everything, but didn’t have anything that could open them as they were a combination of ancient Microsoft Word writings — old enough that Pages didn’t recognise them — and ClarisWorks drawing documents — ClarisWorks had a vector-based drawing component to it as well as word processing. I ended up going down quite the rabbit hole in getting set up to bring them forwards into a modern readable format, and figured I’d document it here in case it helps anyone in future.
Running Mac OS 9 with SheepShaver
The very first hurdle was getting access to Mac OS 9 to begin with. I originally started out with my Power Mac G4 that I’ve posted about previously but unfortunately it seems like the power supply is on the way out, and it kept shutting down (people have apparently had success resurrecting these machines using ATX power supplies but I haven’t had a chance to look into it yet). Fortunately, there’s a Mac OS 9 emulator called SheepShaver that came to the rescue.
Download the latest SheepShaver and the “SheepShaver folder” zip file from the emaculation forums.
You need an official “Mac OS ROM” file that’s come from a real Mac or been extracted from the installer. Download the full New World ROMs archive from Macintosh Repository, extract it, rename the 1998-07-21 - Mac OS ROM 1.1.rom file to Mac OS ROM and drop it into the SheepShaver folder.
Download the Mac OS 9.0.4 installer image from Macintosh Repository (SheepShaver doesn’t work with anything newer).
Follow the SheepShaver setup guide to install Mac OS 9 and set up a shared directory with your Mac. Notes:
It defaults to assigning 16MB of RAM to the created virtual machine, be sure to increase it to something more than 32MB.
Disable the “Update hard disk drivers” box in the Options sections of the Mac OS 9 installer or the installer will hang (this is mentioned in the setup guide but I managed to miss it the first time around).
When copying files from the shared directory, copy them onto the Macintosh HD inside Mac OS 9 directly, not just the Desktop, or StuffIt Expander will have problems decompressing files.
Recovering ClarisWorks files
This was the bulk of the rabbit hole, and if you’re running macOS 10.15, you’ve got some additional rabbit hole to crawl through because the software needed to pull the ClarisWorks drawing documents into the modern era, EazyDraw Retro (scroll down to the bottom of the page to find the download link), is 32-bit only which means it doesn’t run under 10.15, only 10.14 and earlier.
Download the AppleWorks 6 installer CD image (it has to be added in SheepShaver’s preferences as a CD-ROM device) and install it.
Open each of the ClarisWorks documents in AppleWorks, you’ll get a prompt saying “This document was created by a previous version of AppleWorks. A copy will be created and ‘[v6.0]’ will be added to the filename”. Click OK and save the copy back onto the shared SheepShaver drive with a .cwk file extension.
Step 2: Install macOS 10.14 inside a virtual machine
This entire step can be skipped if you haven’t upgraded to macOS 10.15 yet as EazyDraw Retro can be run directly.
Installing 10.14 inside a virtual machine requires a bootable disk image of the installer, so that needs to be created first.
Download DosDude1’s Mojave patcher and run it (you’ll likely need to right-click on the application and choose Open because Gatekeeper will complain that the file isn’t signed).
Go into the Tools menu and choose “Download macOS Mojave” to download the installer package, save it into your Downloads folder.
Open Terminal.app and create a bootable Mojave image with the following commands:
Once you’ve got the disk image, fire up your favoured virtual machine software and install Mojave in it.
Step 3: Convert AppleWorks 6 files to a modern format
The final part to this whole saga is the software EazyDraw Retro which can be downloaded from their Support page. It has to be the Retro version because the current one doesn’t support opening AppleWorks documents (I’m guessing whatever library they’re using internally for this is 32-bit-only and can’t be updated to run on Catalina or newer OSes going forwards, so they dropped it in new versions of the software). It can export to a variety of formats, and has its own .eazydraw format that the non-Retro version can open.
Unfortunately EazyDraw isn’t free, but you can get a temporary nine-month license for US$20 (or pay full price for a non-expiring license if you’re going to be using it for anything else except this). It did work an absolute treat though, it was able to import every one of my converted AppleWorks 6 documents and I saved them all out as PDFs. There were a few minor tweaks required to some of the text boxes because the fonts were different between the original ClarisWorks document and the AppleWorks one and there were some overlaps between text and lines, but that was noticeable as soon as I’d opened them in AppleWorks and wasn’t the fault of EazyDraw’s conversions.
Converting Aldus SuperPaint files
There were only two of my illustration files that were done in anything but ClarisWorks, and they were from Aldus SuperPaint. Version 3.5 is available from Macintosh Repository and pleasingly it’s able to export straight to TIFF so I could convert them under current macOS from that straight to PNG. There were some minor tweaks required there as well, but it was otherwise quite straightforward.
Converting Microsoft Word files
All my non-illustration text documents were written with Microsoft Word 5.1 or 6, but the format they use is old enough that Pages under current macOS doesn’t recognise it. I wouldn’t be surprised if the current Word from Office 365 could open them, but I don’t have it so I went the route of downloading Word 6 from Macintosh Repository which can export directly out to RTF. TextEdit under macOS opens them fine and from there I saved them out as PDF.
History preserved!
Following the convoluted process above, I was able to convert all my old files to PDF and have chucked them into the Docker image at archive.virtualwolf.org as well (start at the What, even more rubbish? section), so you can marvel at my terrible fan fiction world-building skills!
I’m not deluding myself into thinking that this is any sort of valuable historical record, but it’s my record and as with the websites, it’s fun to look back on the things I’ve done from the past.
I had blogged back in October of last year about setting up DNS over HTTPS, and it’s been very reliable, except for the parts where I’ve had to run Software Update on the Mac mini to pick up security update, and while it’s restarting all of our DNS resolution stops working! I’d come across OpenWRT a while back, which is an open-source and very extensible firmware for a whole variety of different routers, but I did a bunch of searching and hadn’t come across any reports of people fully-successfully using it on our specific router, the Netgear D7800 (also known as the Nighthawk X4S), just people having various problems. One of the reasons I was interested in OpenWRT because it’s Linux-based and extensible and I would be able to move the DHCP and DNS functionality off the Mac mini back onto the router where it belongs, and in theory bring the encrypted-DNS over as well.
I finally bit the bullet and decided to give installing it a go today, and it was surprisingly easy. I figured I’d document it here for posterity and in the hopes that it’ll help someone else out in the same position as I was.
Important note: The DSL/VDSL modem in the X4S is not supported under OpenWRT!
Installation
Download the firmware file from the “Firmware OpenWrt Install URL” (not the Upgrade URL) on the D7800’s entry on OpenWRT.org.
Make sure you have a TFTP client, macOS comes with the built-in tftp command line tool. This is used to transfer the firmware image to the router.
Unplug everything from the router except power and the ethernet cable for the machine you’ll be using to install OpenWRT from (this can’t be done wirelessly).
Set your machine to have a static IP address in the range of 192.168.1.something. The router will be .1.
Reset the router back to factory settings by holding the reset button on the back of it in until the light starts flashing.
Once it’s fully started up, turn it off entirely, hold the reset button in again and while still holding the button in, turn the router back on.
Keep the reset button held in until the power light starts flashing white.
Now the OpenWRT firmware file needs to be transferred to the router via TFTP. Run tftp -e 192.168.1.1 (-e turns on binary mode), then put <path to the firmware file>. It’ll transfer the file and then install it and reboot, this will take several minutes.
Once it’s up and running, the OpenWRT interface will be accessible at http://192.168.1.1, with a username of root and no password. Set a password then follow the quick-start guide to turn on and secure the wifi radios — they’re off by default.
Additional dnsmasq configuration and DNS-over-TLS
I mentioned in my DNS-over-HTTPS post that I’d also set up dnsmasq to do local machine name resolution, this is very trivially set up in OpenWRT under Network > DHCP and DNS and putting in the MAC address and desired IP and machine name under the Static Leases section, then hitting Save & Apply.
The other part I wanted to replicate was having my DNS queries encrypted. In OpenWRT this isn’t easily possible with DNS-over-HTTPS, but is when using DNS-over-TLS, which gets you to the same end-state. It requires installing Stubby, a DNS stub resolver, that will forward DNS queries on to Cloudflare’s DNS.
On the router, go to System > Software, install stubby.
Go to System > Startup, ensure Stubby is listed as Enabled so it starts at boot.
Go to Network > DHCP and DNS, under “DNS Forwardings” enter 127.0.0.1#5453 so dnsmasq will forward DNS queries on to stubby, which in turns reaches out to Cloudflare; Cloudflare’s DNS servers are configured by default. Stubby’s configuration can be viewed at /etc/config/stubby.
Under the “Resolv and Hosts Files” tab, tick the “Ignore resolve file” box.
Click Save & Apply.
Many thanks to Craig Andrews for his blog post on this subject!
Quality of Service (QoS)
The last thing I wanted to set up was QoS, which allows for prioritisation of traffic when your link is saturated. This was pretty straightforward as well, and just involved installing the luci-app-sqm package and following the official OpenWRT page to configure it!
Ongoing findings
I’ll update this section as I come across other little tweaks and changes I’ve needed to make.
Plex local access
We use Plex on the Xbox One as our media player (the Plex Media Software runs on the Mac mini), and I found that after installing OpenWRT on the router, the Plex client on the Xbox couldn’t find the server anymore despite being on the same LAN. I found a fix on Plex’s forums, which is to go to Network > DHCP and DNS, and add the domain plex.direct to the “Domain whitelist” field for the Rebind Protection setting.
Xbox Live and Plex Remote Access (January 2020)
Xbox Live is quite picky about its NAT settings, and requires UPnP to be enabled or you can end up with issues with voice chat or gameplay in multiplayer, and similarly Plex’s Remote Access requires UPnP as well. This isn’t provided by default with OpenWRT but can be installed with the luci-app-upnp and the configuration shows up under Services > UPnP in the top navbar. It doesn’t start by default, so tick the “Start UPnP and NAT-PMP service” and “Enable UPnP” boxes, then click Save & Apply.
Upgrading to a new major release (February 2020)
When I originally wrote this post I was running OpenWRT 18.06, and now that 19.07 has come out I figured I’d upgrade, and it was surprisingly straightforward!
Connect to the router via ethernet, make sure your network interface is set to use DHCP.
Log into the OpenWRT interface and go to System > Backup/Flash Firmware and generate a backup of the configuration files.
Go to the device page on openwrt.org and download the “Firmware OpenWrt Upgrade” image (not the “Firmware OpenWrt Install” one).
Go back to System > Backup/Flash Firmware, choose “Flash image” and select your newly-downloaded image.
In the next screen, make sure “Keep settings and retain the current configuration” is not ticked and continue.
Wait for the router light to stop flashing, then renew your DHCP lease (assuming you’d set it up to be something other than 192.168.1.x like I did).
Log back into the router at http://192.168.1.1 and re-set your root password.
Go back to System > Backup/Flash Firmware and restore the backup of the settings you made (then renew your DHCP lease again if you’d changed the default range).
I had a couple of conflicts with files in /etc/config between my configuration and the new default file, so I SSHed in and manually checked through them to see how they differed and updated them as necessary. After that it was just a case of re-installing the luci-app-sqm, luci-app-upnp, and stubby packages, and I was back in business!
We bought a treadmill back at the start of 2014 and it came with a heart rate monitor that you wear around your chest, which is pretty cool. I gave the treadmill a pretty good going and was doing one of those Couch to 5K programs, but I keep having issues with my knees where running messes one of them up. We bought an elliptical in May last year and I’ve been thoroughly enjoying using it. The one we have has a tablet holder right at eye level so I’ve been watching TV shows on Netflix while using it, and it really helps pass the time.
The downside was that I had no heart rate monitor, as the one that came with the treadmill only works with the treadmill (it shows your current heart rate right alongside the distance and estimated calories burned and such). I’d been going pretty hard on it but had noticed that I was getting some heart palpitations, and had a couple of feeling-dizzy moments a while after I’d finished exercising. I went to the doctor and she suggested cutting down on caffeine to start with — I was on four admittedly only instant coffees a day — and see if that improves things to start with, and if not we could get an EKG done.
Quite conveniently timed, the Apple Watch Series 5 was announced on the 10th of September this year, and it comes with an always-on display. Prior models had their display totally black and would only light up when you’d either raise your wrist or tap on the screen. I’d been eyeing the Apple Watch off for a couple of years, and finally decided I’d jump on board because it’d be usable as a regular watch even if the screen doesn’t fully light up. I got the 40m stainless steel with black leather Modern Buckle band and it looks classy as hell.
(I also realised after my first workout that I needed to get one of the cheaper non-leather bands as well because man do I get sweaty wrists when I’m exercising 😛).
Apple has been leaning pretty hard into the health thing with the Apple Watch in recent years, and as well as the heart rate monitor — which is constantly taking your heart rate periodically throughout the day as well as constantly when you start a workout — it comes with an app called “Activity” on the iPhone to help motivate you to keep moving. The way it works is that there’s three “rings” you should try to close each day, called Move, Exercise, and Stand. Move is just generally getting up and about and not sitting on your arse, and is set to 1422kJ for me based on my height and weight. Exercise is 30 minutes of brisk movement — I walk fast enough that I get a few minutes counted towards it each time I’m walking to or from the station or taking the stairs at work. The stand goal is standing up and moving for at least a minute during a one hour period for 12 separate hours during the day, and if you’ve been sitting around for 50 minutes in a given hour you get a little buzz on your wrist at ten minutes to the next hour that reminds you to stand up and move around a bit.
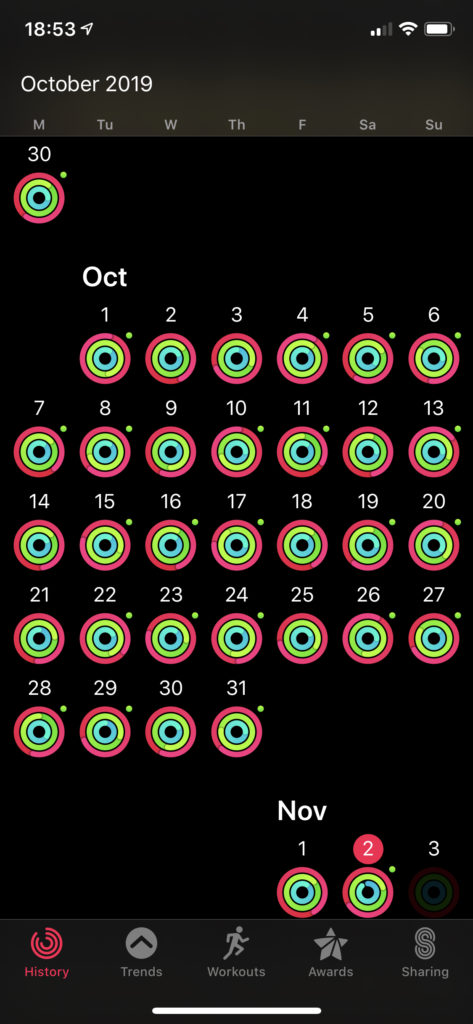
Apple must have done a whole lot of psychological research into what’s most satisfying in terms of motivation because god damn closing those rings feels good. You get a little round fireworks animation of the given colour of ring when you fully complete one for the day, and the one with all three when you’ve finished all of them. I bought the Watch on the 23rd of September and every single day since then I’ve closed all three rings! You get little badges called “Awards” when you complete certain goals, like getting a full week of closing all three rings, which has meant that when I’ve been working from home I’ve been jumping on the treadmill or elliptical for just a quick half hour to get my exercise goal done. I also downloaded an app for the Watch called HeartWatch that gives you a little speedometer of heart rate when you’re exercising and ensures you keep it in the correct zone — not too fast and not too slow — for what you’re trying to do, in my case just generally be fitter.
I completed October with every single day’s rings fully closed, which I’m pretty chuffed about!
We’d also bought a set of smart scales last year that sync with the Health app on iOS, I’ve been weighing myself each morning and as a result of all of this fitness I’m hovering around 70.2kg, which is a weight I don’t recall being for many years now; I was at 82kg a few years back. The heart palpitations have definitely decreased as well and I haven’t had any dizziness since I’ve been monitoring what my heart rate has been while exercising.
I don’t do much by way of outdoor exercising, but the Apple Watches all come with GPS as well so you can keep maps of the routes you’ve taken and see the speed you did during each section. Overall I’m wildly impressed with this bit of technology! I hadn’t worn a watch since about 2001 when I got a job and bought my first mobile phone, but now I feel naked without it, haha.
I posted back in February about some of the stuff I’d been doing in Procreate on my iPad, and I’m overdue for another post! I haven’t been doing as much in the intervening months, as there’s been lots of other things taking up my time and I haven’t felt as inspired but I still managed to do a few.
I’ve quite enjoy using Procreate’s Acrylic brush, you can get some really nice layer and lighting effects with it, and I used only that brush for this one:
The Window
I don’t actually remember the brush I used for this next one, but I definitely took full advantage of Procreate’s symmetry guides so I could get it properly even:
Cybernetic Woman
This next one is interesting, I was intending on the main structures that take up the top two-thirds of the image to look like a big craggy mountain range, but I showed it to Kristina and she can’t see it as anything but a tornado coming down!
The River
I quite enjoy doing epic-looking landscapes, and this one ended up starting out in a very different place than it finished. It was much more brown, the feature in the middle was a river, and the sky was a sunset which I didn’t manage to get looking how I wanted. In the end it became very much inspired by the aesthetic of the Hive from Destiny!
The Emergence
The paintings above were all done from about March to half-way through May, then there was a bit of a break until July.
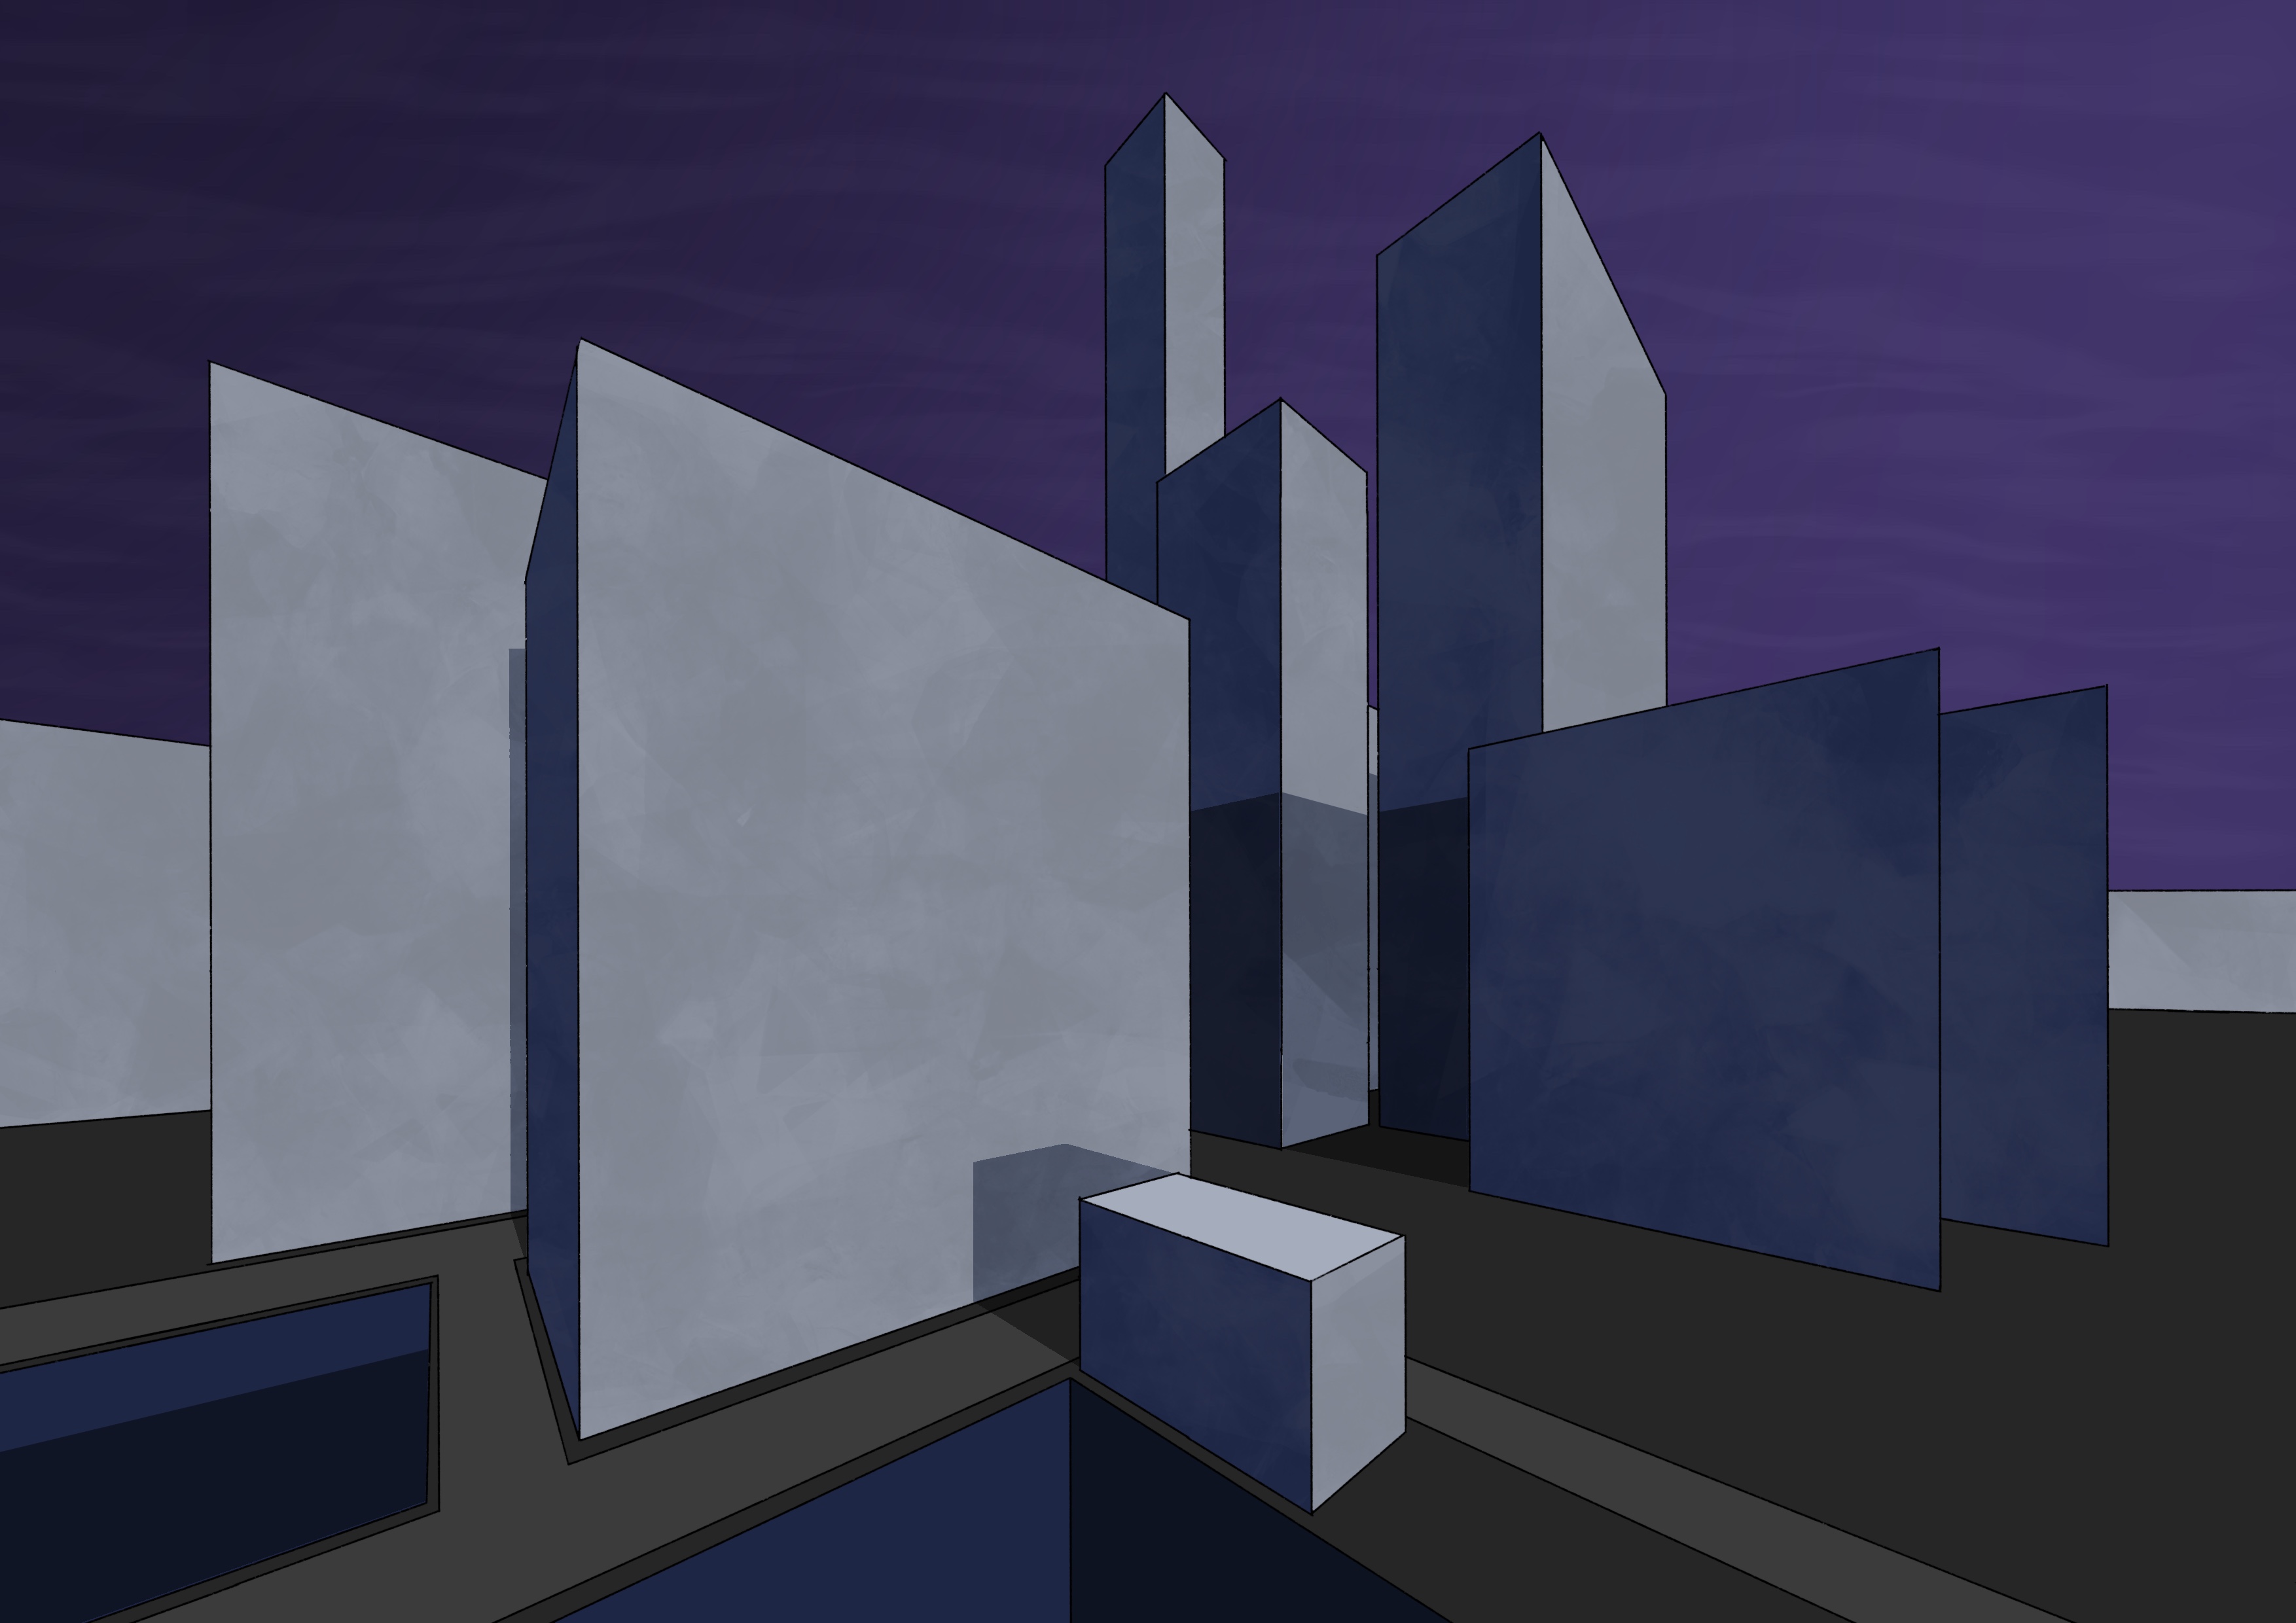
I decided to take advantage of Procreate’s drawing guide again, this time with the perspective guide. I was aiming for buildings in a futuristic city but the thing that I always struggle with is details and a sense of scale, so it didn’t turn out to be anything but big blocks. ? Still pleased with the shadows and sense of lighting though.
City Buildings
This next one I did as “speed-painting”, and did it in about 45 minutes! It was a combination of the acrylic brush and a palette knife brush from a big third-party brush pack I bought.
Volcano
Then lastly, this one was done in August, again with Procreate’s symmetry guide on! I was going to give her a witch’s hat but couldn’t get it looking right.
The Witch
I also had a burst of inspiration and got some more miniature painting done! I’m still working my way through the Dark Imperium box set I got nearly two years ago, but the main impetus here was Games Workshop releasing their “Contrast” line of paints. They’re essentially a base coat plus wash combined into one single coat, and they’re seriously incredible. Dark Imperium comes with twentypoxwalkers which I was dreading having to paint, but the Contrast paints made them far quicker to deal with! There’s twenty models (but only ten unique ones), and I’ve done half of them so far.
As part of doing this, I also discovered how much better the miniatures look when you apply a varnish to them! The Contrast paint specifically comes off a lot more easily than regular paint, so varnish is a necessity, but it also really makes the colours pop, they’re a lot more vibrant than without it.
I also finally finished off the Plague Marine champion that’d been sitting there mostly-finished for months, and I’m really happy with the base I did. I had a bunch of really old Space Marines from a starter painting box that a friend had given me, so I sacrificed one of them and cut him up to adorn the base, and it looks absolutely fantastic.
It’s fascinating seeing the evolution of Games Workshop’s plastic miniatures, back when I started (*cough*24 years ago*cough*) plastic was the cheap and crappy option, and the pewter (or lead as they were back then!) miniatures were much more detailed. Nowadays it’s very much the reverse, the plastic is INSANELY detailed — have a look at the full-size poxwalkers on Flickr and zoom all the way in — and the pewter ones are a bit shit by comparison.
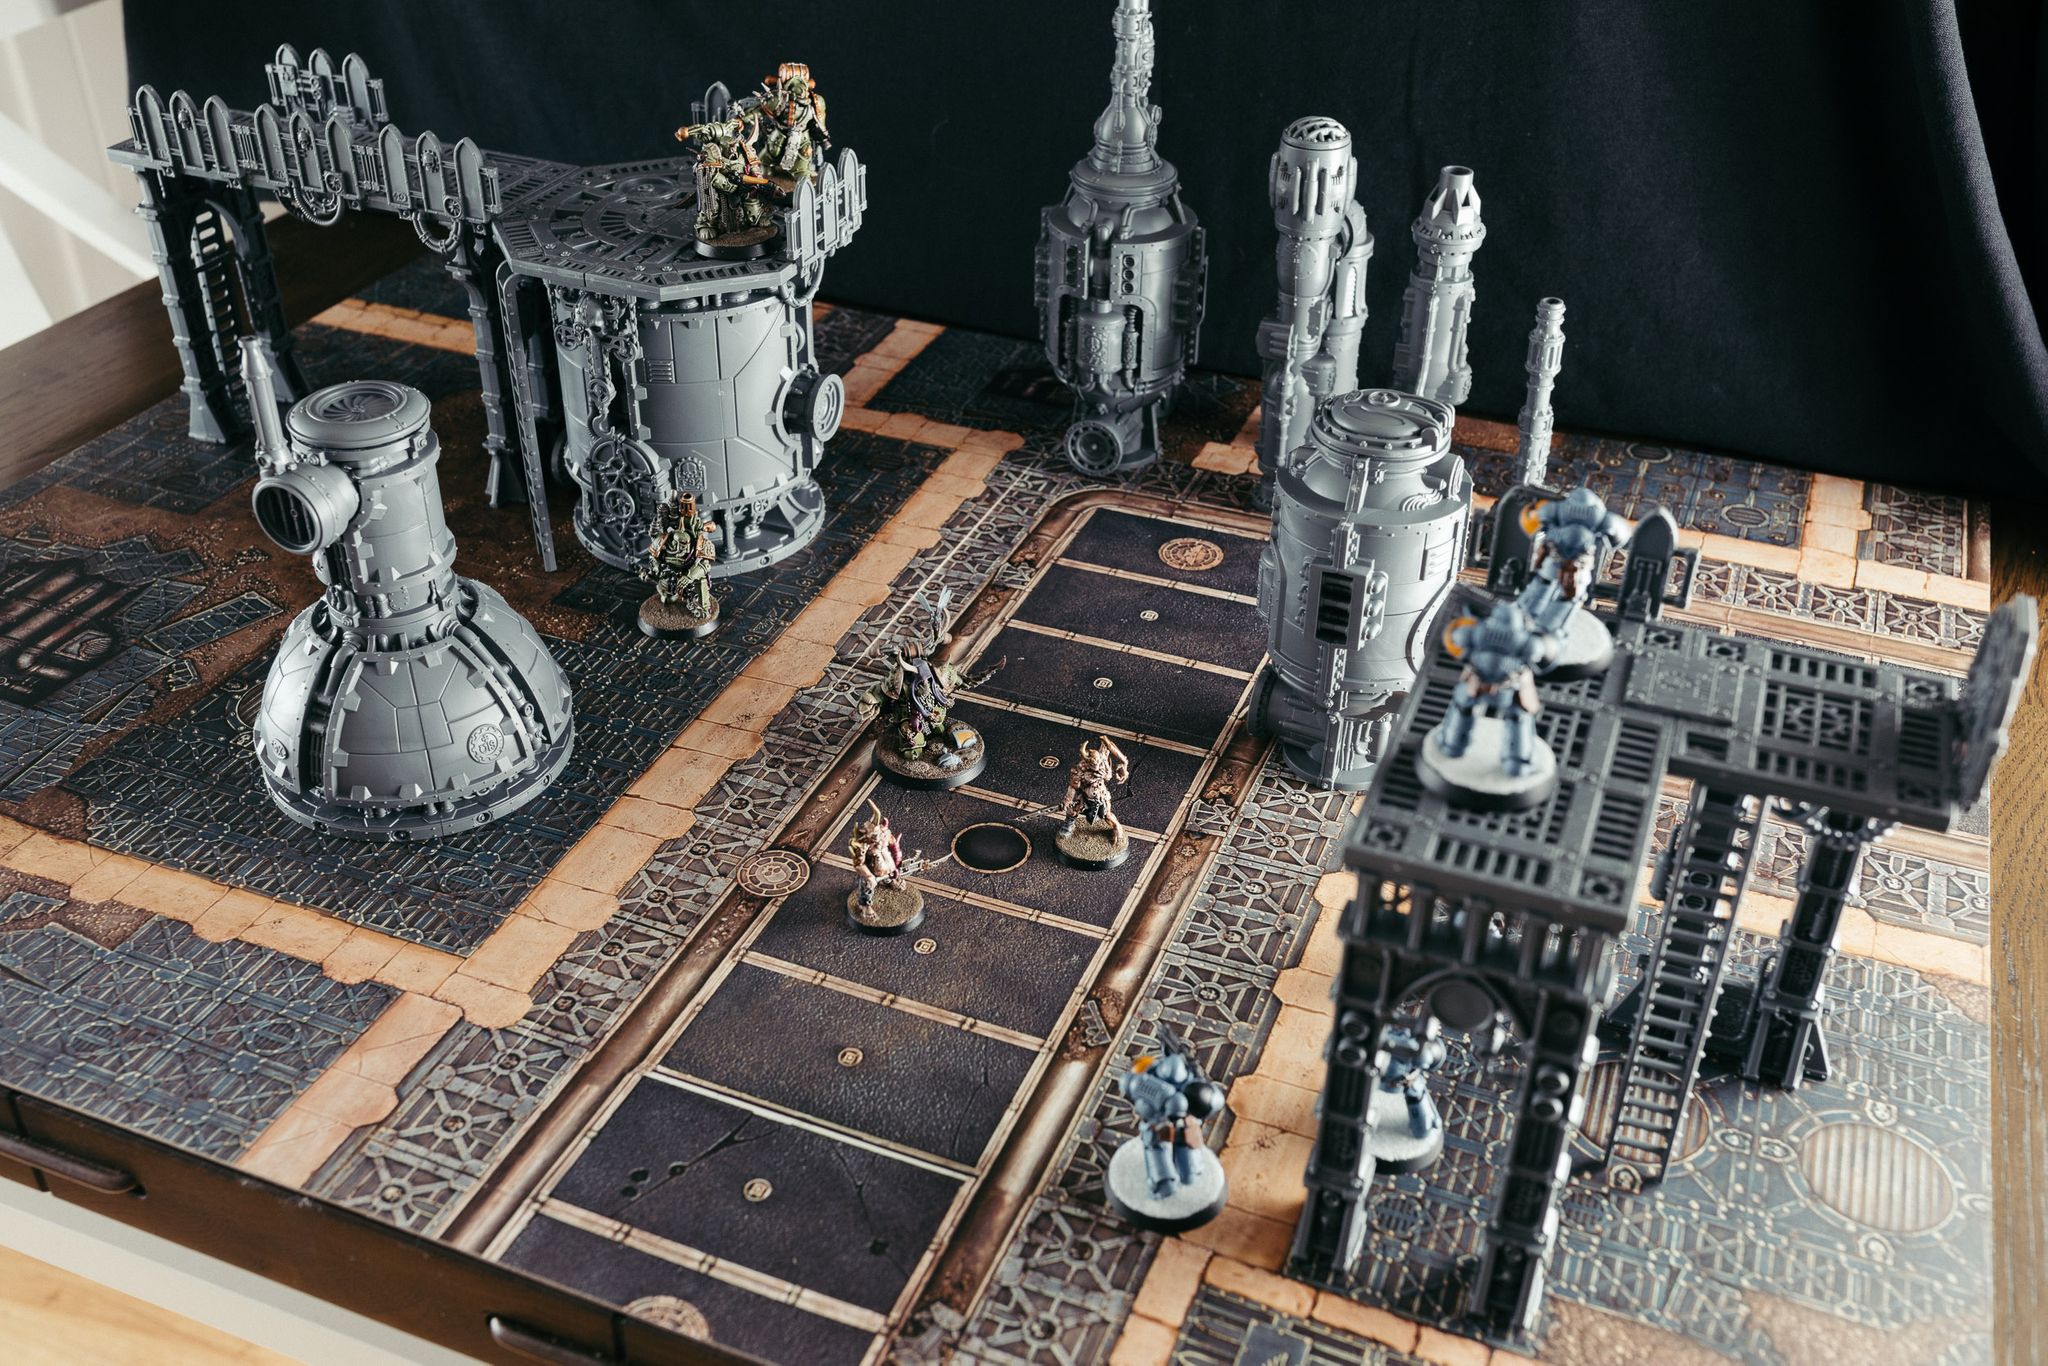
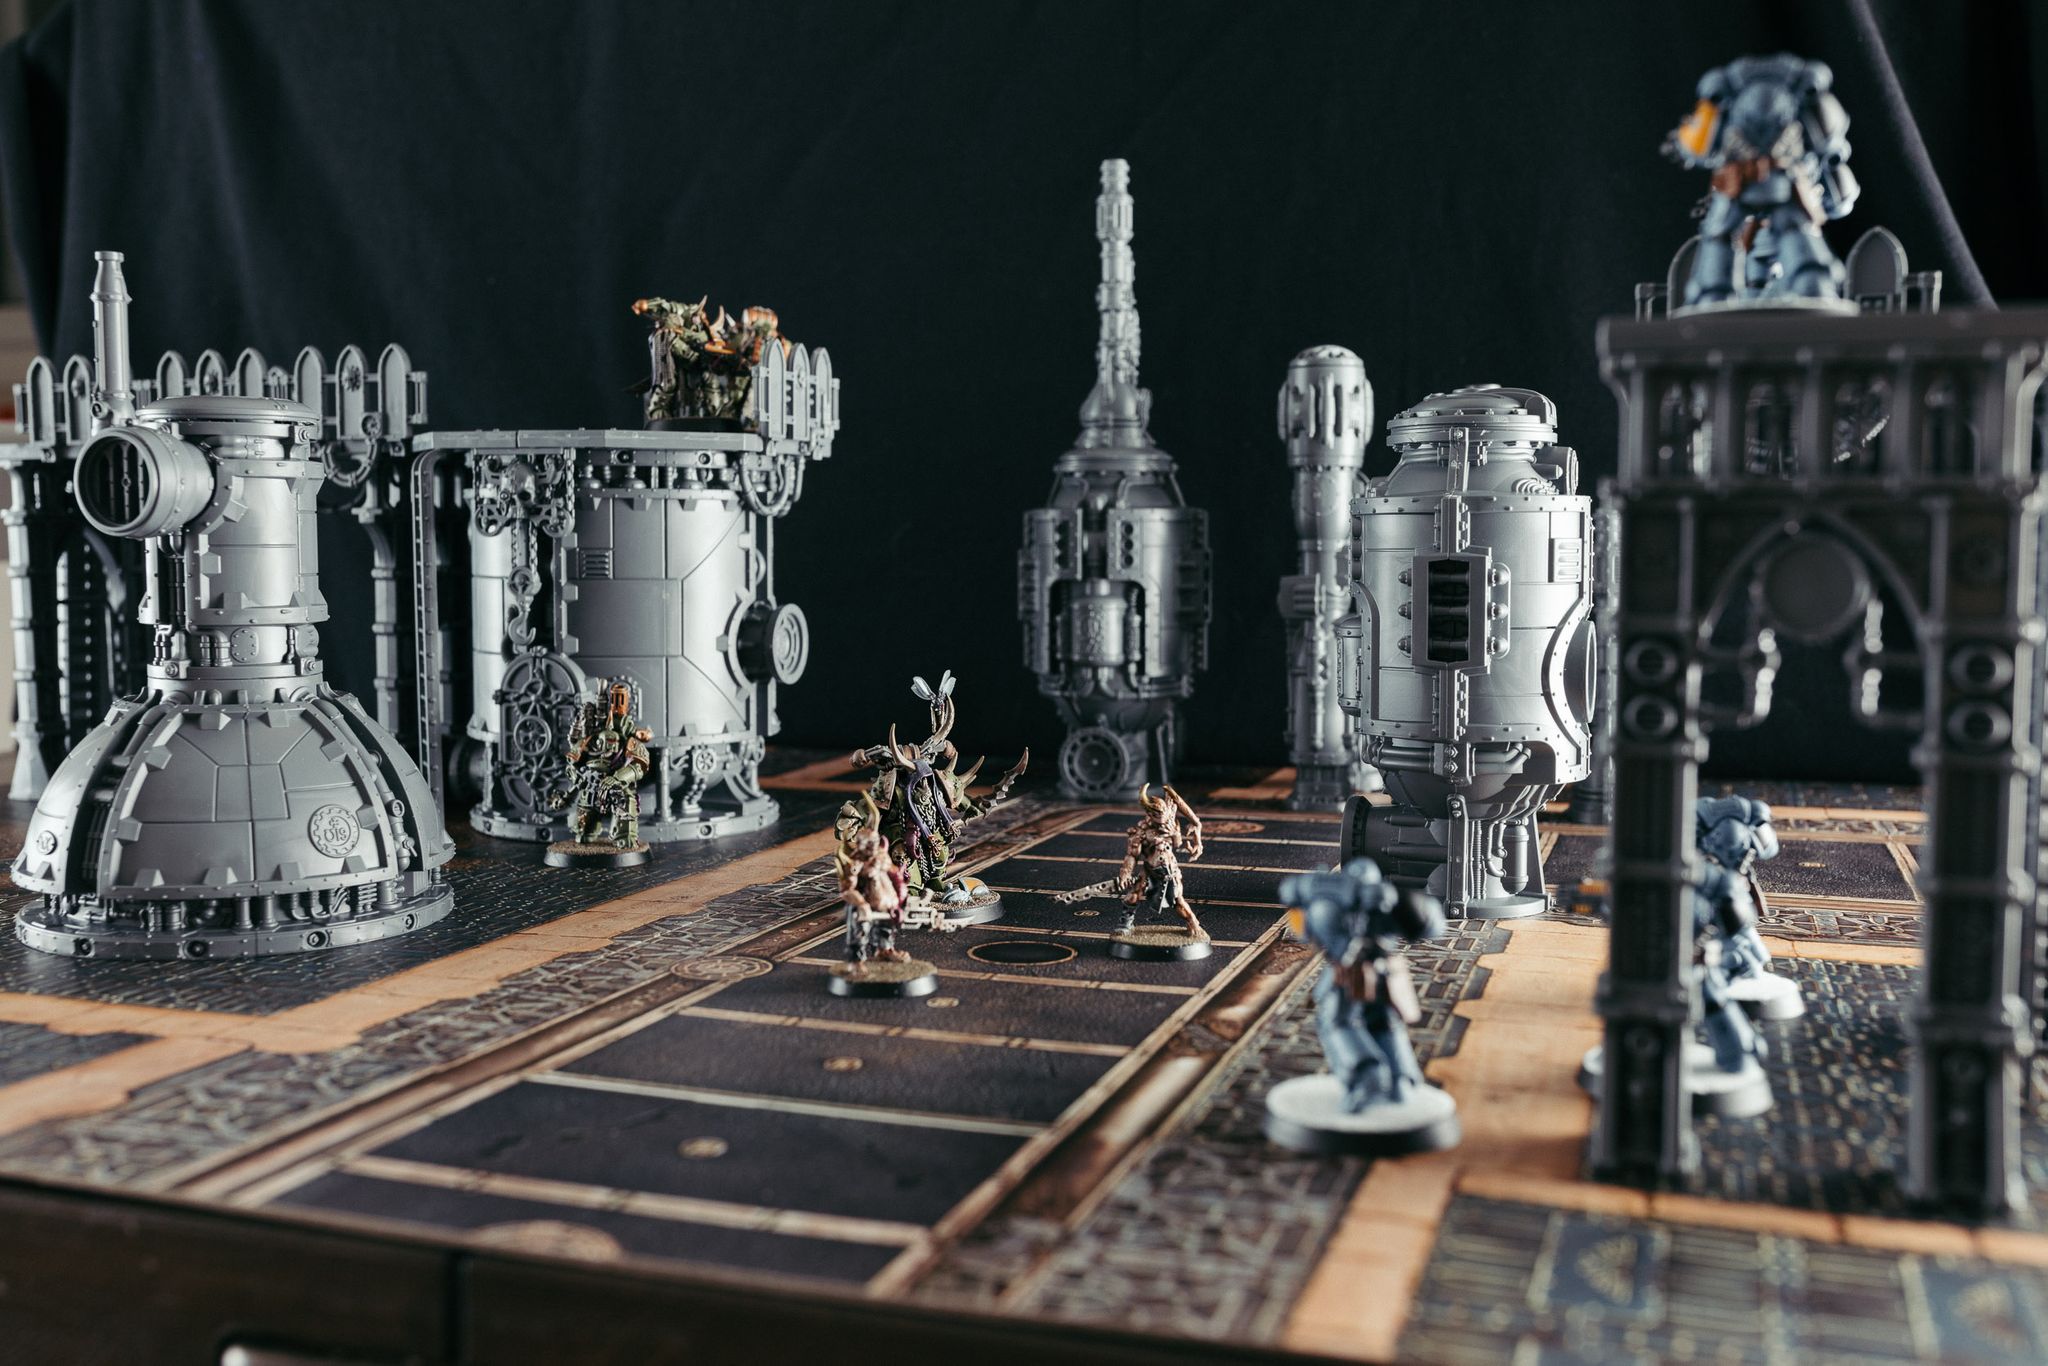
There’s also a small-scale Warhammer 40,000 game called Kill Team that I’ve started playing at work with some people, and have bought the new box set that was released in September. It’s similar to Shadespire in that your squads only have a small number of miniatures so it’s much more feasible to get them painted, but it comes with a bunch of absolutely amazing-looking terrain. I put it together and took a couple of photos prior to it being painted, just to get a sense of the scale and what the terrain looks like.
I’ve finished painting a couple of pieces of it, but it’s so big that I don’t have a large enough white backdrop that’ll fit the whole terrain piece! Photos will definitely be forthcoming once I do get said backdrop though. ?
(Update December 2022: As suggested in the latest comments, this entire blog post is pretty much redundant now! Linux Mint 21.1 installs without a hitch, even using Cinnamon, and I have fully-functional brightness and sound keys straight out of the box.)
(Update December 2020: I successfully upgraded from Linux Mint 19.3 to Linux Mint 20 by following the official Linux Mint instructions. The only additional post-upgrade work I had to do was re-adding the Section "Device" bit to /usr/share/X11/xorg.conf.d/nvidia-drm-outputclass-ubuntu.conf as described below to get the brightness keys working again.)
(Update May 2020: I’ve re-run through this whole process using Linux Mint 19.3 and have updated this blog post with new details. Notably, no need to install pommed, and including the specific voodoo needed for the 2010 MacBook Air from Ask Ubuntu regarding PCI-E bus identifiers.)
We have a still perfectly usable Late-2010 MacBook Air (“MacBookAir3,2”, model number A1369), but with macOS 10.14 Mojave dropping support for Macs older than 2012 (it’s possible to extremely-hackily install it on older machines but I’d rather not go down that route), I decided I’d try installing Linux on it. The MacBook Air still works fine, if a bit slow, on macOS 10.13 but I felt like a bit of nerding!
Installation
My distribution of choice was Linux Mint, which is Ubuntu-based but less with the constant changes that Canonical keep making. The first hurdle right out of the gate was which “edition” to choose: Cinnamon, MATE, or xfce. There was zero info on the website about which to choose, I started with Cinnamon but that kept crashing when booting from the installation ISO and giving me a message about being in fallback mode. It turns out Cinnamon is the one with all the graphical bells and whistles, and it appears that an eight-year ultralight laptop’s video card isn’t up to snuff, so I ended up on “MATE” edition, which looks pretty much identical but works fine.
My installation method was using Raspberry Pi Imager to write the installation ISO to a spare SD card (despite the name, it can be used to write any ISO: scroll all the way down in the “Choose OS” dialog and select “Use custom”). Installing Linux requires you to partition the SSD using Disk Utility, I added a 2GB partition for the /boot partition, and another 100GB to install Linux itself onto. It doesn’t matter which format you choose as it’ll be reformatted as part of the installation process.
After partitioning, reboot with the SD card in and the Option key held down, and choose the “EFI Boot” option. The installer is quite straightforward, but I chose the custom option when it asked how to format the drive, formatted both the 2GB and 100GB partitions as ext4, with the 2GB one mounted at /boot and the 100GB at /. The other part is to install the bootloader onto that /boot partition, to make it easy to get rid of everything if you want to go back to single-partition macOS and no Linux.
Post-install
The next hurdle was video card drivers. Mint comes with an open-source video card driver called “Nouveau” which works but isn’t very performant, and there was lots of screen tearing as I’d scroll or move windows around. This being Linux, it was naturally not as simple as just installing the official Nvidia one and being done with, because that resulted in a black screen at boot. 😛 I did a massive amount of searching and eventually stumbled across this answer on AskUbuntu which worked where nothing else did: I followed those instructions and was able to successfully install the official Nvidia drivers without getting a black screen on boot!
(Update May 2020: I honestly don’t remember whether I had to go through Step 1 of Andreas’ instructions, “Install Ubuntu in UEFI mode with the Nvidia drivers”, but check for the existence of the directory /sys/firmware before running the rest of this. That directory is only created if you’ve booted in EFI mode. If it doesn’t exist, follow the link in Step 1).
I’m copying the details here for posterity, in case something happens to that answer, but all credit goes to Andreas there. These details are specifically for the Late 2010 MacBook Air with a GeForce 320M video card, so using this on something else might very well break things.
Create the file /etc/grub.d/01_enable_vga.conf and paste the following contents into it:
Next, load up the “Driver Manager” control panel and set the machine to use the Nvidia drivers, once it’s finished doing its thing — which took a couple of minutes — restart once more, and you’ll be running with the much-more-performant Nvidia drivers!
At this point I realised that the brightness keys on the keyboard didn’t work. Cue a whole bunch more searching, with fix being to add the following snippet to the bottom of /usr/share/X11/xorg.conf.d/nvidia-drm-outputclass-ubuntu.conf:
And now I have a fully-functioning Linux installation, with working sleep+wake, audio, wifi, and brightness!
I’m certainly not going to be switching to it full-time, and it feels like a lot more fragile than macOS, but it’s fun to muck around with a new operating system. And with 1Password X, I’m able to use 1Password within Firefox under Linux too!
I use my Linode to host a number of things (this blog and Kristina’s, my website and Kristina’s, an IRC session via tmux and irssi for a friend and me, and probably another thing or two I’m forgetting). Kristina started up a travel blog a few months ago which I’m also hosting on it, and shortly after that point I found that maybe once every two weeks or so my website and our blogs weren’t running anymore. I looked into it and it was being caused by Linux’s Out-Of-Memory Killer, which kicks in when the system is critically low on memory and needs to free some up, killing the Docker container that my website runs in as well as MariaDB.
The main cause was Apache and MariaDB using up entirely too much memory for my little 1GB Linode, it was evidently just sitting on this side of stable with two WordPress blogs but adding a third seems like it tipped it over the edge. The reason MariaDB and my website’s Docker container were being killed is because although Apache was using up a heap of memory it was spread over a number of worker threads, so individually none of those were high, and MariaDB and my website were the largest on the list. There’s lots of tweaks you can do, several of which I tried, but all that happened was that it delayed the inevitable rather than entirely resolving it. Apache is powerful but low-resource-usage it ain’t. The primary low-resource-usage alternative to Apache is Nginx, so I figured this weekend I’d have a crack at moving over to that.
Overall it was pretty straightforward, this guide from Digital Ocean was a good starting point, the bits where it fell short was mostly just a case of looking up all of the equivalent directives for SSL, mapping to filesystem locations, etc. (I have ~15 years of history of hosted images I’ve posted on the Ars Technica forums and my old LiveJournal—which is now this blog—and wanted to make sure those links all kept working).
One difference is with getting WordPress going… WordPress is all PHP, and Apache by default runs PHP code inside the Apache process itself via mod_php, whereas when you’re using Nginx you have to be using PHP-FPM or similar which is an entirely separate process that runs on the server and that Nginx talks to to process the PHP code. I mostly followed this guide, also from Digital Ocean though there were a couple of extra gotchas I ran into when getting it fully going with Nginx for WordPress:
Edit /etc/nginx/fastcgi_params and add a new line with this content or you’ll end up with nothing but an empty blank page: fastcgi_param PATH_TRANSLATED $document_root$fastcgi_script_name;
Remember to change the ownership of the WordPress installation directory to the nginx user instead of apache
The default settings for PHP-FPM assume it’s running on a box with significantly more than 2GB of RAM; edit /etc/php-fpm.d/www.conf and change the line that says pm = dynamic to be pm = ondemand; with ondemand PHP-FPM will spin up worker processes as needed but will kill off idle ones after ten seconds rather than leaving them around indefinitely.
Additionally, Nginx doesn’t support .htaccess files so if you’ve got WordPress set up to use any of the “pretty”-type links, you’ll end up with 404s when you try to view an individual post instead. The fix is to put the following into the server block at the bottom:
So it’ll pass the correct arguments to WordPress’ index.php file. You’ll also want to block access to any existing .htaccess files as well:
location ~ /\.ht {
    deny all;
}
The last thing I did with this setup was to put the entirety of my website, Kristina’s, and our respective blogs behind Cloudflare. I had great success with their DNS over HTTPS service, and their original product is essentially a reverse proxy that caches static content (CSS, Javascript, images) at each of their points of presence around the world so you’ll load those from whichever server is geographically closest to you. For basic use it’s free, and includes SSL, you just need to point your domain’s nameservers at the ones they provide. The only thing I needed to do was to set up another DNS record so I could actually SSH into my Linode, because now the host virtualwolf.org resolves to Cloudflare’s servers which obviously don’t have any SSH running!
Overall, the combination of Nginx + PHP-FPM + Cloudflare has resulted in remarkably faster page loads for our blogs, and thus far significantly reduced memory usage as well.