Apple announced the HomePod “smart speaker” in 2017, and started shipping them in early 2018. I had zero interest the smart speaker side of things — I’d never have Google or Amazon’s voice assistants listening to everything I say, and despite trusting Apple a lot more with privacy compared to those two companies, the same goes for Siri — but the praise for the sound quality definitely piqued my interest, especially having set up shairplay-sync on the Raspberry Pi as an AirPlay target and enjoying the ease of streaming music to a good set of speakers. For AU$499 though, I wasn’t going to bother as the setup for the stereo system in our home office did a reasonable enough job. It consisted of an amplifier that was sitting next to my desk, going into an audio switchbox that sat next to my computer and could be switched between the headphone cable attached to my computer, and one that snaked across the floor to the other side to Kristina’s desk so she could plug into it, with the speakers were sitting on the bookshelves on opposite sides of the room (you can see how it looked in this post, the speakers are the black boxes visible on the bottom shelves closest to our desks).
Fast-forward to last week, and someone mentioned that JB Hi-Fi were having a big sale on the HomePod and it was only AU$299! The space behind my desk was already a rat’s nest of cables, and with the standing desk I’ve ordered from IKEA I was wanting to reduce the number of cables in use, and being able to get rid of a bunch of them and replace it with a HomePod, I decided to get in on it (it’s possible to turn the “Listen for ‘Hey Siri'” functionality off entirely).
It arrived on Tuesday, and to say I’m impressed with the sound quality is a bit of an understatement, especially given how diminutive it is. It has no trouble filling the whole room with sound, the highs are crystal clear, and if the song is bassy enough you can feel it through the floor! It shows up just as another AirPlay target so it’s super-easy to play music to it from my phone or computer. I took a photo of our new setup and you can see the HomePod sitting on the half-height bookshelf right at the bottom-left of the frame (the severe distortion is because I took the photo on our 5D4 with the 8-15mm Fisheye I borrowed from a friend, which requires turning lens corrections on to avoid having bizarrely-curved vertical lines, which in turn distorts the edges of the image quite a bit).
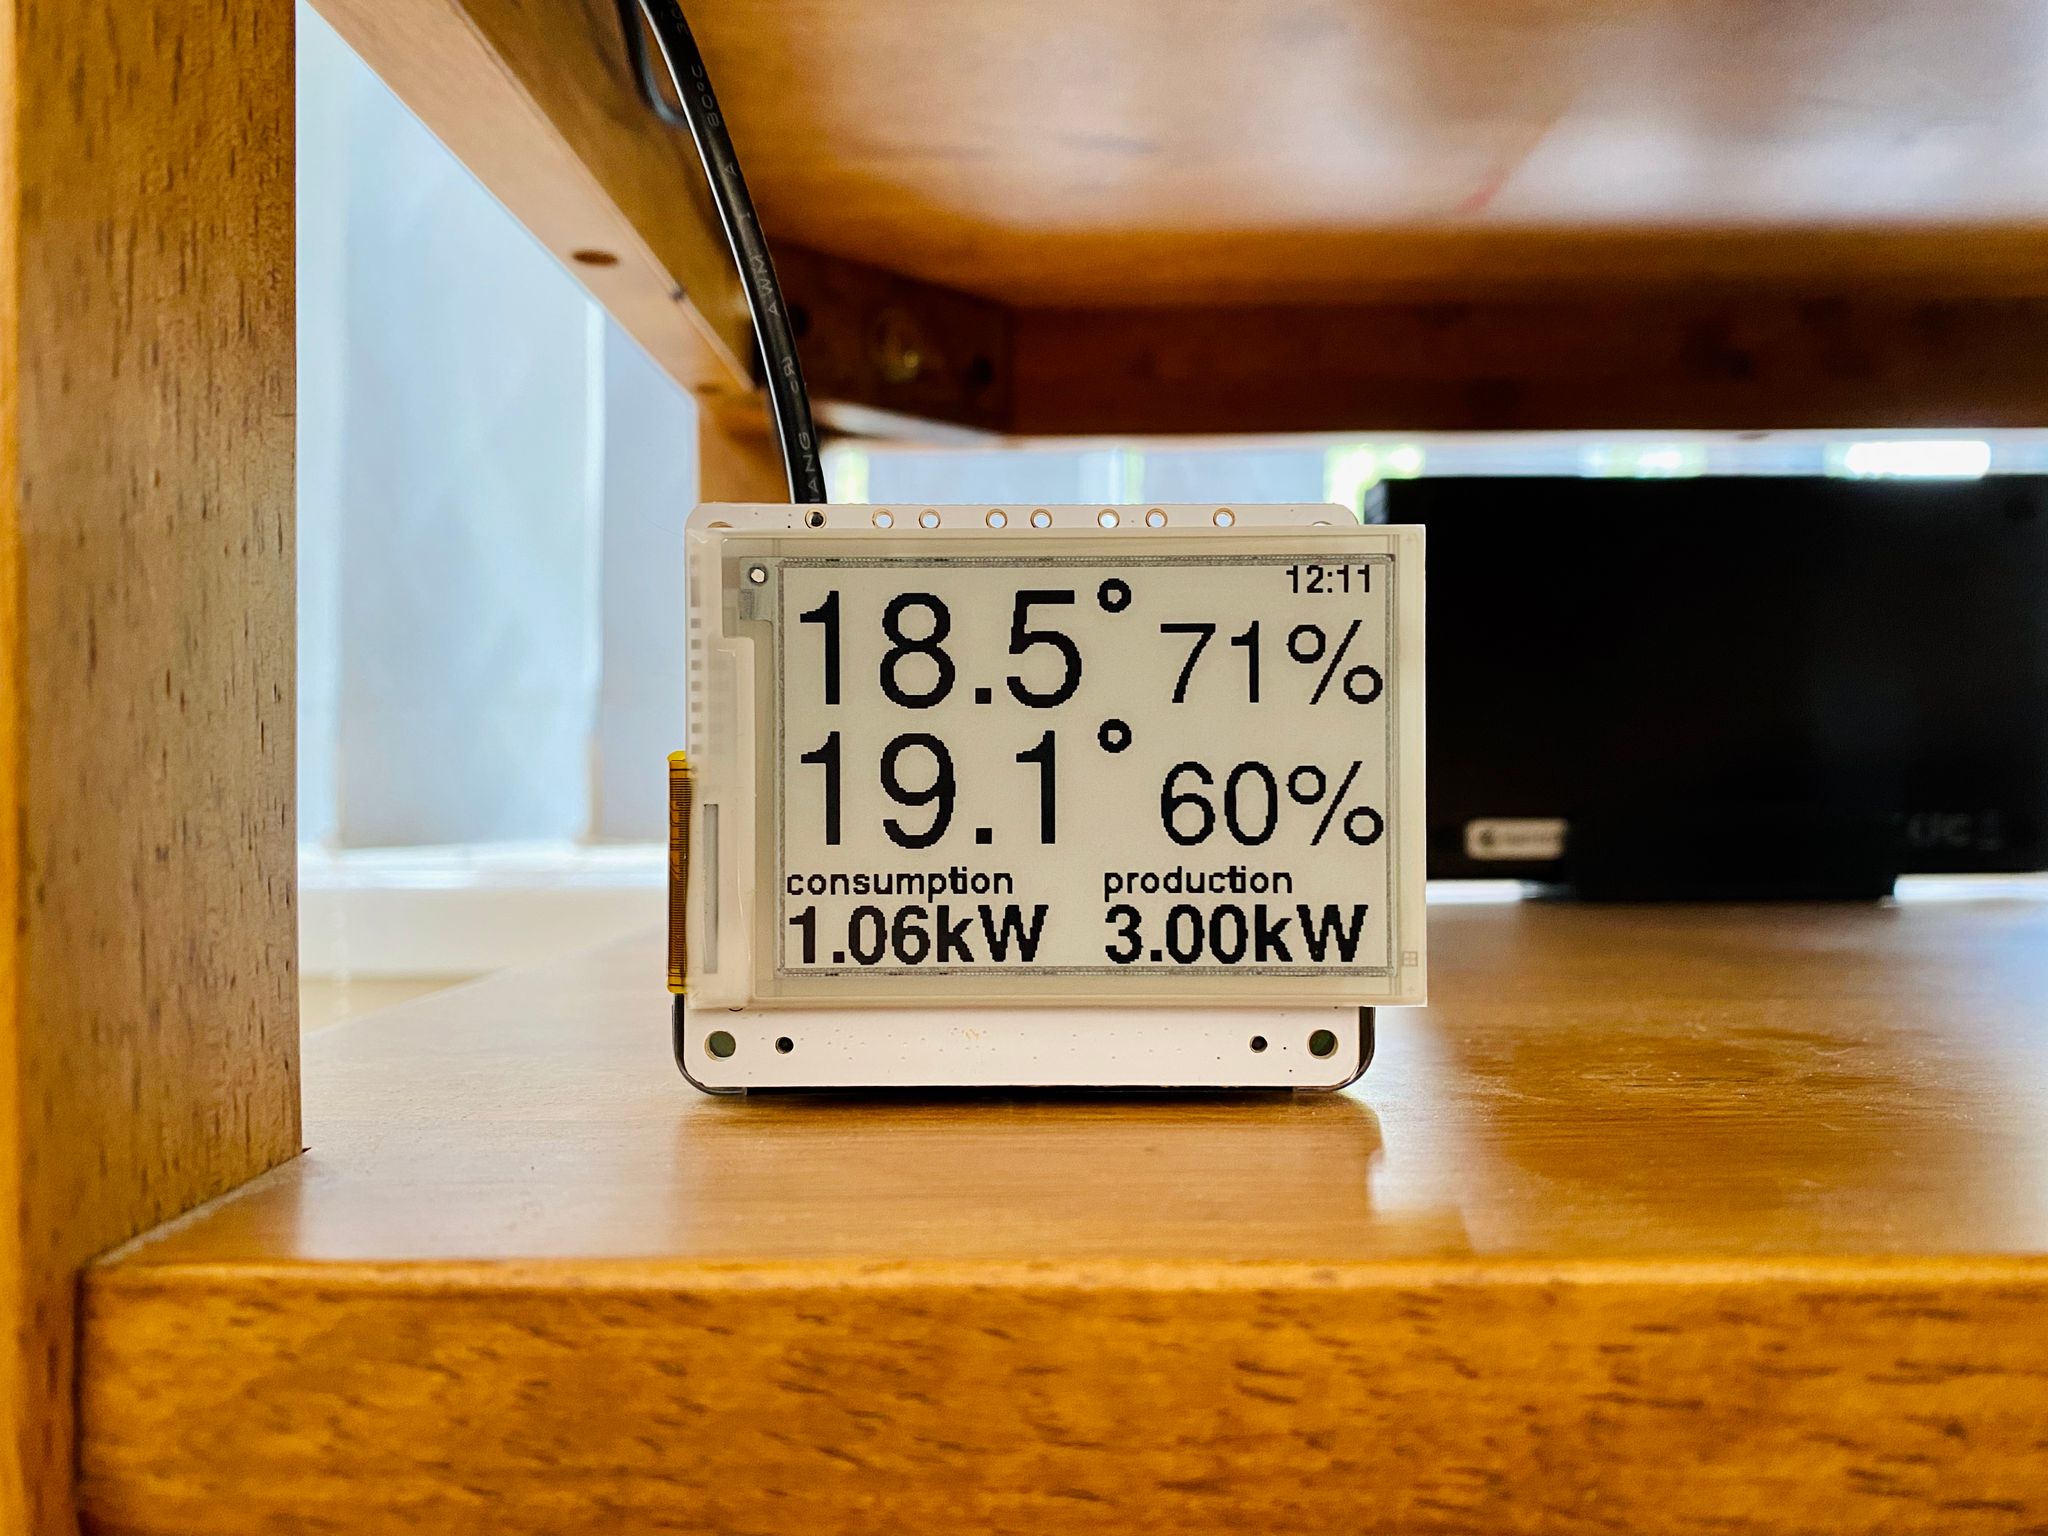
The setup and configuration of the HomePod is done via Apple’s Home app, which uses a framework called HomeKit to do all sorts of home automation stuff, and the HomePod is one of the devices that can work as the primary “hub” for HomeKit. I have no interest in home automation as such, but a selling point of the HomeKit is that’s a lot more secure than random other automation platforms, and one of the things it supports is temperature sensors. Someone wrote a Node.js application called Homebridge that lets you run third-party plugins and even write your own ones to appear and interact with in HomeKit, so I decided I’d see if I could hook up the temperature sensors that are attached to the Raspberry Pi(s)!
I’d ordered a 4GB Raspberry Pi 4B last month because I wanted to have a bit more grunt than the existing Pi 3B — which only has 1GB RAM — and to start using Docker with it, and it arrived on the 1st of this month. With that up and running inside in place of my original Raspberry Pi 3B, I moved the Pi 3B and the outside temperature sensor much further outside and attached it to our back room that’s in the backyard, because the previous position of the sensor underneath the pergola and next to the bricks of the house meant that in summer the outdoor temperatures would register hotter than the actual air temperature, and because the bricks absorb heat throughout the day, the temperatures remain higher for longer too.
Installing and configuring Homebridge
Next step was to set up Homebridge, which I did by way of the oznu/docker-homebridge image, which in turn meant getting Docker — and learning about Docker Compose and how handy it is, and thus installing it too! — installed first:
- Install Docker —
curl -sSL https://get.docker.com | sh
- Install Docker Compose —
sudo apt-get install docker-compose
- Grab the latest docker-homebridge image for Raspberry Pi —
sudo docker pull oznu/homebridge:raspberry-pi
- Create a location for your Homebridge configuration to be stored —
mkdir -p ~/homebridge/config
Lastly, write yourself a docker-compose.yml file inside ~/homebridge —
version: '2'
services:
  homebridge:
    image: oznu/homebridge:raspberry-pi
    restart: always
    network_mode: host
    volumes:
      - ./config:/homebridge
    environment:
      - PGID=1000
      - PUID=1000
      - HOMEBRIDGE_CONFIG_UI=1
      - HOMEBRIDGE_CONFIG_UI_PORT=8080
Then bring the Homebridge container up by running sudo docker-compose up --detach from ~/homebridge. The UI is accessible at http://<address-of-your-pi>:8080 and logs can be viewed with sudo docker-compose logs -f.
The last step in getting Homebridge recognised from within the Home app is iOS is to open the Home app, tap the plus icon in the top-right and choose “Add accessory”, then scan the QR code that the Homebridge UI displays.
Writing your own Homebridge plugins
Having Homebridge recognised within the Home app isn’t very useful without plugins, and there was a lot of trial and error involved here because I was writing my own custom plugin rather than just installing one that’s been published to NPM, and I didn’t find any single “This is a tutorial on how to write your own plugin” pages.
Everything is configured inside ~/homebridge/config, which I’ll refer to as $CONFIG from now on.
Firstly, register your custom plugin so Homebridge knows about it by editing $CONFIG/package.json and editing the dependencies section to add your plugin. It has to be named homebridge-<something> to be picked up at all, I called mine homebridge-wolfhaus-temperature and so my $CONFIG/package.json looks like this:
{
  "private": true,
  "description": "This file keeps track of which plugins should be installed.",
  "dependencies": {
    "homebridge-dummy": "^0.4.0",
    "homebridge-wolfhaus-temperature": "*"
  }
}
The actual code for the plugin needs to go into $CONFIG/node_modules/homebridge-<your-plugin-name>/, which itself is a Node.js package, which also needs its own package.json file located at $CONFIG/node_modules/homebridge-<your-plugin-name>/package.json. You can generate a skeleton one with npm init — assuming you have Node.js installed, if not, grab nvm and install it — but the key parts needed for a plugin to be recognised by Homebridge is adding the keywords and engine sections into your package.json:
{
  "name": "homebridge-wolfhaus-temperature",
  "version": "0.0.1",
  "main": "index.js",
  "keywords": [
    "homebridge-plugin"
  ],
  "engines": {
    "homebridge": ">=0.4.53"
  }
}
index.js is your actual plugin code that will be run when Homebridge calls it.
Once I got this out of the way, the last bit was a LOT of trial and error to actually get the plugin working with Homebridge and the Home app on my iPhone. The main sources of reference were these:
After several hours work, I had not the nicest code but working code (Update 2020-04-12 — moved to ES6 classes and it’s much cleaner), and I’ve uploaded it.
The final bit of the puzzle is telling Homebridge about the accessories, which are the things that actually show inside the Home app on iOS. For this, you need to edit $CONFIG/config.json and edit the accessories section to include your new accessories, which will use the plugin that was just written:
{
    "bridge": {
        "name": "Traverse",
        [...]
    },
    "accessories": [
        {
            "accessory": "WolfhausTemperature",
            "name": "Outdoor Temperature",
            "url": "http://pi:3000/rest/outdoor"
        },
        {
            "accessory": "WolfhausTemperature",
            "name": "Indoor Temperature",
            "url": "http://fourbee:3000/rest/indoor"
        }
    ],
    "platforms": []
}
The url is the REST endpoint that my pi-sensor-reader runs for the indoor and outdoor sensors, and the name needs to be unique per accessory.
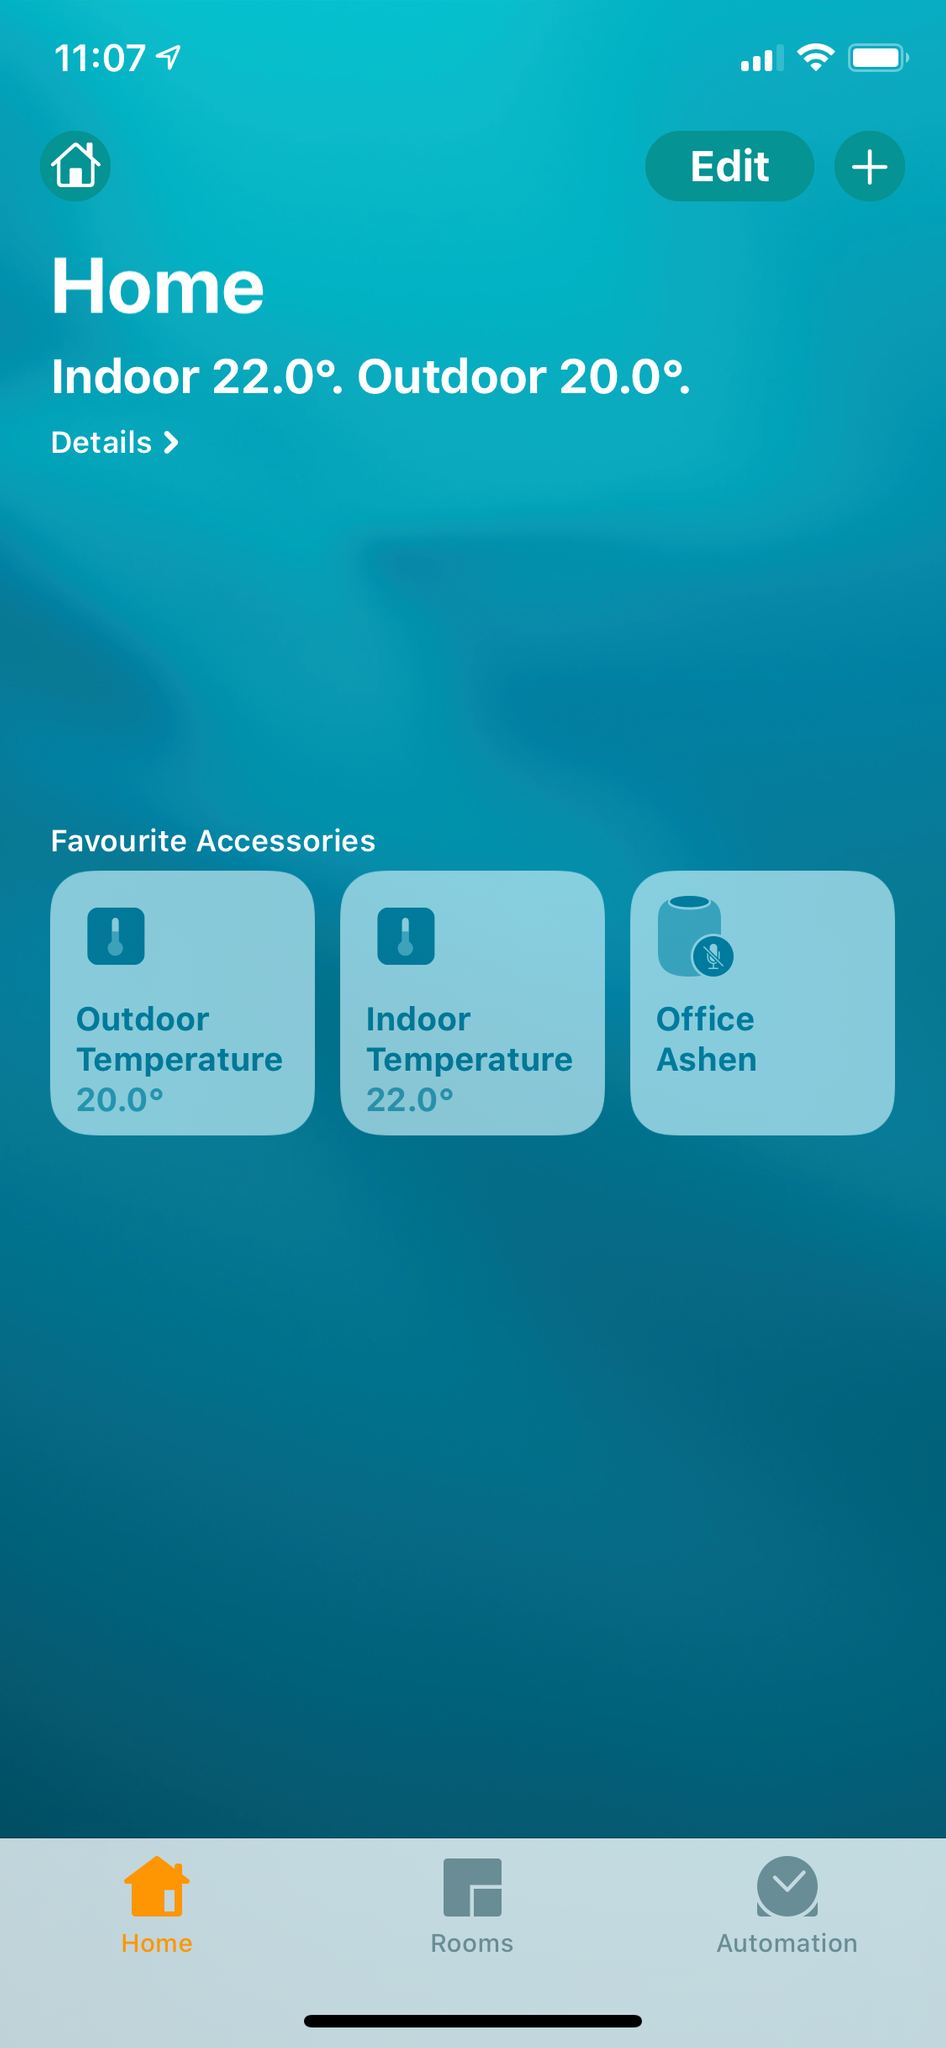
Homebridge needs restarting after all these changes, but once you’re done, you’ll have two new accessories showing in Home!
They initially appear in the “Default Room”, you can add an “Indoor” and “Outdoor” room to put them into by tapping on the Rooms icon in the bottom bar, then tapping the hamburger menu at the top-left, choosing Room Settings > Add Room, then long-pressing on the temperature accessory itself and tapping the settings cog at the bottom-right and selecting a different room for it to go into.
What’s next?
As part of doing all this, I moved all of my public Git repositories over to GitHub (Update May 2025: Make that Codeberg) where they’re more likely to be actually seen by anybody and will hopefully help someone! I also updated my pi-sensor-reader to use docker-compose, and fully-updated the README to document all the various options.
Next on the Homebridge front is going to be tidying up the plugin code — including moving to async/await — and adding the humidity data to it!